-
Utilities
davidjones8418 said:
Maybe there are ways to do this already, but 2 things that would be super helpful and I would be prepared to pay money for are..
1.
A way to make the object I have selected the centre of the scene (0,0,0,). Give me a button or something I can click to shift everything so many x, y and z so this object is at 0,0,0 while retaining their relative co-ordinates from each other. I know I can create a group, add everything to it and use my chunky calculator to work out how much to shift it by, then alter the x, y and z of the group and then unparent anything I want out. But it is time consuming. When I fire up a scene I work out where I want the action to happen and then it needs to be 0,0,0.
2.
A script or something that would generate an A4 pdf catalogue of all the products I have installed, broken down by category. Like a paper version of the smart content. I have got to the point when I am forgetting I even have certain content. If I could print out a little catalogue it would be super helpful. Not every little object. Just the products. Rip the little pictures into a document, add their name and organize by category.
I could flip through this and plan out a scene on my sofa. Wouldn't need to be at the PC even.
Just a couple of ideas : ).
At least with respect to #2, I am in the same boat and I have been developing a standalone utility to index my catalog and give me more flexibility to full-text search it. It includes a point-and-click "give me a product fact sheet" for all the products I have installed, which I think is what you are looking The concepts themselves are not as complex as I had thought, but it still takes a lot of machinery to make the parts work together. For example, I can use a Daz script to grab metadata for all the installed products, but there are some bits of metadata that are only on the product page, which is accessible through a different API endpoint. The whole thing feels a little "creaky", but it does seem to work. Probably another week or two before it's in good enough shape, but happy to share when I get to that point.
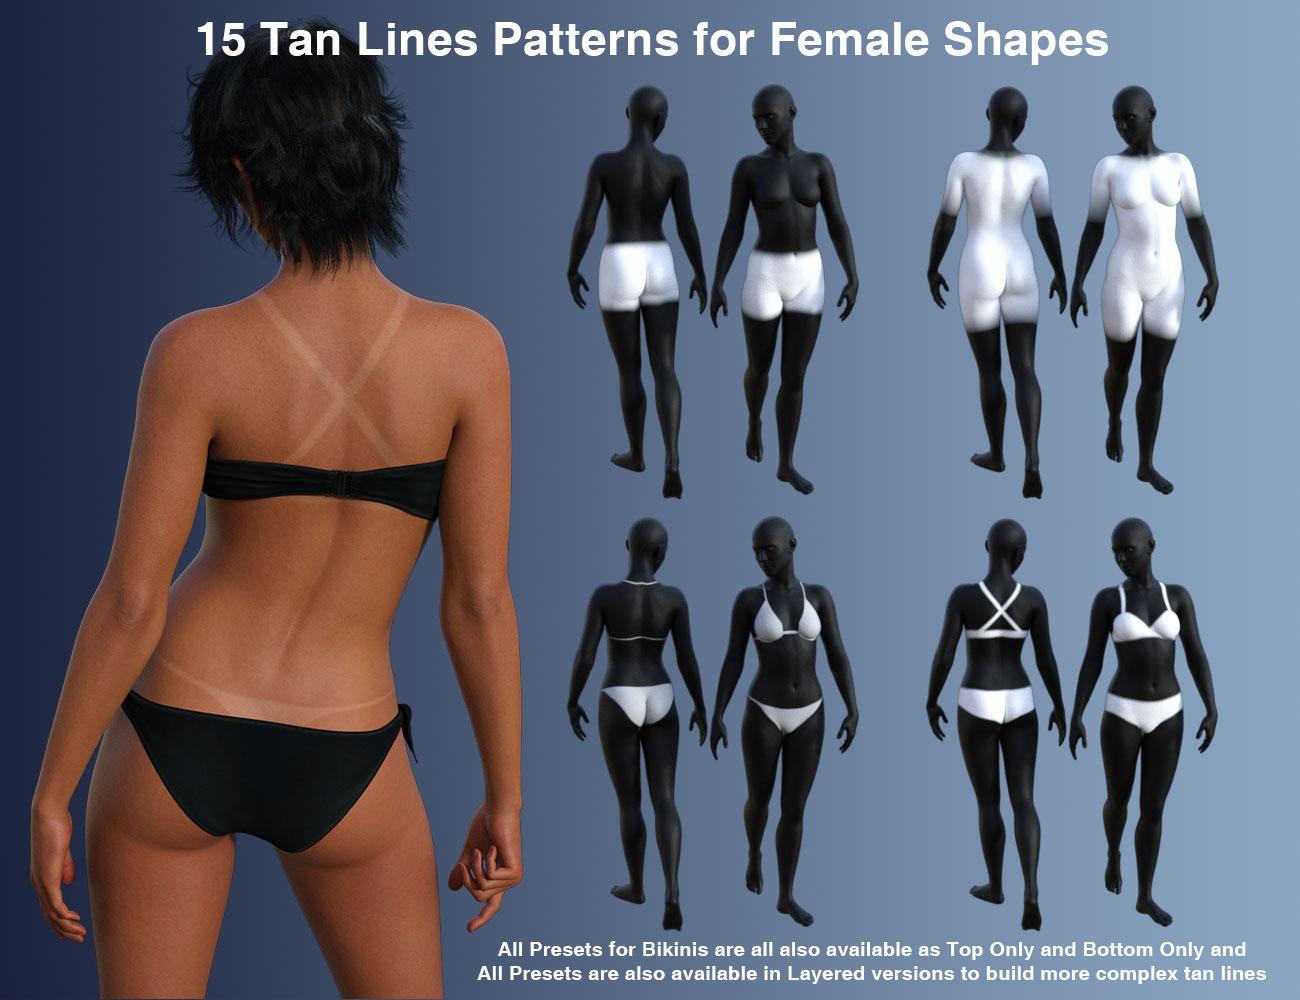
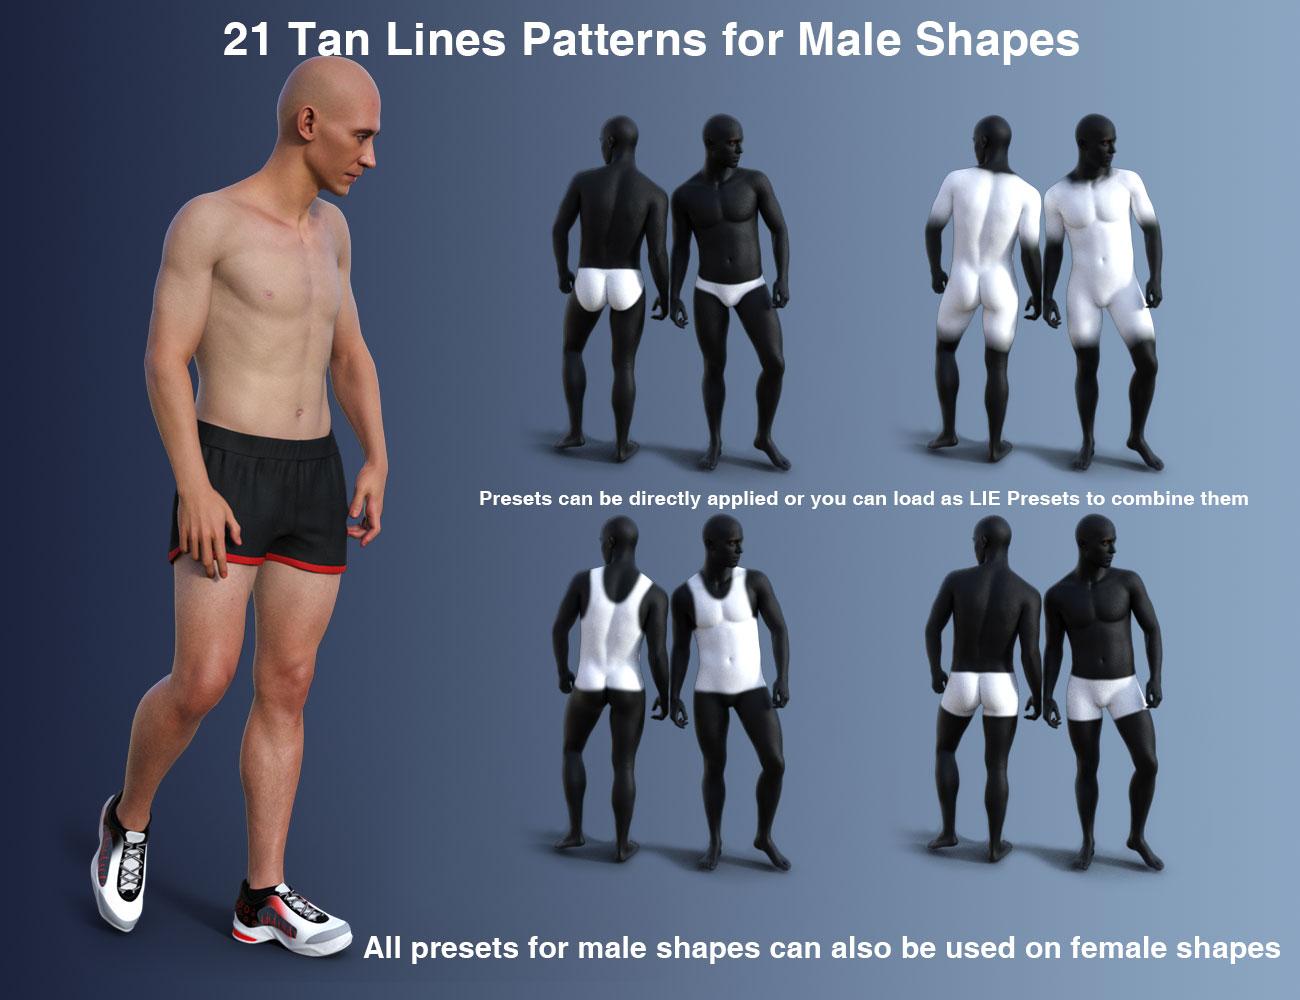
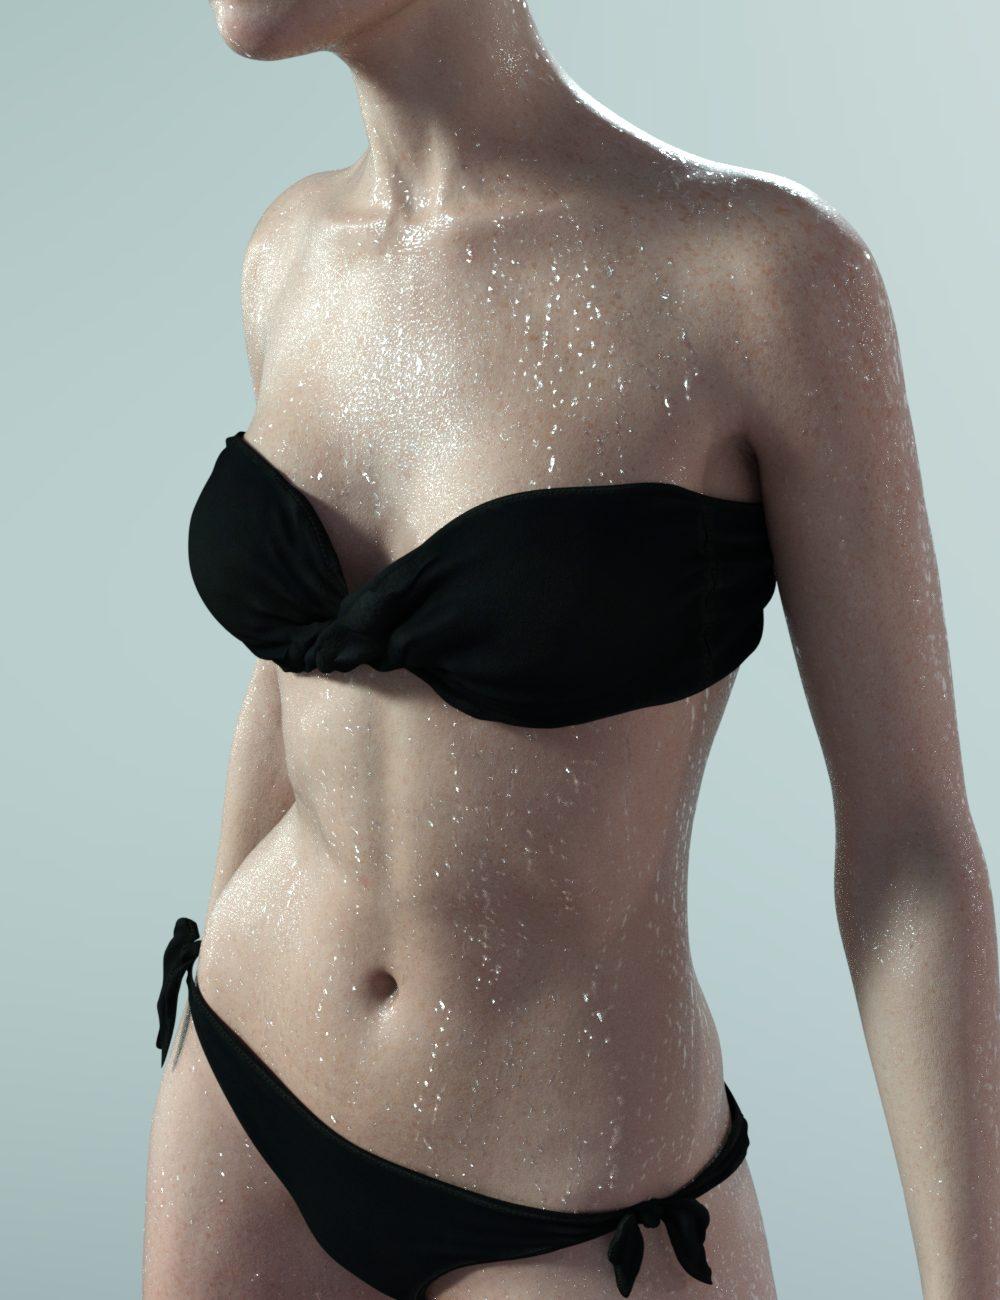
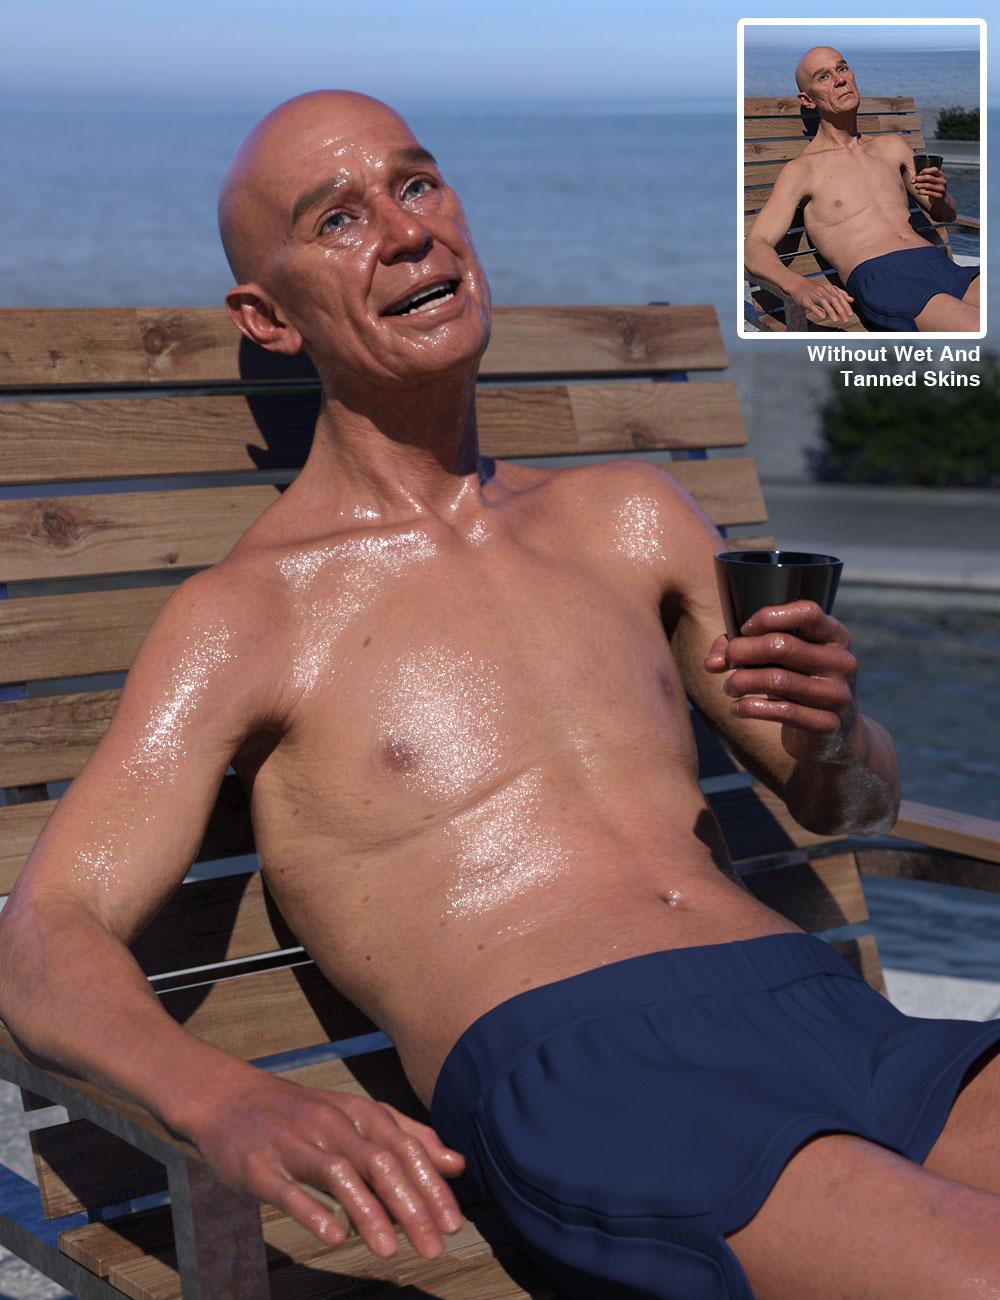
Released : "Wet And Tanned Skins For Genesis 9" (Commercial)Find it here : Wet And Tanned Skins For Genesis 9 | Daz 3D
Wet And Tanned Skins For Genesis 9 is finally coming! Based on the same, but improved, principle of the wet and tanned version for Genesis 8, with more bonuses and features. Control the tan, tan lines, and wet look of your figures like never before. Here is as a summary of what you will find:
- The ability to browse easily wide ranges of skin tones, from super pale to super tanned,
- The ability to adjust the wet looks from dry to super wet, with or without drops or drips,
- Based on a custom made shader relying on the PBRSkin shader,
- All the tans (+skin tones) and wet look effects can be made three ways, depending on what you prefer :
- via partial or full presets, or
- via a simple global control interface,
- or via the surfaces editor (enter “tan” for tan or tan lines, and “wet” for the wet layers)
- with even more possibilities for the wet looks (partial presets with 2 wet layers and/or 2 other additional methods and/or Geometry Shells)
- All this so that you can really create your look using the method you prefer.
- Volume tan boosters were also included as bonuses
- Two wet layers and several wet maps are included for each layer, you can control amount and various other aspect of wet look to adjust it to your lights if necessary (maps and maps strengths, roughness, exponent, grazing and normal factors)
- Additional “Fast Wet” methods were included as bonuses (based on metallic flakes or on the dual lobe and normal properties).
- All the wet layers are now also available as Geometry shells if you prefer. Fast wet, Geometry Shells and Tan boosters can be used on even non converted figures.
- Tans and skin tones sub-tools include lightness, saturation and hue controls associated with tan boosters (Base and Volume) and translucency weights tools. They also include a huge amount of full presets to cover a wide range of initial figures, lighting, and desired tan.
- Many tan lines patterns are provided, both male based and female based even if you can apply female patterns to male and inversely, and once they are applied, you can adjust the tan lines saturation, lightness and hue.
- Tan lines can be applied directly or combined as overlays to build more complex tan lines patterns.
- Even if most the users will probably not try this, I mention here that the shader mixer shader is made “like in photoshop” were layers can be used above each other with different mix (saturation, hue, blend, lightness, color burn, etc..) allowing to create their own unique skin tones and effects via the Surfaces Editor.
- Genitalia support (shader transfer and correct maps application) is included by scripts (one male, one female) which will handle everything except the tan lines (but you have the tan lines presets for the Genitalia available for almost all tan lines patterns for the gender the tan lines were made.).
- Two documentations, one 2 pages for people in a hurry, and one “big” for the most curious.
Compatible with your Genesis 9 figures.
Feel free to use this post or PM for feedback, remarks or questions.
REMARKS :
- on the release day, I'm not 100% satisfied with the metadata where "main scripts" folder should have been first (instead you/I presently have the bonuses folders at the top of the folders/options, and they should be at the end). I may ask Daz for a metadata change later on. It does not impact how the product works, I'd just like them to be more straighforward for the users.
- There are tons of options, so don't get lost : main script first for conversion, then either global interface. If you prefer working with presets go for or partial or full tan (+ tan lines) presets, then wet partial presets (and/or geometry shells). Just read the names of the folders in the metadata - I personally prefer to work in the Content Library folder where the subfolders are exactly sorted the optimal way for the most comfortable development.
I won’t show all the images here because I there are too many, so only a few of them here. You can click on the images to enlarge. You can also click the image bottom of this post that I did not enlarge in this text.


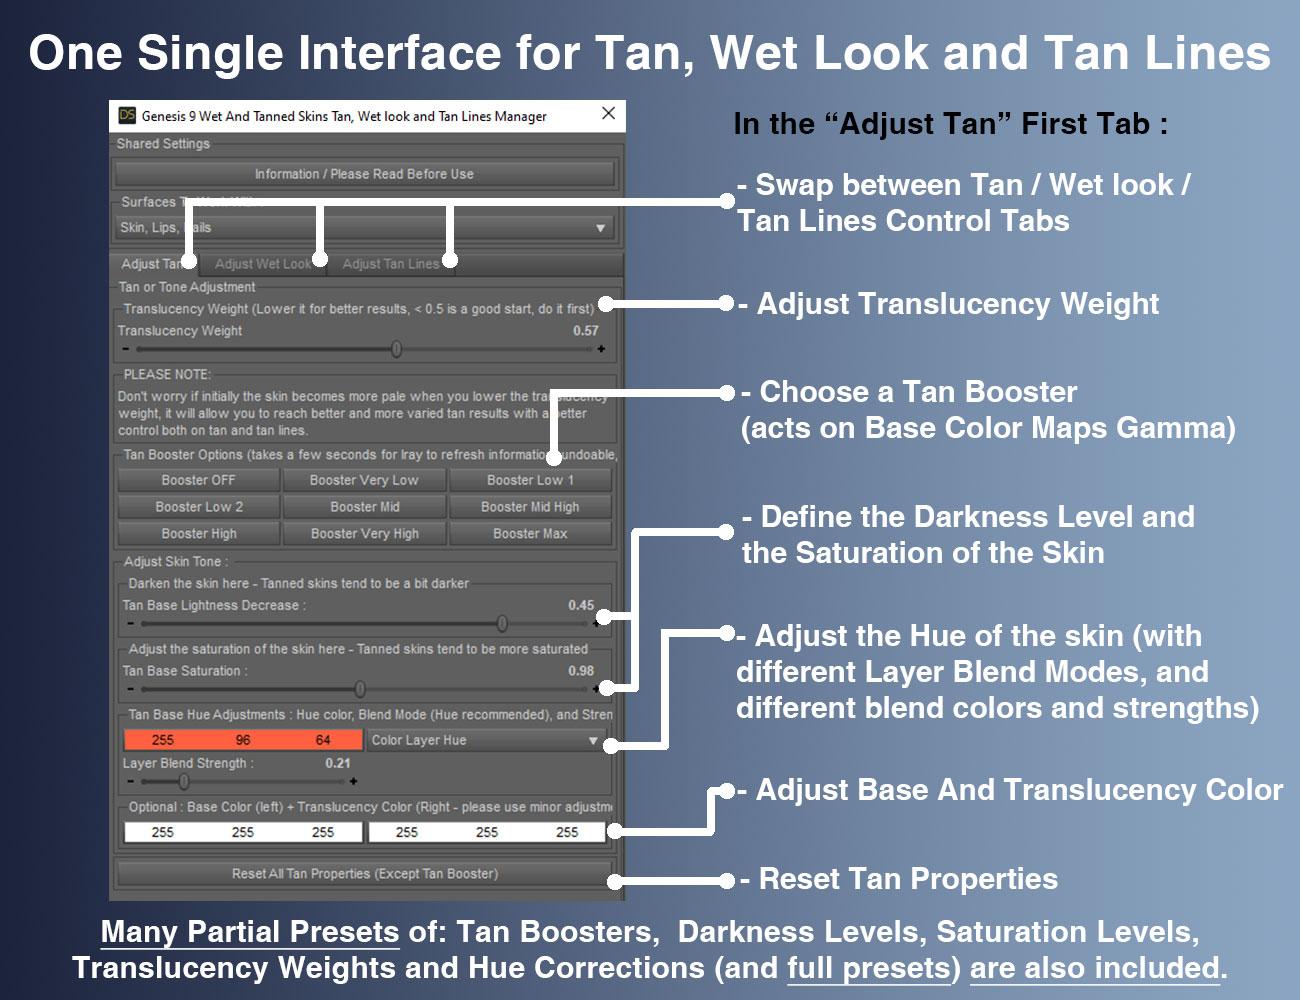
edit : additional mention : recommended to install with DIM (or manually).
DAZ To Unreal - Characters importing into Unreal 5.1 rotated 90 degrees offFor me the key discovery to make it work egardless of import options was to generate my own IK Retargeter asset in 5.4, rather than using the one that comes with the bridge.
 Is Strand-based hair taking a step backward in realism, lately? August 2024
mrpenguin76 said:
The reason why I said direct Auto-Fit doesn't work and manual fixing will be needed was because we ever experimented a lot with this sort of "new hairs".... I have to say the way with which you Auto-Fitted the hair breaks a couple of things: original "Fit to" structure, ghost morphs on the hair's root node, and dForce modifier ~~ So if one does need a conversion... the better way should be always the old school way : Auto-Fit (or Re-rig with Transfer Utility) + Fix Base. With this hair, key steps :
1) Load hair into the Scene, just auto-fit Face Dummy and Summer Style Wavy Long Bob Hair root node to G8. (Re-rigging with Clone will also do. )
2) Load hair on G9, dial G8F Clone on G9. Export Cap and Strand nodes to OBJ files. Import OBJ files onto Cap and Strand nodes on G8 with MLP as "Fix Base" morphs. Then dial the morphs.
3) Save a Wearable Preset or a converted version Figure Asset. Done ~With this way, everything on G9 version's hair will be kept on the converted one on G8, and works well.
That is a MUCH better method, thanks for Tip, added a warning in my first post. I do tend to break stuff when I play around ;) It's how i learn to fix it.
Ah... oaky, got it !
Importing a Poser CR2 with geometry switching and morphs - all okay except morphsI'm in the final stages of making a stackable adjustable bookstack figure for Poser (tested and working in Poser 6, PP2014 and Poser 11). The Poser figure uses geometry switching, ERC, and morphs.
I'd like to do a version for DAZ Studio too, so I imported the latest figure into Studio (I have 4.20 installed - I don't use it very often), had a little play with it, saved it as a scene subset, closed and reopened Studio, and loaded the new scene subset. I did this a few times. In summary these are the results:
☑ Geometry switching works as intended
☑ ERC works as intended
☒ Morphs don't do anything regardless of which alternate geometry I select **More details on what happens with the morphs
When I import the CR2 the morphed geometries are correctly displayed as per the CR2 settings
With the freshly imported CR2 the morph dials work as intended and the displayed alternate geometry morphs correctly - but only for the alternate geometries. None of the morphs for the default geometry work.
I can switch the geometry of any of the books and that works. If I switch to an alternate geometry the morphs for that geometry all work. But if I switch to the default geometry none of the morphs work.When I save a scene subset from an imported CR2 and reload that scene subset the morphed geometries are correctly displayed.
But none of the morph dials for any geometries do anything to the displayed geometriesThe screenshot below gives a concrete example of this - on the left is an imported CR2, on the right is that saved as a Scene Subset and then reloaded

So can anybody explain what's happening here, and more to the point, how I can fix it.
How do I uninstall Diffeomorphic causing scaling issuesI had the Daz to Blender bridge instaled, and watnign to try the Diffeomorphic scripts, the problem is ever since i added these script all my Blender imports have scaling issues, no matter what i try, if i import a Obj file at 1000% it always need to be recaled after importing manually to 1000% but the rigging seems to be keeping the correct scalig on import, how do I remove Diffeomorphic is it as simpe as delting the scripts, what else could eb causing this dissocation between the rigging scaling and the object ?
Daz To Cinema 4d OctaneAny time I import something into another program, I do so with the full expectation that I will have to completely build the shaders myself.
Is Strand-based hair taking a step backward in realism, lately? August 2024The reason why I said direct Auto-Fit doesn't work and manual fixing will be needed was because we ever experimented a lot with this sort of "new hairs".... I have to say the way with which you Auto-Fitted the hair breaks a couple of things: original "Fit to" structure, ghost morphs on the hair's root node, and dForce modifier ~~ So if one does need a conversion... the better way should be always the old school way : Auto-Fit (or Re-rig with Transfer Utility) + Fix Base. With this hair, key steps :
1) Load hair into the Scene, just auto-fit Face Dummy and Summer Style Wavy Long Bob Hair root node to G8. (Re-rigging with Clone will also do. )
2) Load hair on G9, dial G8F Clone on G9. Export Cap and Strand nodes to OBJ files. Import OBJ files onto Cap and Strand nodes on G8 with MLP as "Fix Base" morphs. Then dial the morphs.
3) Save a Wearable Preset or a converted version Figure Asset. Done ~With this way, everything on G9 version's hair will be kept on the converted one on G8, and works well.
That is a MUCH better method, thanks for Tip, added a warning in my first post. I do tend to break stuff when I play around ;) It's how i learn to fix it.
How to save new character morphs?Yes ~ with the setting in the screenshot. And do not dial any other morphs before you import OBJ files with Morph Loader Pro to update an existing Morph. For instance, to update "Phan Head fixed", you can only dial this morph to 100% before importing OBJ with MLP.
Is Strand-based hair taking a step backward in realism, lately? August 2024mrpenguin76 said:
crosswind said:
Uthgard said:
ArgleSW said:
Looking at OOT's (outoftouch) recent products which have started to use strand based hair, I feel the materials and overrall look have taken step backwards. The colors do not look natural and has an odd metallic look to it (even after lowering glossiness). While the strand based technology might be more advanced and has greater potential, the out of the box final look in renders can look off in my opinion. When I try to apply a blonde material for example, they all end up looking like a metallic gold.
Speaking of OutOfTouch, how feasible is it to use the G9 hairs on G8? Are they on a cap, or is that strand-based thing where they can only be used on the figure they were made for? Sorry for the slight out-of-topic, but I didn't want to make a new thread for this, and one of their hairs is today's big sale item.
Not feasible... direct Auto-Fit doesn't work. There's a Cap indeed but the Cap + SBH are both under another root Hair node. After Auto-Fitting, the root Hair node will not be redirected to the correct position, so a manual fix is always needed. So... easy and straigh-forward way is still parenting the hair to figure's hair node.
It is Possible to fit OOT G9 strand based hair to G8 using auto-fit, it just requires a couple extra steps to do it. I'll use dForce Strand-Based Summer Style Wavy Long Bob Hair for Genesis 9 | Daz 3D as my example for how to do it.
First of course have your G8F/M Loaded. Now bring in the strand based hair with the character UNSELECTED. You will still get a pop up on this one as the dforce dummy will still try to auto fit, just hit cancel. Now click and expand the Summer style Wavy Long Bob Hair, and unparent the STRANDS. Now select that, in parameters change it's "fit to" to NONE. Now right click on the scene tab and choose edit scene info. One the prefered base for the strands set it to Genesis 9 Base and hit accept. Now right click on the Strands and choose fit to Genesis 8F/M (i used both Genesis 9 CS and MMX Gensis 9 clone and result were pretty much the same) I used shoulder length as the tempate. Now right click and auto fit the other pieces that already have the G9 Base Prefered. And the results are on the Left...
Now IF you load the hair with the character selected and do choose to Auto fit at the point you can Also simply Unparent and UNFIT the strands, changed the prefered base to Gensis 9 Base and RE-auto fit the strands... So why didn't i just say that in the first place? well, something about skinning a Ca---- a Buck, yeah a Buck (don't want to offend the cat lovers ;)).
....
The reason why I said direct Auto-Fit doesn't work and manual fixing will be needed was because we ever experimented a lot with this sort of "new hairs".... I have to say the way with which you Auto-Fitted the hair breaks a couple of things: original "Fit to" structure, ghost morphs on the hair's root node, and dForce modifier ~~ So if one does need a conversion... the better way should be always the old school way : Auto-Fit (or Re-rig with Transfer Utility) + Fix Base. With this hair, key steps :
1) Load hair into the Scene, just auto-fit Face Dummy and Summer Style Wavy Long Bob Hair root node to G8. (Re-rigging with Clone will also do. )
2) Load hair on G9, dial G8F Clone on G9. Export Cap and Strand nodes to OBJ files. Import OBJ files onto Cap and Strand nodes on G8 with MLP as "Fix Base" morphs. Then dial the morphs.
3) Save a Wearable Preset or a converted version Figure Asset. Done ~With this way, everything on G9 version's hair will be kept on the converted one on G8, and works well.
Animating Daz characters in Maya and re-importing them back to Daz issue with rotationsWhich version of Daz Studio? The beta branch currently has a number of improvements to FBX import that are not in the General Release, so it may be worth trying the beta if you are not currently doing so.
[Released] Content Wizard [Commercial]Cliffborne said:
Also, any chance that you could publish a revamped version of the Content Wizard at some point, with native support for several different 3D shops? I have noticed that the batch installer actually works wonders with Daz3d products, but usually fails with any other third-party content. that would be a massive help as at present I need to manually install all third-party products.
There isn't native support for any shop. I include some shops in the constants file, but all of the metadata matching is done using Daz standards. The problem is that many vendors at other sites do not follow any standards, or do it poorly.
Daz To Cinema 4d OctaneThe DAZ Octane converter is of no use in this case.
The main issue is that the imported materials have NO color channel and a layered reflectance channel instead.
My current workflow is:- import with the plugin in FBX format
- collapse any duplicate materials (Alt+slide it onto another similar material)
- convert to Octane. The plugin and Octane 'Convert materials' command give the same (bad) results
- In the Octane node editor, remap the diffuse map to the correct channel
- Add the roughness map by searching it from the maps directory
There must be a way to import materials WITHOUT the problematic DAZ layers, but I have not found the option to get rid of them, either in DAZ or in C4D.
I submitted a bug report for this issue.
Keeping content on external drive--SOLVEDI've reinstalled though DIM, reset database, reimported metadata, and my Smart Content still looks like this (screenshot). If I go to the Products tab, right click and Update Metadata, then the Install option shows, and when I've done that, the item shows in Smart Content. But if I try to do them all at the same time, it crashes, and the same if I do it in batches, so... I really don't think I can reinstall what's apparently 700 items one by one. I really, really wish I'd never started this!
Isla Bikini pressure morph glitch, need help to fixThe readme said that some fixes were deployed to prevent the pressure morphs from affecting part of the body they should not affect.
-
2021-09-21 - Resolved issues with bikini pressure morphs causing deformation in the teeth.
-
2023-03-03 - Morphs Deforming Head, Fixed.
If you have the last version, maybe some problems are still to be fixed (I don't have the product).
The pressure morphs are using HD morphs and as a user, we don't have tools to import / modify them.
The best way to fix these problem is to open a ticket with Daz and wait for Daz / the PA to fix them then push an update.
Transfer Face morphsI'm trying to create a beard for my G1 figure but it seems I'm doing something wrong since the morphs aren't tranferred correctly.
I did this some other times in the past: I import the OBJ, load the figure, set as Favourite the moprhs I want to transfer and then start the Transfer Utility setting it to transfer the favorited miprhs to the prop, but even if the beard is transferred and perfectly working, the facial morphs aren't trasnferred and nowhere to be find in the beard parameters.
Someone can give me the right procedure for this? Thanks!
Clothes no longer moveable after import to blenderGordig said:
How are you getting it into Blender? FBX import? DaztoBlender Bridge? Diffeomorphic?
I'm using Difgeomorphic. sorry my problem finally got sloved few hours ago. turned out some reason there was location ,rotation and scale lock in blender on 3d object . tahnks for reply.
Keeping content on external drive--SOLVEDTotte said:
etaktrash_d29ae59121 said:
Okay, eventually (after a lot of Googling and trying lots of things that didn't work) I looked at the Smart Content > Products tab and right-clicked an item: clicked Update Metadata. After that, the icon changed to grey with an 'install' icon in it. Clicked that, it installed, and... hey presto! It appeared in Smart Content and so did all its materials, etc! So now I am reinstalling everything this way, in batches, which is painfully slow. This seems completely ridiculious when I already reinstalled it all (again, painfully slowly) via DIM, but here we are!
That means installing with DAZConnect, which is good for most types of content, but not so great for script products.
depending on how the script is written http://docs.daz3d.com/doku.php/public/software/dazstudio/4/referenceguide/scripting/api_reference/samples/file_io/file_find/start , though I do recognise that testing anything that needs to use metadata or that is isntalled through Connect requires a version that has been built by QA with the product metadata so suporting Connect and being sure the support works is tricky [removed as laregely or entirely incorrect, or misunderstood].
So, this also emans your Daz Studio didn't know whee the content were installed. Had you updated the Daz Studio Content Directory Settings to point at the new directory?
Keeping content on external drive--SOLVEDTotte said:
etaktrash_d29ae59121 said:
Okay, eventually (after a lot of Googling and trying lots of things that didn't work) I looked at the Smart Content > Products tab and right-clicked an item: clicked Update Metadata. After that, the icon changed to grey with an 'install' icon in it. Clicked that, it installed, and... hey presto! It appeared in Smart Content and so did all its materials, etc! So now I am reinstalling everything this way, in batches, which is painfully slow. This seems completely ridiculious when I already reinstalled it all (again, painfully slowly) via DIM, but here we are!
That means installing with DAZConnect, which is good for most types of content, but not so great for script products.
So, this also emans your Daz Studio didn't know whee the content were installed. Had you updated the Daz Studio Content Directory Settings to point at the new directory?You mean, in In Daz Studio: Preferences > Content > Content Directory Manager > DAZ Studio Formats? First thing I did.
bigmediumsmallbeyonder2k9 said:
Is there a tutorial or how to, to integrate the assets from bigmediumsmall to Daz?
Looking at the site, the formats offered are Blend, FBX, OBJ, Unreal Project, so the only real option to get any of them into DS is the OBJ format and any characters will have to be re-rigged inside DS. You could try thev FBX format with the new DS beta since some say the import option is better (FBX with rigging would not import correctly before). You may also have to re apply the various textures once imported as well.
Daz 3D is part of

Connect
DAZ Productions, Inc.
7533 S Center View Ct #4664
West Jordan, UT 84084Licensing Agreement | Terms of Service | Privacy Policy | EULA
© 2026 Daz Productions Inc. All Rights Reserved.