Daz 3D is part of 
Connect
DAZ Productions, Inc.
7533 S Center View Ct #4664
West Jordan, UT 84084
Licensing Agreement | Terms of Service | Privacy Policy | EULA
© 2026 Daz Productions Inc. All Rights Reserved.
Comments
Thanks, @WendyLuvsCatz
Now I know, why you like their assets so much.
LOL not enough to actually buy any yet, only have the freebies
but yeah, one day, they are pricey and right now not even buying the plugin though it's on my wishlist
too many non 3D wants
They have 3 freebies at the moment. Just wonder, if they change them or put another ones.
I have started with one of them yesterday, but they are really huge. Need more time to experiment.
I have the post Appocalytic MiniKit, Mission to Minerva, Neo City and in FAB Gaea and Luminara (those only Unreal format)
Yes, I figured it out. Great, that KitBash3D Blender files contain separate props, but in common file.
Thanks for info. I have their freebies: Mission to Minerva, Neo City and Luminara.
In the past I was a Kitbash3D member. The membership was quite expensive, but as a big plus you could download INDIVIDUAL objects and their textures rather than a massive mega-scene like the freebies (or better, as an alternative to the whole scene).
Does anyone know how to make Blender particle hair so that it can be converted via the Blender-to-Daz plugin?
The Temple A from the KitBash3D freebie: Secrets of the Luminara.
Added Gia 6 as a reference.
For a quick test take a look at the demo file from Blender. I have tested it and it transfers to Daz Studio with this plugin.
There are a lot of tutorials on YouTube about creating a hair in Blender.
I have tested one of these hairs on https://www.daz3d.com/em3d-kash-hd-for-genesis-9
The Temple B from the KitBash3D freebie: Secrets of the Luminara looks also great.
Are there any Mac people out there who have successfully installed and used the Blender to DAZ plug-in?
I have tried installing using the Daz Install manager AND manually (in both Blender 4.4 and then 3.6). The Blender to DAZ add-on never shows up in Blender's Preferences> Add-ons window.
BTW: (When I tried tinstalling manually) I followed the Install video that the plug-in’s creator provided. Though he was telling how to install on a Windows computer, I think I placed everything correctly on a Mac computer.
I am running off an 2019 Intel Mac Pro tower using Sequoia. (The system requirements just says macOS - it does not say it only works on the M4 chip. So it should work on my Intel Mac - am I wrong?)
Please help
It is an interesting topic, so we should discuss it here. I have made a searches and this is what I have found:
**Step-by-Step Guide**
#### **1. Export Genesis 9 from Daz Studio**
- Use the **Daz to Blender Bridge**.
- In Daz Studio:
- Select your Genesis 9 character.
- Go to **Scripts → Bridges → Blender → Daz to Blender**.
- Choose **Current Frame** and **Include Morphs** if needed.
- Export and then import into Blender using the bridge add-on.
#### **2. Prepare the Character in Blender**
- After import, you’ll have:
- A rigged Genesis 9 mesh.
- Materials converted to Blender shaders.
- **Apply all transforms** (`Ctrl+A → Apply All Transforms`) to avoid scale issues.
- Make sure the mesh has **UVs and clean topology** (the bridge usually handles this).
#### **3. Remove Daz Hair (if any)**
- If the character came with Daz hair, delete it.
- We’ll create **Blender particle hair** instead.
#### **4. Add a Scalp Mesh**
- Particle hair works best on a separate scalp mesh.
- **Duplicate the head mesh**:
- `Shift+D` → Separate by selection → Name it `Scalp`.
- Edit the scalp mesh:
- Delete everything except the top of the head where hair should grow.
- Add a **Solidify modifier** (optional) for thickness.
- Assign a **new material** for the scalp.
#### **5. Add Particle Hair System**
- Select the scalp mesh → **Particles tab** → Add **Hair**.
- Set **Hair Length** and **Segments**.
- Enable **Advanced Hair** options for better control.
#### **6. Groom the Hair**
- Switch to **Particle Edit Mode**.
- Use **Comb, Smooth, Length, Puff** tools to shape the hair.
- For realism:
- Enable **Children → Interpolated** for more strands.
- Adjust **Clumping, Roughness, Kink** for natural variation.
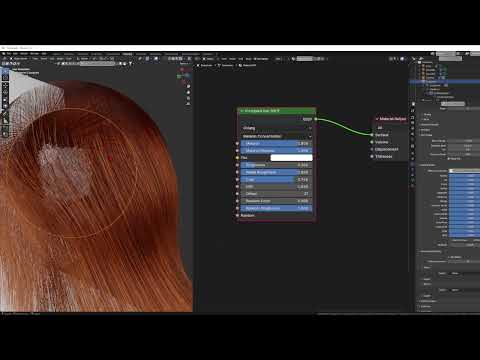
#### **7. Add Hair Shaders**
- Use **Principled Hair BSDF** in the Shader Editor.
- Connect to the hair particle system.
- Adjust **Melanin** and **Roughness** for realistic color and shine.
#### **8. Weight Paint for Hair Density**
- On the scalp mesh:
- Create a **Vertex Group** for density.
- Weight paint areas where hair should grow.
- Assign this group in the **Particles → Density** slot.
#### **9. Final Adjustments**
- Enable **Cycles** for realistic rendering.
- Add **Subdivision Surface** to the scalp for smoothness.
- Use **Hair Dynamics** if you want physics simulation.
Here’s how to set up **Hair Dynamics** in Blender for your particle hair system:
**Step 1: Enable Hair Dynamics**
1. Select your **scalp mesh** with the hair particle system.
2. Go to **Particles Properties → Hair → Physics**.
3. Check **Hair Dynamics**.
- This activates the physics simulation for the hair strands.
**Step 2: Adjust Hair Dynamics Settings**
Under **Hair Dynamics**, you’ll see two main sections:
**A. Structure**
- **Stiffness**: Controls how rigid the hair is.
- Higher = straighter hair.
- **Bending**: Controls how easily hair bends.
- Lower = more flexible hair.
**B. Damping**
- **Air Drag**: Slows down hair movement in the air.
- **Internal Friction**: Reduces oscillation and jitter.
**Step 3: Add a Collision Object**
- Select the **character body mesh**.
- In **Physics Properties**, add a **Collision** modifier.
- This ensures hair doesn’t pass through the head or body.
**Step 4: Pin Hair Roots**
- In the **Particle Settings → Vertex Groups**, assign a **Pin Group**.
- Weight paint the scalp:
- **Red (1.0)** = fully pinned (roots stay fixed).
- **Blue (0.0)** = free to move.
- Assign this group to **Hair Dynamics → Pinning**.
**Step 5: Add Gravity and Wind (Optional)**
- Gravity is enabled by default.
- To add wind:
- **Shift+A → Force Field → Wind**.
- Adjust **Strength** and **Direction**.
**Step 6: Bake the Simulation**
- Go to **Particle Settings → Cache**.
- Set **Start/End frames**.
- Click **Bake**.
- For complex scenes, use **Bake All Dynamics** in the Physics tab.
**Step 7: Test and Refine**
- Play the animation to check movement.
- Adjust **Stiffness, Damping, and Collision** until it looks natural.
Please share your renders of the hair transferred to Daz Studio from Blender.
@WendyLuvsCatz the Blender to Daz tool is currently for sale with a 40% discount!!! :)
Blender to Daz Studio Plugin | Daz 3D
Best wishes,
Matronius
There is a tutorial for Blender to Daz hair export:
I will release an updated tutorial with voiceover shortly.
Best wishes,
Matronius
I know but I am broke, I may end up paying more later but right now it's not a priority and the non free Kitbash3D sets definitly are out of the question
I have an abundance of DAZ content and haven't scratched the surface as far as rendering
it's in my wishlist, things may change but I am glad to know it indeed brings all the maps over
Just quickly tested to create a hair particle system in Blender and transfer it to Daz Studio.
From this:
to that in Daz Studio:
Great. Looking forward to it. Maybe you could also cover transferring hair particles inside collections in Blender.
Thanks everyone :)
One more question: Any good tutorials on converting to Principled BDSF in Blender? I find some of my older Blender files are missing textures on conversion.
I assume you are talking about Principled Hair BSDF?
Just in case below is a short info about differences between 2 similar ones.
**1. Principled BSDF**
- **Purpose**: A general-purpose, physically-based shader for most materials
(metals, plastics, glass, skin, etc.).
- **Features**:
- Combines multiple layers (diffuse, specular, subsurface, clearcoat, sheen, transmission) into one node.
- Designed for **solid surfaces**, not for thin fibers like hair.
- Works in both **Eevee** and **Cycles**.
- **Color Handling**: Uses base color and roughness for surface reflection and transmission.
**2. Principled Hair BSDF**
- **Purpose**: Specialized shader for **hair and fur rendering** in **Cycles only**.
- **Why Special?** Hair is a thin, cylindrical structure with complex light scattering
(reflection, transmission, absorption inside the strand).
This shader models that accurately.
- **Features**:
- **Color Parametrization**:
- **Direct RGB**: Simple color input.
- **Melanin-based**: Physically accurate hair pigmentation
(eumelanin for dark, pheomelanin for red tones).
- **Absorption Coefficient**: For technical users using scientific data.
- **Advanced Controls**:
- **Melanin & Redness** for natural hair tones.
- **Tint** for dye effects.
- **IOR** (Index of Refraction) for realistic light bending.
- **Roughness & Radial Roughness** for glint control.
- **Randomization** (color and roughness) for strand variation.
- **Coat** for shiny fur effect.
- Implements **Chiang** and **Huang** scattering models for realistic light interaction.
- **Limitations**: Does **not** work in Eevee; only in Cycles.
**Summary**:
- Use **Principled BSDF** for general materials.
- Use **Principled Hair BSDF** for realistic hair/fur because it simulates internal scattering,
pigment absorption, and anisotropic reflections that the regular Principled BSDF cannot handle.
https://docs.blender.org/manual/en/latest/render/shader_nodes/shader/hair_principled.html
Some tutorials from YouTube related to the hair in Blender.
88: Hair material in Blender
The Secret of Realistic Hair Shader in Blender

Principled Hair BSDF in Blender Shader
You might be doing HAIR Materials WRONG... Here's How to Fix it!

Can I, for example, make a boot in Blender and transfer it to DazStudio along with a weight map for Genesis 9? (I use GoogleTranslator)
If you mean some kind of shoes, it should work.
I do not know if weight maps from Blender are transferred to Daz Studio.
How long does the importing step usually take? I'm trying to import this BlenderKit scene into Daz. I've removed any of the Blender/non-Daz materials (mix nodes, glass BSDF shaders, etc.). I'm just using the base textures and mapping. It's basically stuck at 0% for 20+ minutes. I tried a smaller scene, but even that got stuck at 3% after several minutes. What exactly am I missing here?
I would suggest to start with something relatively simple to check how fast your computer converts.
Converting just a selected building with the settings pictured on the screenshot took under 1 minute on my laptop.
Example iray render from Daz Studio.