Rendering a Light Bulb in Carrara
 otodomus
Posts: 332
otodomus
Posts: 332
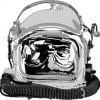
Hello there, I have done several renders in Carrara and the results had become very nice, very well represented as I was intended to do since the beginning, but at this time I am stuck in a little issue, I am rendering a light bulb, the which means some transparency and clearness that the object demands, so my intents are not giving the results that I want, so I am asking that of someone has done some similar before and want to share their settings?
I am posting a picture of what I have so far, if you notice this seems to be a solid bulb instead a empty thin wall glass light bulb:
Any help will be much appreciated.
Otto
Daz 3D is part of 
Connect
DAZ Productions, Inc.
7533 S Center View Ct #4664
West Jordan, UT 84084
Licensing Agreement | Terms of Service | Privacy Policy | EULA
© 2026 Daz Productions Inc. All Rights Reserved.
Comments
It seems that my post was duplicated, can a moderator delete the previous one?
Thanks!
Otto
It can be difficult to help in situations where we can't actually see screenshots of the shader setups. However, I think I can help a bit:
The gray in the bulb may be coming from a common mistake of having the "Reflections" sett too high. I could be wrong. I'm still seeing the filament through the bulb shader just fine, which leads me to believe that it may be something else.
Here's the problem:
You say that you're not getting what you were expecting, without telling us what you were expecting.
Also, we have no notes or images to go by, telling us what you've done so far to achieve the above image, and how it differs from what you're looking to achieve.
Please help us to help you! ;)
Try putting a wood shader on the table, or something. It's hard to tell if those gray artifacts are coming from the ceiling or the shadow.
EDIT:
It would also help if you'd put some shaders on the room, itself - instead of just having a bland color. If you want to go back to bland later, that's fine. But just to see what is affecting (causing the artifacts) the bulb's shader, let's see what it looks like with a more realistic looking environment.
Not sure where to start? try dragging into your scene one of the examples from "Interiors" in the Scenes tab of the Browser, and move (rotate, etc.,) the whole room around to get your bulb onto one of the included tables.
Carrara's render engine is reproducing reality as best it can. Just like the real-world you'll need to add some dimension to the glass by duplicating and scaling.
The image below has a simple sphere on the left (which renders as solid glass) and a sphere within a sphere on the right (which renders as thin glass in a round shape).
**You will need to set the Fresnel effect in the Transparency channel to between 20 and 30 to get s similar result. This let's the program reduce both the reflection and refraction distortion on the geometry the more perpendicular it gets to the viewer – just like in real life.
@ Mark,
Kick a.... um... I mean... ankle! Kick Ankle! Yeah... that's it... ankle!
Thanks for the awesome response!!!
@Dartanbeck,
Why do I get the feeling that you are going to be rendering shiny, clear things now? :-D
Well... because. Now I know the trick! :ahhh:
Holly Wetcircuit (where is she these days?) also would point out that DCG's Shader Ops includes a "Fake Fresnel" function, which she used to great affect on wine glasses and bottles and such. Not sure if that would add a fake thickness to the mesh or not?
I love Fake Fresnel.
However, if there is anything else in the scene that reflects the object FF is applied, the reflection reveals the cheat – the reflected objects are shown as a solid because the effect aims at the camera, not other objects in the scene.
I've used FF to imitate the look of the skin on women to create a "Vargas Girl" effect from the 40's. (http://www.thepinupfiles.com/vargas1.html) I use it as a blender for a multichannel mixer. Pretty fun.
Thanks for those responses so far! I am posting the settings I did for the previous image if this helps:
OK, to which one I need to apply those settings? The duplicated one inside? or the one in the exterior?
@otodomus, The same glass shader is applied to both object; if in the vertex room, it can be the single object that makes the glass if it's created that way. Then Carrara does the math and figures it out.
@ Dartanbeck, Here is some Vargas skin treatment with Fake Frenel used in a multichannel mixer:
Thank you very much, after some testings, I am much more closer of what I wanted to create:
Super. Glad it helped out!. You'll probably want to activate Caustics in the render room to help 'sell' the idea of glass. I usually put the filter value at 100% but dial the strength into the 20s.
Have fun!
Cool! I am very happy with the results so far, to me Carrara is one of the most powerful tools to render.
Thanks again!
Just to add a little bit to this,.
In Carrara Pro's vertex modeller you can "add thickness"
depending on how the model is made, you can select the glass section and add thickness, set it to perhaps 1mm, depending on the model, and that will create an outer mesh layer.
Use a minus value to get an inside layer, or scale the part down to fit, after adding thickness.
If the glass and base are a single mesh,. you can select by shading domain,. then copy, delete, paste,.. to get a separate mesh for the glass and base.
Hope it helps
About time you turned up Andy. Have you locked horns with Carrrara 9 yet? It's been much better than we all expected ;)
Welcome back. Stick around if you can....
This is a glass bottle I made a few weeks ago (it's just a vertex cylinder, squeezed in the right places). I added thickness to give it the solid feel, and using the "Clear with Bump" glass shader gives it that little ripple.
For the water inside, I made another vertex object. I took a copy of the inside surface of the bottle, and an ocean primitive that I converted to a vertex object, and used a boolean operation to get two parts that I could weld together and make a "solid" object. The surface and bottle parts had different shading domains. My intention was then to put white caps on the waves, although I didn't get that far (the render was for a time-limited competition)
Nice sample of how it's done Tim!
Yeah, my thoughts exactly.
Ditto on the ship in a bottle,. Nicely done Tim.
Hi Headwax :)
I've been playing with the latest beta version (8.5.1) .
so far the bullet physics seems to be a little bit more stable, but still not right,. and the smart content browser stuff works better than it did in 8.5.with Genesis 1,. overall,.. some improvements to make it barely workable
I still love using Carrara, but as for genesis,. .. not worth the bother,
it's fine for a "Static render"(after you've rebuilt the shaders) but,.. trying to hand animate genesis in carrara is nuts.
Anyhoo,.. I hope to be around the forums for a while :)
You know, something that amazes me is how many 'high-end' 3d softwares do not have an "Add Thickness" feature. Carrara does so much, so well...
And yes, 3DAGE, nice to see you poking around. I've been MIA for some time and back here simply trying to have some fun in 3D again. :D
Hi Mark :)
I sometimes forget it's got that feature now, and I'm so used to modelling the inside by hand,.
I thing 3d Max had a "Shell" function which is the same thing /different name .. I haven't used max since they changed from version numbers to year dates. :)
Good to see you here, and it's nice to be back :)
Thanks for all the comments so far!
This is the last update on the Light Bulb render, I think is more vivid...
Looks great! Well done.
Thank you Mark, in this last render I did enable the Caustics, and I leave the 100% because I couldn't see much difference when decrease it... And at last I have added a "window" shape to do a reflect on it...