DAZ, MD, and Traditional Pattern Making - Graduation
 bohemian3
Posts: 1,035
bohemian3
Posts: 1,035
I have been using Marvelous Designer for creating garments for DAZ for close to a year now. My gallery linked here shows some of my recent work. Through this thread I'm hoping to create a microcommunity of other DAZ users who want to explore fashion and traditional pattern making techniques using DAZ and Marvelous Designer. Ask questions, post your work.
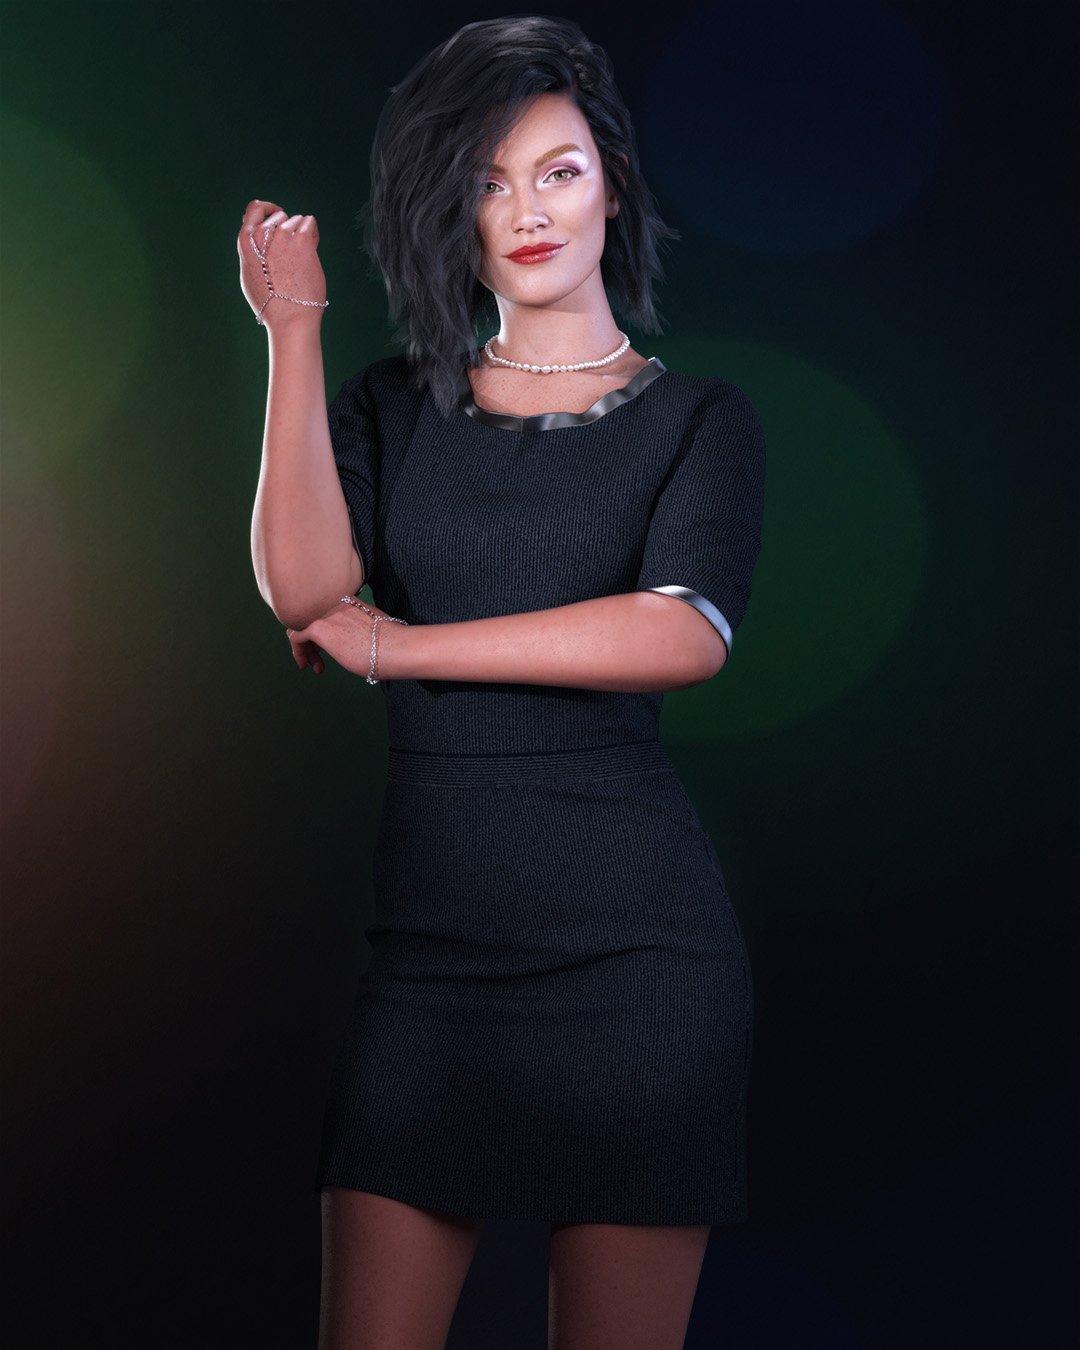
A fashion staple of many women's wardrobe is the LBD - the Little Black Dress. I have created a very brief overview of creating custom fitted garments like the LBD for Victoria 9 in Marvelous Designer using traditional pattern making technique. It is not a step-by-step guide, but rather an overview. I will be posting more videos that go in-depth into the sloper creating process soon.
Since doing these videos, Marvelous Designer has added puckering and binding tools - be sure to check them out when adding trim around necklines and armholes.
I used FBX and obj exports in earlier videos out of inexpereince. Thanks all you introduced me to the Alembic Exporter - a better workflow for exporting out of DAZ:
Video 1: Tutorial Overview : LBD for Victoria 9
Video 2: Creating Slopers for DAZ Characters in Marvelous Designer
Video 3: Posing in DAZ and Draping in Marvelous Designer Workflow
Video 4: Finishing the Sloper: Sleeves
Video 5: From Slopers to Patterns
Video 6: Collarless Casual Shirt Complete Project
Video 7: Alternal Method for Adding Trim
Video 8: Prepping meshes for DAZ and Substance Painter
Video 9: Shape Morphs and Scripting the Timeline
Video 10: Creating Pleats and Ruffs
If you've never used Marvelous Designer before, but are familiar with 2D Vector tools like Illustrator you can probably jump right in with Video 6 and the free trail version and the template starter files in resources if you have V9 or M8.
Link: Free Trial at bottom of page - you'll need to create login
Last off, here is a link to a shared folder that contains the reference images I used in the videos and the M8 and V9 Marvelous Designer Project files.
If you've been thinking of checking out the free one month trial of Marvelous Designer, Video 3 is a good video to beging with to show the power of MD and the sloper patterns will get you started.
|
|
 |
Daz 3D is part of 
Connect
DAZ Productions, Inc.
7533 S Center View Ct #4664
West Jordan, UT 84084
Licensing Agreement | Terms of Service | Privacy Policy | EULA
© 2026 Daz Productions Inc. All Rights Reserved.
Comments
Marvelous Design TIps:
Pretty much anything can be an avatar in Marvelous Design. In this image I created the DAZ figure and then the Edwardian suit. Then I exported both and used that as the avatar and draped the cape on that - Marvelous Designer still has trouble layering fabrics and it can be challenging. When I can, I create the layers separately and then import athem as avatars.
Thanks for starting this thread. I'd like to see the LBD on a more contrasting background. Here it seems to blend in, and I can't really see its shape.
Hiya @barbult - ask and you shall receive. A quick masking of the background in PS.
Thanks! Since you are exporting as Thick and not using dForce, did you drape to a fixed pose in MD for this render, or did you just pose the character, and the thick dress followed that well?
I should really study sewing a bit more, because I've been making clothing in MD for an animation project, and I feel like I've got the basic concepts down, but when something doesn't work they way I want/expect it to, I'm mostly just guessing about how to solve it.
Here's the latest shots. All clothing made in MD except for their boots and arm wraps/gauntlets.
@barbult - I create the JCMS - joint control morphs in Marvelous Designer as well, not in a modeling program like Blender, so the folds are natural. I'll be doing a video on that. You are anticipating my moves.
Hiya @Gordig - so how are you getting the animated cloth out of MD? Alembic? It looks like you may need to play around with particle distance - but that effects your polygon budget. But looks fantastic so far - I've not played with exporting animation yet. Next video is going to be on importing FBX animations.
One of the things I like about Marvelous Designer is the flexability - For this render I wanted to show off the chest tattoo but didn't want the model totally shirtless. MD is perfect when you need your characters in all sorts of undress as well as dressed.
Also I learned you can import Photoshop brushes into Substance Painter. This one uses Ron's Rips and tears for the Zombies. Dang - all those Ron's brushes just got a new lease on life!
Gallery Link
Yes, I'm using Alembic, which is unfortunate because MD's Alembic exporter is garbage. I'm working with a particle distance of 10 and subdividing within C4D. I'm currently exporting out an Alembic of a figure to do another simulation in MD because I've never bothered to make an avatar, so I should really spend some time with your tutorials.
edit: I'm also using remesher to turn everything into quads. Would you recommend against that?
Hiya @Gordig - I don't pretend to be an expert - but I've found particle distance of 10 creates bulky folds and draping. You can get decent results with 8 and may not need to subdivde, except for closeup work. So why aren't you using quads in Marvelous Designer? Yes, alembic exporter is garbage, I agree. DAZ won't even read it. If I export to 3DS Max, and then export another alembic from there, DAZ can read it. grrrr.
I mean that I use the remesh option in MD to create quads. Is there a way of creating patterns with quads as default? For me, the biggest problem with the Alembic exporter is that it doesn't export surface groups, meaning that in order to texture it in C4D, I have to export an OBJ of the outfit and copy all the surface groups from that to the Alembic.
Under Settings/Preferences --> 3d --> Mesh --> you can set the default to quads. I'll be posting the 'sloper' (template) video tomorrow - lots of time saving stuff in that for this sort of thing. Regarding alembic... there's no way around the surface group issue that I know of. In 3DS Max I wrote a script to transfer the surface groups.
Posted a New Video
Creating Slopers for DAZ Characters in Marvelous Designer Using Traditional Pattern Making Techiques.
Link to Gallery Image
These are the techniques I use to create images like this. The video does not cover creating a suit, but rather an overview of the tools and skill you'll need to create your own garments.
interesting concept, this was a novel concept to me
The latest video had MD techniques and tips I was completely unaware of. Thanks. This is shaping up to be a great tutorial series! Are more coming?
Hiya, thanks @barbult - yes more on the way.
Thank you. I learned a great deal from this. Liked and subscribed.
EDIT - deleted wrong cut and paste - sorry.
Oh, yes, I went back and "liked" and "subscribed", too. Thanks for the reminder. I was so enthralled by the content and professionalism of the videos, I somehow didn't even think of those buttons at the time.
New Video Posted
Posing In DAZ - Draping in Marvelous Designer Workflow
Thanks for the positive comments, @barbult, @Diomede, and @lilweep - I'm glad to hear the videos are helpful. Let me know what topics you want to see covered or how you're using Marvelous Designer. I'm working on two videos now - sleeves, and techniques for adapting patterns using your sloper.
Also, anyone currently not using MD, if you've been thinking of checking out the free one month trial of Marvelous Designer, this is a good video to begin with to demonstrate the power of MD.
Three Images created using the workflow described in this video (In my Gallery):
Another great video! I've never used the wind node in MD, so this was interesting. I've also never used FBX to import animation. I've always used MDD. Is there a significant difference between FBX and MDD import?
I found the text that flew in and grew in size to be distracting and difficult to read before it disappeared. I think it would be easier to read if it just appeared at full size and didn't fly in and grow.
I'm interested in learning more about how you use materials in MD and get them out to Daz Studio. Or do you texture everything in Daz with shaders, or do you create textures with a 2D editor? I'm interested in learning how to effectively export things like button holes and top stitching and use them in Daz Studio. I am interested in you you import Daz clothing into MD and drape it in MD, if you do that.
Here is my attempt with following Posing In DAZ - Draping in Marvelous Designer Workflow.
I learned that after importing the thick unwelded OBJ back to Daz Studio, I cannot add smoothing or SubD, because gaps form at the unwelded seams. This could be because of the simple way I designed the skirt. Any suggestions?
unwelded mesh (i.e., thick MD export) cant be smoothed or subdivided properly regardless of how you make your dress. well, unless you weld all vertices manually first.
Sub divide in Marvelous Designer by making Partical Density like 5 or lower. I always simulate my 'final drape' at particle distance of 2 or 3 before my final export.
Yes it increases render time, but so what?
Thanks for sharing your insight. I used the particle distance 8 suggested in the videos. Normally when making thin welded clothing for dForce I use particle distance 10 and then subdivide once in Daz Studio, so 5 in MD may be equivalent for clothing that will not use dForce. If there are tight gathers or something like that, I can see where even a smaller distance might look better. 2 or 3 seems kind of extreme. I'll have to give it a try.
you could also just export thin welded, and add the thickness after the fact in Daz with that thickness plugin (i recall you using it), but dont know how successful your results were with that.
I go to 2 or 3 pd if the situation calls for it because I often still see artifacts at 5 pd on wrinkles.
Hi @barbult and @lilweep - thanks for the lively dialogue. I will do a video on detailing and texturing next - it answers a lot of questions that you have with handling a thick mesh exported out of MD, realistic texturing, and using subD in DAZ - it's a combination of techniques including @lilweep insights. I've not really tried draping using existing objs - guess I want total control. @barbult - that skirt looks great! the folds are very organic and natural.
Actually - I had not tried MDD - just did - converting the Z axis seems to work with exporting all the HD and JCM morphs. Though you do have to have the animate plug in. Mine wasn't registered so it wouldn't allow me to export MDD until I registered it, so fbx is still the way if you don't have the plug in.
Thanks for the tip! Save one step - that's what this discussion is all about.
Now getting high quality animated HD clothing back into DAZ - well, that's another challenge!
I have never simulated daz clothing per se, but I have simulated many other objs.
I attached an example of simulated obj garments. The bag in the image was not an obj, that was a MD garment.
Key findings
New Videos Posted
Finishing the Sloper: Sleeves
This video guides you through a process for creating a template sleeve pattern, and also gives insight into why a sleeve pattern look the way is does.
From Slopers to Patterns
Moving forward, the real fun begins: This video introduces the concepts and techniques of transforming your slopers into real patterns you can use for your DAZ figures.
Last off, here is a link to a shared folder that contains the reference images I used in the videos and the M8 and V9 Marvelous Designer Project files.
Images and MD Project Files
I am finishing up another video for this week that will take a project from start to finish: Building the pattern from the sloper, Adding detail for realism, Setting up fabrics for material zones, bringing the finish garment into DAZ, Applying materials in DAZ (including stitching and buttonhose) and rendering. Taking a little longer than I thought ;)
Thanks for the heads up, @lilweep - I look forward to playing with these new toys this weekend.
Hello @Stupido3D - thanks so much for sharing your insights - I learned a lot and have started experimenting with the techniques you suggest. And that render is terrific - I take it the clothes were done in MD?
If the clothing were made in MD, I would just simulate the MD garment file. The obj garments I simulate with are usually 3D Scan assets, rather than Daz store clothing or MD clothing (think polygonal miniature's content, although there are others out there).
3D Scan assets will typically be welded as a result of how the models are built from scan data, so there is less risk of buying/downloading an obj only to realise it cannot sim without falling apart.
If something falls apart and I am highly motivated to use it anyway, I might manually weld the pieces together in Blender but only if there a few pieces to weld.