My Skin Tweaks for the Iray Uber Shader

MelissaGTMelissaGT Posts: 2,602
edited October 2021 in The Commons

Hey guys - a while back I made mention that I was asked to write a tutorial on how to get started with the tweaks I use for skin settings. These are tweaks I always use, whether I'm wanting to update a G3 skin, or simply enhance the skin from a G8 character. The article with also hopefully serve to demystify the surfaces panel a bit when it comes to sss. If folks like this article, and find it useful, I might think about writing more, such as what settings I use for Spectral rendering, how I build up more in-depth sss maps and what products I use to do it, or how I work with tattoos and make tattoos from the store look better. Maybe how I go about making my own skin mashups, or what I call franken-skins. I'd also like to dig deeper into the new PBR Skin Shader and see what I can do to improve upon those settings, but I need to work with it a bit more before I can recommend stuff to other people. Right now I still prefer to work with the Uber Shader. 

Anyways, I hope it helps folks out there who want to try and start customizing skins but don't know where to get started!

https://thinkdrawart.com/making-skin-pop-with-the-daz-studio-iray-uber-shader-part-1
https://thinkdrawart.com/making-skin-pop-with-the-daz-studio-iray-uber-shader-part-2

Post edited by MelissaGT on
«13

Comments

  • DaventakiDaventaki Posts: 1,621

    Oh excellent! Will absolutely be making use of this!!!!!!!

  • MelissaGT said:

    Hey guys - a while back I made mention that I was asked to write a tutorial on how to get started with the tweaks I use for skin settings. These are tweaks I always use, whether I'm wanting to update a G3 skin, or simply enhance the skin from a G8 character. The article with also hopefully serve to demystify the surfaces panel a bit when it comes to sss. If folks like this article, and find it useful, I might think about writing more, such as what settings I use for Spectral rendering, how I build up more in-depth sss maps and what products I use to do it, or how I work with tattoos and make tattoos from the store look better. Maybe how I go about making my own skin mashups, or what I call franken-skins. I'd also like to dig deeper into the new PBR Skin Shader and see what I can do to improve upon those settings, but I need to work with it a bit more before I can recommend stuff to other people. Right now I still prefer to work with the Uber Shader. 

    Anyways, I hope it helps folks out there who want to try and start customizing skins but don't know where to get started!

    https://thinkdrawart.com/making-skin-pop-with-the-daz-studio-iray-uber-shader-part-1

    Thank you :-) I think this is one of those "never ending topics" - always something more to learn about. Much appreciated.

  • CHWTCHWT Posts: 1,127
    Thank you so much !
  • hiya, your chat style is more style.  That said, not sure if you know about this big DAZstore tut? >  https://www.daz3d.com/skin-shading-essentials-tutorial

    both pdf and mp4s.  For example, provides a 2018 scientific explantion of mono vs chroma SSS.  Know your into massive detail which is awesome, so thought would mention just in case.

  • HylasHylas Posts: 4,744

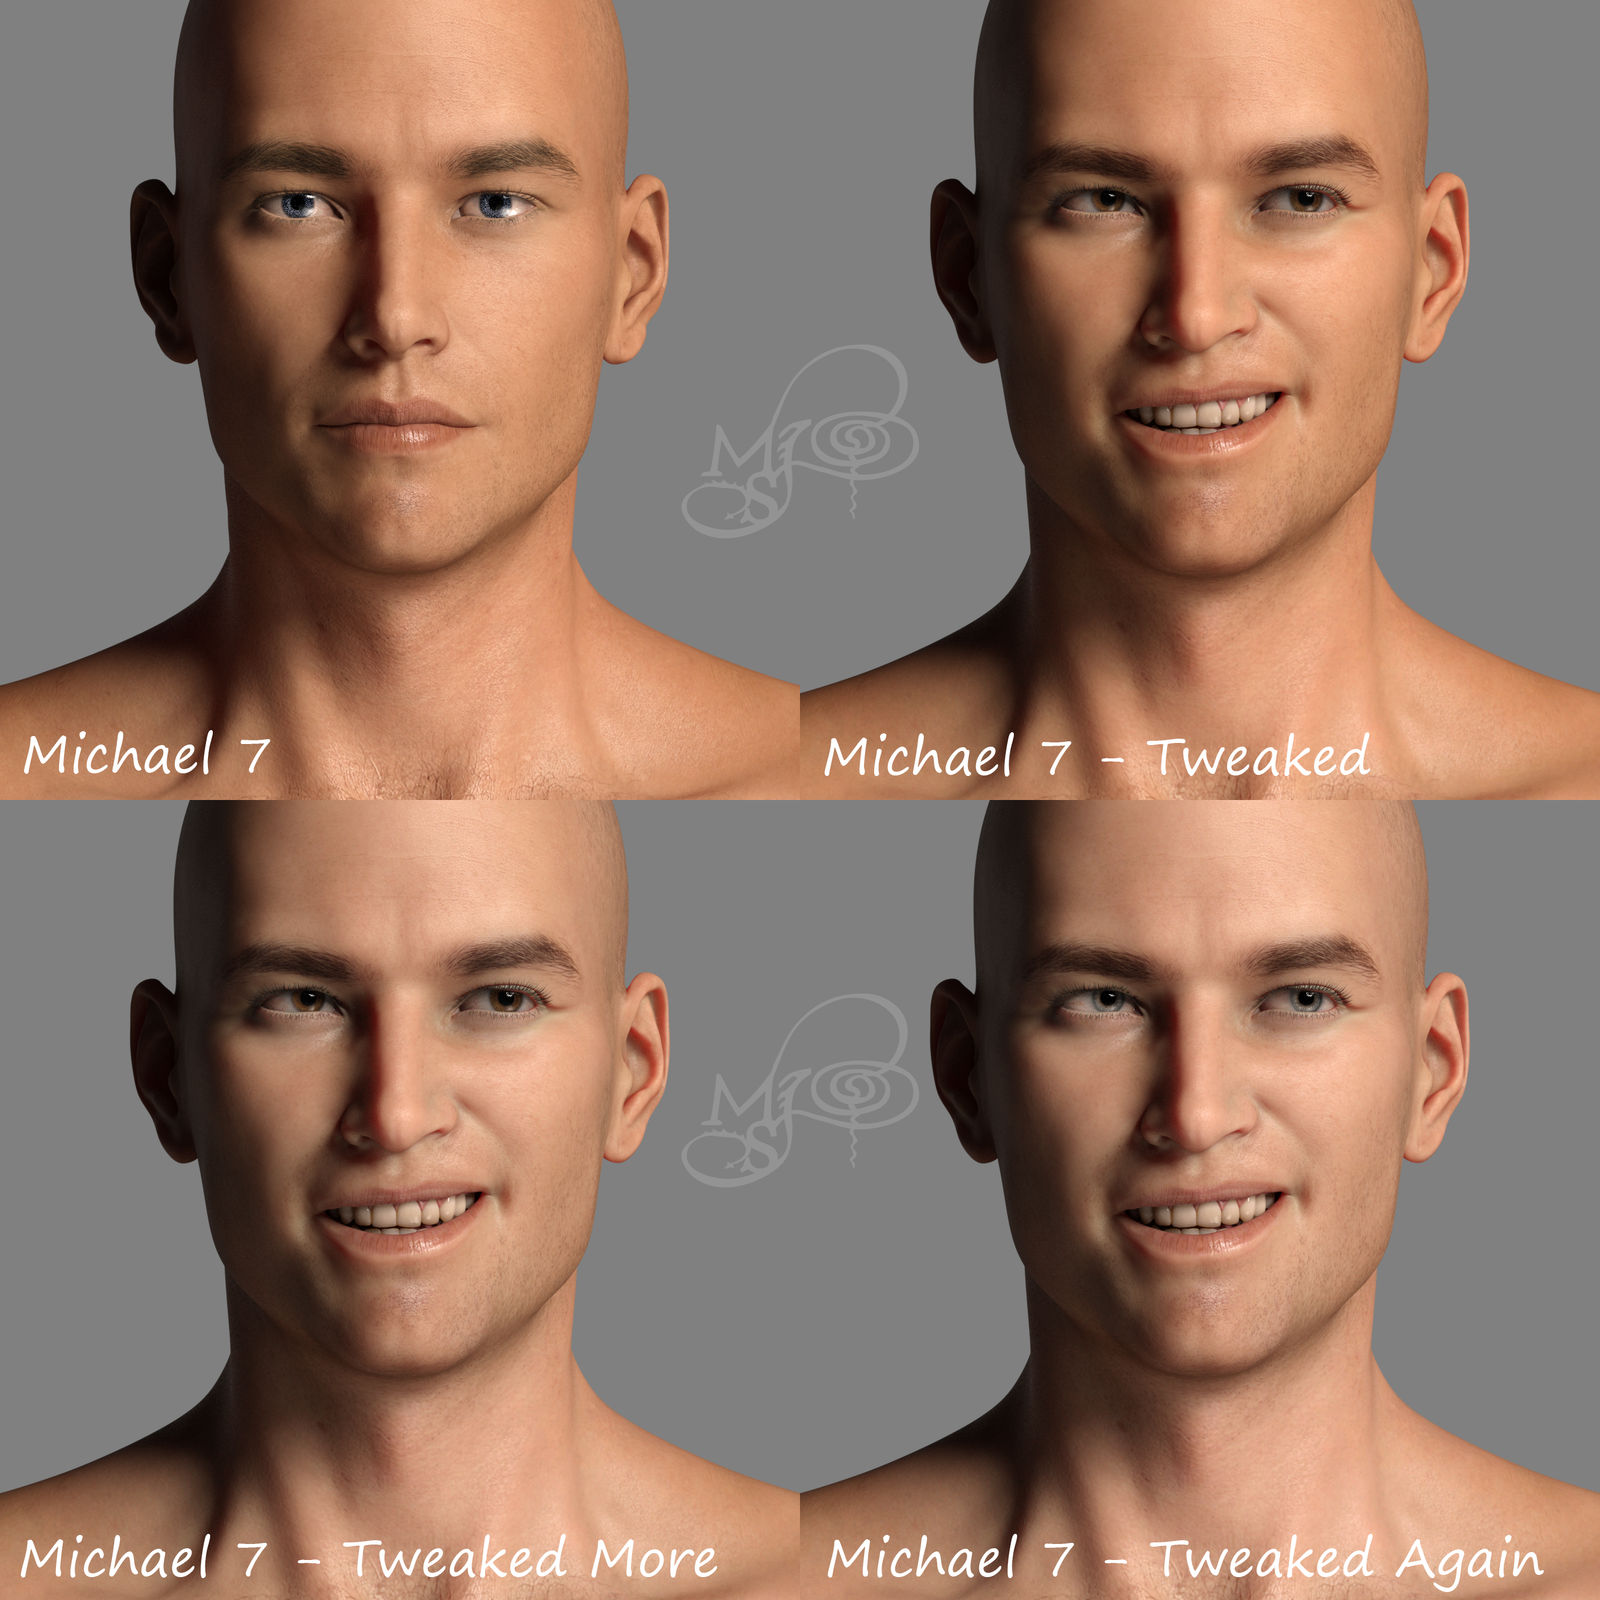
    Very cool! Your V7 example is really a spectacular improvement.

  • AllenArtAllenArt Posts: 7,140

    Thank you :)

  • takezo_3001takezo_3001 Posts: 1,914

    Nice, we definitely need more written tutorials, even though I strictly use spectral rendering by default, I still learned a lot from this tutorial and have definitely saved it for future reference!

  • GalaxyGalaxy Posts: 562

    There is a subheading spelling mistake (part 1).

    It is a helpful site. I also prefer Parmy Baddhan, WPguru youtube channels and others. Daz blogs also providing helpful information.

  • ioonrxoonioonrxoon Posts: 885

    Thanks for posting this, plenty of useful info in there and clearly explained. The chromatic/mono bit is something I knew nothing about.

    I have one question about the Millawa skin, how is the "tweaked more/again" achieved? I really like that result.

  • MelissaGTMelissaGT Posts: 2,602
    edited October 2021

    ioonrxoon said:

    I have one question about the Millawa skin, how is the "tweaked more/again" achieved? I really like that result.

    It's a combination of changing the SSS Color and/or Transmitted Color. You can also adjust the SSS Reflectance Tint. I typically find Daz Original skins to be entirely too orange, and playing with these values is exactly how to fix that. 

    Post edited by MelissaGT on
  • MelissaGTMelissaGT Posts: 2,602

    Guys, I'm not sure if Shiba would host another article of mine, but it does seem like there would be interest in more tutorials from me, such as my tweaks as applied to Spectral Rendering. I've also gotten questions about how I tweak for tattoos, even adjusting ones that come with characters (Kjaer's, etc). 

    Does anybody know of a good place I would be able to post them where they wouldn't be lost as a simple forum thread? I was thinking about making a Facebook page for just my artwork. Would that work? Patreon? Maybe even then I could post up workflow guides on my postwork process? 

  • ioonrxoonioonrxoon Posts: 885

    Thanks, I'll play around with those settings. As for a place to post, there's a tutorial section on Renderosity, you could post them there.

  • Some post tutorials over on DeviantArt. Free accounts include galleries, journals, etc.

  • MimicMollyMimicMolly Posts: 2,093

    Some post tutorials over on DeviantArt. Free accounts include galleries, journals, etc.

    I agree. Also, Tumblr is a good place to write tutorials and organize them via tagging. (Seen plenty of good illustration tutorials in both of these sites.)
  • MelissaGTMelissaGT Posts: 2,602
    edited October 2021

    MimicMolly said:

    Catherine3678ab said:

    Some post tutorials over on DeviantArt. Free accounts include galleries, journals, etc.

    I agree. Also, Tumblr is a good place to write tutorials and organize them via tagging. (Seen plenty of good illustration tutorials in both of these sites.)

    Tumblr = no traffic. The only stuff I post there that anybody ever sees and reblogs is very specific fanart, and I left the fandom communities I was part of because they were toxic as all hell. Ever since Tumblr got rid of adult content, it's been a ghost town, even if one doesn't actually post adult content. They shot themselves in the foot with that move. 

    And Tumblr, even with tagging, is a total poop show when it comes to finding anything. There are video game modding communities that post on Tumblr (rather than a good, centralized location like the Nexus), and finding anything specific that you might be looking for is nigh on impossible. 


    Post edited by MelissaGT on
  • MelissaGT said:

    Guys, I'm not sure if Shiba would host another article of mine, but it does seem like there would be interest in more tutorials from me, such as my tweaks as applied to Spectral Rendering. I've also gotten questions about how I tweak for tattoos, even adjusting ones that come with characters (Kjaer's, etc). 

    Does anybody know of a good place I would be able to post them where they wouldn't be lost as a simple forum thread? I was thinking about making a Facebook page for just my artwork. Would that work? Patreon? Maybe even then I could post up workflow guides on my postwork process? 

    I think a Facebook page would work great, I'm on there all the time personally so I'd see it real easily. 

  • MelissaGTMelissaGT Posts: 2,602

    Catherine3678ab said:

    Some post tutorials over on DeviantArt. Free accounts include galleries, journals, etc.

    I have a DeviantArt, but was looking for a second place that is more friendly to actual articles, rather than screenshots of word documents that I've seen serve as tutorials on DA. 

  • MelissaGTMelissaGT Posts: 2,602

    ioonrxoon said:

    Thanks, I'll play around with those settings. As for a place to post, there's a tutorial section on Renderosity, you could post them there.

    Renderosity is an option but if it's anything like their actual forums...no traffic.  

  • AllenArtAllenArt Posts: 7,140
    edited October 2021

    Well, if Daz had any sense, they'd set aside a section for their very talented users to write articles. Yanno, since there's no manual ;) Forum posts just don't do the job. They should have a community driven tutorial section, divided up by shaders, morphing, dforce, etc. with a filter for DS version.

    Laurie

    Post edited by AllenArt on
  • CHWTCHWT Posts: 1,127
    AllenArt said:

    Well, if Daz had any sense, they'd set aside a section for their very talented users to write articles. Yanno, since there's no manual ;) Forum posts just don't do the job. They should have a community driven tutorial section, divided up by shaders, morphing, dforce, etc. with a filter for DS version.

    Laurie

    DAZ used to have a user submitted tutorial section back in the M3 V3 era. I once submitted a tutorial and got published and I got a $25 voucher lol. Def should let more people know about Melissa's tutorial.
  • vwranglervwrangler Posts: 4,808

    MelissaGT said:

    Catherine3678ab said:

    Some post tutorials over on DeviantArt. Free accounts include galleries, journals, etc.

    I have a DeviantArt, but was looking for a second place that is more friendly to actual articles, rather than screenshots of word documents that I've seen serve as tutorials on DA. 

    You can actually put PDFs on DA, so that you could have an entire article rather than just screen shots. Most of the higher end word processors, like MS Word and Libre Office, allow you to save to PDF. It may not be as easy as a web page, but they can get decent circulation, especially if you publicize them elsewhere as well. 

  • MelissaGTMelissaGT Posts: 2,602

    vwrangler said:

    MelissaGT said:

    Catherine3678ab said:

    Some post tutorials over on DeviantArt. Free accounts include galleries, journals, etc.

    I have a DeviantArt, but was looking for a second place that is more friendly to actual articles, rather than screenshots of word documents that I've seen serve as tutorials on DA. 

    You can actually put PDFs on DA, so that you could have an entire article rather than just screen shots. Most of the higher end word processors, like MS Word and Libre Office, allow you to save to PDF. It may not be as easy as a web page, but they can get decent circulation, especially if you publicize them elsewhere as well. 

    Except for the fact that MS Word is $10/mo that I won't spend. I suppose I could send it to my work email and then save it to .pdf on my work computer and then send it back but that would be a giant pain in the butt and I don't know if I'd get in trouble. I wrote the first article using OpenOffice.  

  • MelissaGT said:

    vwrangler said:

    MelissaGT said:

    Catherine3678ab said:

    Some post tutorials over on DeviantArt. Free accounts include galleries, journals, etc.

    I have a DeviantArt, but was looking for a second place that is more friendly to actual articles, rather than screenshots of word documents that I've seen serve as tutorials on DA. 

    You can actually put PDFs on DA, so that you could have an entire article rather than just screen shots. Most of the higher end word processors, like MS Word and Libre Office, allow you to save to PDF. It may not be as easy as a web page, but they can get decent circulation, especially if you publicize them elsewhere as well. 

    Except for the fact that MS Word is $10/mo that I won't spend. I suppose I could send it to my work email and then save it to .pdf on my work computer and then send it back but that would be a giant pain in the butt and I don't know if I'd get in trouble. I wrote the first article using OpenOffice.  

    LibreOffice has save to PDF, I'm pretty sure OpenOffice does too (they are the same code-base, largely).

  • AllenArtAllenArt Posts: 7,140

    MelissaGT said:

    vwrangler said:

    MelissaGT said:

    Catherine3678ab said:

    Some post tutorials over on DeviantArt. Free accounts include galleries, journals, etc.

    I have a DeviantArt, but was looking for a second place that is more friendly to actual articles, rather than screenshots of word documents that I've seen serve as tutorials on DA. 

    You can actually put PDFs on DA, so that you could have an entire article rather than just screen shots. Most of the higher end word processors, like MS Word and Libre Office, allow you to save to PDF. It may not be as easy as a web page, but they can get decent circulation, especially if you publicize them elsewhere as well. 

    Except for the fact that MS Word is $10/mo that I won't spend. I suppose I could send it to my work email and then save it to .pdf on my work computer and then send it back but that would be a giant pain in the butt and I don't know if I'd get in trouble. I wrote the first article using OpenOffice.  

    I believe OpenOffice will allow you to save to .pdf. If you can't save to .pdf, see if you can print to .pdf :) 

  • vwranglervwrangler Posts: 4,808

    How to make a PDF in OpenOffice

    I hope this is helpful.

  • TugpsxTugpsx Posts: 732

    @MelissaGT Thanks for the update. These steps helped to refine a shader you helped me with some time ago. Again thanks for sharing your process.

  • HylasHylas Posts: 4,744
    edited October 2021

    My first misadventure with MelissaGT's tutorial.

    I'm tackling Drako's skin. I'm not afraid to tweak skin settings and experiment but so far I never quite manage to get Drako right.

    I find his complexion always a little too dark and would like to lighten it without lowering translucency even further (it's 0.5 by default.)

    Besides, it's by no means a bad skin but I think it could be even better.


    This is Anagenessis 2, which sometimes does wonders, especially for G3 skins.

    Drako came out a little corpsy so I added a little peach to the diffuse channel. It's not too bad but still could be better.

    So, following MelissanteGT's instructions...


    yikes yikes yikes yikes yikes yikes yikes yikes yikes yikes yikes yikes yikes yikes

    LOL!

    (I mean no disrespect! Of course I understand that every skin is different and there's no one-size-fits-all solutions.)


    In any case, experimenting a little more I found that the new SSS maps were too dark, so I made them 30% lighter in Photoshop.

    Here I'm using the skin presets of Bernat by Sithlordsims but with Drako's maps, including the newly generated SSS maps.

    I like the skin tone... but it's still not really it, is it?


    Lastly (for now) the skin presets of Vernon by Mousso. Might be the best one so far, not entirely sure.

    I find him too yellow now, and that's after I already dialled out some yellow.

    (Looking back, the original setting maybe wasn't so bad after all... LOL)

    drakoB 01 box.png
    500 x 625 - 409K
    drakoB 03 anagenessis2 adj.png
    500 x 625 - 453K
    drakoB 04 chrom box.png
    500 x 625 - 422K
    drakoB 05 bernat.png
    500 x 625 - 432K
    drakoB 06 vernon.png
    500 x 625 - 432K
    Post edited by Hylas on
  • MelissaGTMelissaGT Posts: 2,602
    edited October 2021

    Hylas said:

    My first misadventure with MelissaGT's tutorial.

    I'm tackling Drako's skin. I'm not afraid to tweak skin settings and experiment but so far I never quite manage to get Drako right.

    I find his complexion always a little too dark and would like to lighten it without lowering translucency even further (it's 0.5 by default.)

    Besides, it's by no means a bad skin but I think it could be even better.


    This is Anagenessis 2, which sometimes does wonders, especially for G3 skins.

    Drako came out a little corpsy so I added a little peach to the diffuse channel. It's not too bad but still could be better.

    So, following MelissanteGT's instructions...


    yikes yikes yikes yikes yikes yikes yikes yikes yikes yikes yikes yikes yikes yikes

    LOL!

    (I mean no disrespect! Of course I understand that every skin is different and there's no one-size-fits-all solutions.)


    In any case, experimenting a little more I found that the new SSS maps were too dark, so I made them 30% lighter in Photoshop.

    Here I'm using the skin presets of Bernat by Sithlordsims but with Drako's maps, including the newly generated SSS maps.

    I like the skin tone... but it's still not really it, is it?


    Lastly (for now) the skin presets of Vernon by Mousso. Might be the best one so far, not entirely sure.

    I find him too yellow now, and that's after I already dialled out some yellow.

    (Looking back, the original setting maybe wasn't so bad after all... LOL)

    If he turned out red like that with my steps, you absolutely did something wrong along the way. Did you create a SSS map for him? G3 characters use different SSS and you have to convert the mono SSS to chromatic. It looks like you might have forgotten to change the SSS to chromatic and then set the transluceny very high on a (still) monochromatic skin. I don't have the character, so I can't show you what he looks like if I do it. 

    If he was only a couple bucks I'd buy him to show you, but I'm not spending $10 on a character I'll never use. I do have Michael 7, who is of similar toning...I can do that one and post here the results. 

    Here are the steps for G3 when I converted Victoria 7 - 

    1. Open up a figure of your choice (I’m using Victoria 7 for my example) in Daz Studio.
    2. Open up the Surfaces tab.
    3. Starting with the Face, open up the translucency map in Photoshop (or photo editing program of your choice that supports layers). In the case of Vicky 7, this map is here on my system – DAZ 3D\My 3D Library\Runtime\Textures\DAZ\Characters\Genesis3\Victoria7\V7FaceMapSSS_1001.jpg. There are other SSS maps for Vicky 7 that are dependent upon any makeup you choose, but for our purposes, we’re only concerned with the base skin that loads with the character. You can always convert the makeup skins if you’d like later (I usually just use third-party makeup anyways).
    4. Once you have the Face SSS map open in Photoshop (it should be greyscale with blue squigglies), take a look at the vein detail. It’s great! I really wish Daz kept these details on their newer figures but c’est la vie. Now open up the base color map, in this case V7FaceMapD_1001.jpg. We’re going to need both to create a proper Chromatic SSS map.
    5. Next take the SSS map and copy/paste it onto a new layer over the base color map. You should now have two layers…one with the SSS map, and one with the base color map. The SSS map should be on top, currently blocking the color map from showing.
    6. Change the opacity of the SSS map to 25%.
    7. Now create a new solid color adjustment layer and pick a nice fleshy pink tone (205,165,165).
    8. Change the opacity of the solid color adjustment layer to 20%. The pink layer will bring back some nice color to the map we’re building.
    9. Go ahead and save this working file as a .psd if you want to come back to it later and play around (I would highly advise playing around…that’s how I learned!). Flatten the image or stamp visible if that’s you’re thing and save this new SSS map as a .jpg (the highest quality setting). You can save it in Vicky 7’s folder, or anywhere you’d like to save it if you want to set aside a special folder for your custom maps. I’ve saved mine as V7FaceMpaD_1001 – CUSTOM SSS.jpg.
    10. Back in Daz, change the Translucency Color map to the one you just created. You do this by clicking on the map in the Surfaces tap and then going to Browse when the menu pops up.
    11. Change the Translucency Color to white (you can absolutely play with this if you’re going for fantasy skin colors)
    12. Change the Translucency Weight to .85 (you might need to play with this depending on the character).
    13. Change the Base Color Effect to Scatter & Transmit Intensity (Vicky 7 is already set up that way, but if the character you’re working on doesn’t have it, go ahead and change it).
    14. Change the SSS Reflectance Tint to 0.56, 0.98, 1.00. (you might need to play with this depending on the character, I usually start with 0.79, 1.00, 1.00 and adjust from there).
    15. Scroll down on the Surfaces pane.
    16. Change the SSS Mode to Chromatic.
    17. Change the Transmitted Measurement Distance to .15 (you might need to play with this depending on the character).
    18. Change the Transmitted Color to 0.95, 0.20, 0.10 (you can definitely play with this depending on the character and skin tone you’re going for…unlike with Monochromatic SSS, this is where you can go to fine tune the ultimate lightness/darkness and tone…to an extent).
    19. Change the Scattering Measurement Distance to .015 (you can play with this setting too).
    20. Change the SSS Color to 0.95, 0.45, 0.55 (you can play with this setting too…in fact, you will have to depending on the character and look you’re going for).
    21. Change the SSS Direction to -.15 (I typically don’t mess with this and leave it set to 0, but using small negative values, such as -.1 to -.25, can be helpful if there is too much scattering effect…this can vary greatly on lighting).
    22. Repeat these steps for the Lips and Ears (I often do them at the same time as the Face since they use the same maps).
    23. Repeat these steps for the rest of the skin surfaces…Arms, Body, Legs, Fingernails, Toenails, EyeSocket, etc. All of these maps are located in the same folder where we found the Face map (in example, the body would be V7TorsoMapD_1002.jpg for Victoria 7).
    Post edited by MelissaGT on
  • HylasHylas Posts: 4,744
    edited October 2021

    Double checked my steps, I did make one mistake: I had set Scattering Measurement Distance to 0.15 instead of 0.015

    Here's the result as intended:


    Here's the original once more for comparison:

    It really is an improvement! laugh

    drakoB 08.png
    500 x 625 - 431K
    Post edited by Hylas on
  • MelissaGTMelissaGT Posts: 2,602
    edited October 2021

    Hylas said:

    Double checked my steps, I did make one mistake: I had set Scattering Measurement Distance to 0.15 instead of 0.015

    Here's the result as intended:


    Here's the original once more for comparison:

    It really is an improvement! laugh

    Try changing the following to lighten the skin, if your intention is to lighten it - 

    Transmitted Color - .95, .20, .10
    SSS Color - .95, .20, .10

    Here are my Michael 7 tweaks. Could totally have kept playing with it. Once you have the skin moved over to chromatic SSS, just keep playing with the SSS Reflectance Tint, Transmitted Color, and SSS Color and you can get pretty much any look you want (within reason, of course). 


    Post edited by MelissaGT on
Sign In or Register to comment.