Blender Topology Mask
 marble
Posts: 7,500
marble
Posts: 7,500
I'm using Blender when I want to fix/morph clothing. There has been one thing that has long frustrated me and that is how to deal with parts of clothing that are all part of the same mesh but are separated - like the two sides of an open Dressing Gown. The frustration came because I use Sculpt mode in Blender and if I grab part of the cloth on one side of the separation, the other side moves with it. Well, maybe now there's a solution.
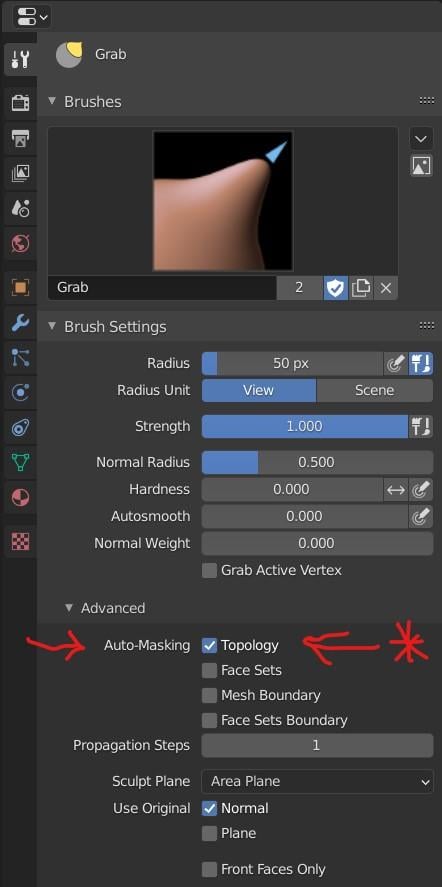
I know that ZBrush has a brush called Move Topological which is exactly what is needed for this task but, as far as I know, Blender doesn't. However, I've just discovered a feature that I had no idea was there and it seems to do what I need. It is a Check Box in the Tool settings for the sculpt brush (the Grab brush in this case). See screen shot.
Daz 3D is part of 
Connect
DAZ Productions, Inc.
7533 S Center View Ct #4664
West Jordan, UT 84084
Licensing Agreement | Terms of Service | Privacy Policy | EULA
© 2026 Daz Productions Inc. All Rights Reserved.
Comments
Do you have to paint the part you want to mask? How does it work?
You can also use, in edit mode, proportional editing and select 'connected-only'. That might work for one side of a shirt that is not connected. Just another tool for your toolbox.
By the way, I am aware that an alternative way to deal with separated mesh editing is to use Edit mode > Proportional Edit > Connected Mode. I just prefer the sculpting brushes to Edit mode but I get that modellers probably prefer the Edit tools.
Looks like you posted at the same time as my second post about Proportional Edit. :)
As for the sculpt brush - no, it seems that the mask is automatic (and not displayed). I'm guessing that it works in a similay way to Connected Mode in Proportional Edit.
Hey marble, great find.
I remember watching development threads regarding this, but I was unaware that it was implemented already -- There were comparisons to Zbrush...
Which version is that? The latest LTS 2.83, 2.90, or perhaps one of the 2.91_beta or 2.92_alpha?
Regarding Blender not already having this ability, though -- It already could do this, and I outlined the technique a couple of years back.
It was by way of hiding parts of mesh in Edit Mode that you did not want affected in Sculpt Mode (either using selection sets/vertex groups or just by raw selecting/hiding) -- Then you switch to Sculpt Mode where entire mesh is visible, but tools will only work on the parts not hidden in Edit Mode.
It has always been a big part of my non-destructive morphing edits utilizing shape keys.
I have been waiting for this, because this will nullify having to do my Edit Mode hide technique. Thank you, for bringing it to our attention.
While I am here -- I have been growing the morphing bridge addon even bigger, and I have the direct to Sculpt Mode import (that you requested) alongside the direct to Edit Mode import for both a non-destructive (shape keys/ safe modifiers) and a destructive (no shape keys/ safe modifiers) starting workflow.
Right now, I have eight non-destructive sculpt brushes to pick from as a starter, and am working on adding all non-destructive brushes to the sculpt edit panel (T-tools can be closed).
Two questions for you -- 1. are there any non-destuctive sculpt brushes you would like specifically in the panel (just in case I miss one), and 2. Do you think I should put the selected brush tool settings (as shown in your Grab Brush image) directly in the sculpt edit panel for quicker access?
I know some users like to just use hotkeys, or even pie-menu for this, but I still have to navigate all the way to the other side of Blender to make my adjustments, so I thought I might add them to the panel -- Maybe as an elective drop-down section as to not get in the way of those who don't need it.
Firstly, I'm using Blender 2.90.0 if that helps.
Secondly - that method of hiding in Edit mode and then switching to sculpt is very clever. I would never have thought of that. I have been trying to mask in Sculpt mode but it isn't vertex exact and there's some blend across boundaries. This new feature of auto-masking is a godsend.
Can hardly wait for your Morphing Bridge. It will be so helpful to move away from that tedious routine of switching to base resolution, hiding, etc. As for brushes - I'm afraid I can't be of much help because I basically use only two: the Grab and the Draw. I know - I really should learn the merits of all the brushes but I only use it for morphing clothing. One of these days I'm going to take on something more adventurous ... really. :)
Anyhow, quicker access is the goal, Ken, so I'm for anything that makes the job easier. I don't use the Pie selector much. I know a few keyboard shortcuts but often find myself clicking the mouse on some slider or panel. I find the hardest thing about getting to know Blender is actually not knowing that something is there in the first place. I mean - not knowing what to look for. This Automatic Topology Mask is a case in point. I knew that ZBrush had a specific Brush but I couldn't see it in Blender. Who would have guessed that it would be hidden as a check box under an Advanced Menu?