Daz 3D is part of 
Connect
DAZ Productions, Inc.
7533 S Center View Ct #4664
West Jordan, UT 84084
Licensing Agreement | Terms of Service | Privacy Policy | EULA
© 2026 Daz Productions Inc. All Rights Reserved.
Comments
@davidtriune

Playing around with emily 1 some years ago in iray - was a real eye opener for me too..
And made me stop trying to get photorealistic renders with DAZ characters..... Having the right microdetails in 8k does the trick...
I still hope that DAZ3 sooner or later will (have to) come up with high resolution Characters -> Because the whole charater market will change over the next 2 years (starting with the RTX GPU's NOW)... Developers will start to look around for high resolution - rigged models more and more...
In Game Enginges AAA Characters are real scanned Actors now.. 300k mesh and 8K Maps are needed for Cinematic Renders - Which can now be done by Hobbists too ! Hardware dropped massiv in prices.. Ray Tracing is done now real time.. and so on.... i really hope DAZ dosent overlseep this Trend :-)
I still like DAZ3D BUT
I'm 99% sure it has more to do with extreme transparency and SSS settings vice anything else... at least in my experience.
The problem is there is no particular 'setting' or anything per se... its just a combination of tons of things... some small, some large. I promise I will try to document the things I look for and adjust...basically my lessons-learned. Will try to get to it tonight.
It would really help because I do crave to make interesting realistic stuff when I'm not trying to make fun unrealistic stories haha :)
Where do you get your skin resources as well?
Looking forward to this as well :)
I read a few things from Jeff earlier (over and over, and had others try to read it) but I ended up just not being able to replicate the results.
There were a lot of missing variables on my end. Even a screenshot of his render settings would help a lot!
Jeff has already been very forthcoming with sharing his process even though he's not obligated to do so. From my perspective most of what makes his renders unique is the work he puts into his skin material/texture and also the "lofi" render settings with the jpeg compression.
Could you be a bit more descriptive for those of us who have never done this before?
I see what you're saying - but I don't have a mechanical/functional reference to replicate.
Meaning that you're telling me about baking a cake by mentioning the use of softer flours - yet I don't understand that I need a sifter and food processor as step 11 of the process.
I hope my analogy makes sense. I need concrete instructions since I am not as technical as you all yet.
It's this 'lofi render settings' - or any render settings at all that I do not understand. And most of the details are scattered across a few pages.
I have been looking for 4k skins, and came across 'perfeclty imperfect skin' which I think I will try for the next realistic render but I of course don't think it'll work to make mine like Jeff's...hence my desire for help.
If Jeff is nice enough to toss me some info that would be great and I'd be happy!
Hello all,
I have read the whole thread because I am also very interested in photorealism. Nobody has mentioned the NGS shaders, which I still find excellent to bust up the reality of human skin. Here is Gia6 in a quick render with NGS 2. Opinions?
Pictures 2 and 3 are just simple renders I made with a character from rendo (Allegra from Tempesta3D), which has those imperfection in skin that Jeff is pushing, and he is right in my opinion.
Difference between Picture 2 and Picture 3 is that in the last I have used David setup. Opinions?
Thanks.
Davide
This tutorial has been very enlightening to me :
https://thinkdrawart.com/daz-studio-iray-skin-tutorial
Latest render and some info below in random order:
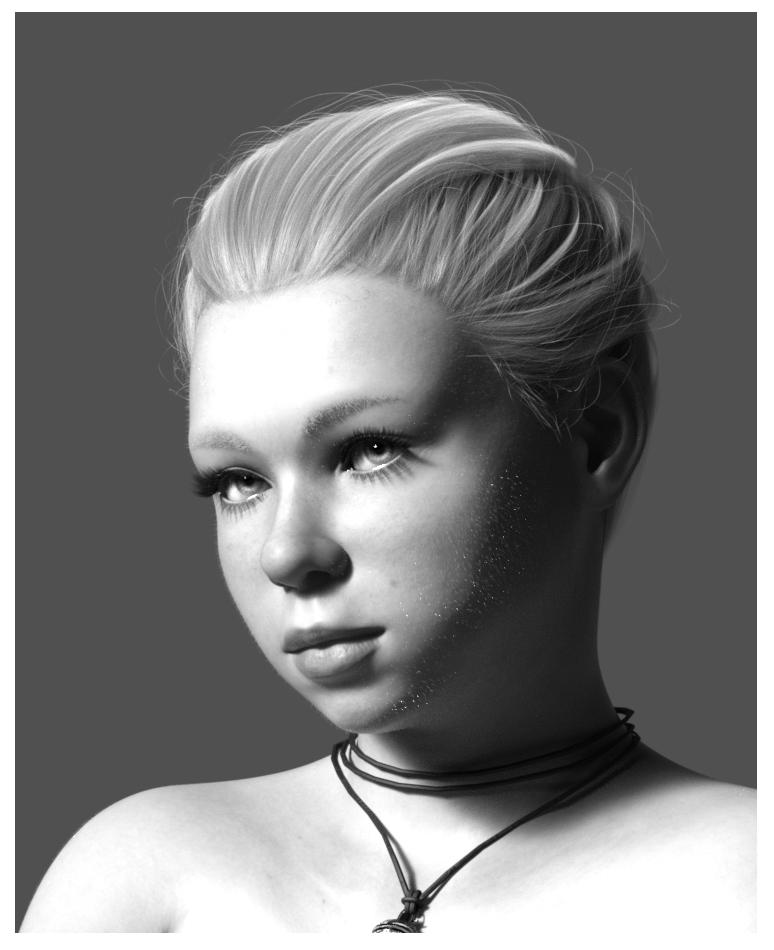
Model: all of the base Daz models are proportioned ideally and therefore pretty unrealistic when compared to someone you see on the street (unless you happen to live next to Giselle Bunchen or something). So, if you're going for photorealism, before you worry about textures or render setting, make sure you've adjusted the base models to a more realistic form. Recommed to start with the characters from Bluejaunte as they're pretty realistic. Also, for kicks I always make the legs shorter to reduce the 'fashion model' look of the default models. Also, if you want to take it to the next level, I highly recommend using several of the awesome products in the store from D. Master and others. Such as the AutoFace enhancer series -- they are awesome.
Textures: There's too much here to go into all the details but in short you will need to add significant color variation to the skin (including subtle green, blue, yellow tints) to mimic the perceivable colors given off by viens, arteries, and just general discoloration common on real human skin. Fire up Photoshop and keep tweaking until the renders start to look more and more realistic to your eye. No short cut around this really. A few things though: by far the biggest give away of a fake image is the eyes. Daz's G8 eye geometric is OK, but not at the level needed to make convincingly real eyes either from afar or close up. As such I spend a lot of time mucking with eye textures to soften and hide the geometry shortcomings. e.g., using blurred eyeliner around the eyes will stop the aburpt/crisp edges of the eyes normally produced by the low-res eye geometry. For the body, you'll want to add blemishes, pimples, bumps, etc to further the realism.
Lighting: super important piece. It is very hard to achieve totally realistic renders with a complex light set up. This because the more lights, the more shadows, etc then the more obvious the image is fake because for the most part, in typical real world photos, there's not a lot of harsh shadows or such. Hard to describe, but I've only had luck using a single spot light positioned slightly behind and lower than the camera and whose focal point is directly on the character. It is cheating, but it works best.
Surface/shader settings: Too much to go into in detail, but needless to say you'll need to be using Iray, and should employ virtually all of the available map slots (diffuse, translucemt, sub surface, bump, displacement, etc). For any noticeable subsurface effect, you will need to set the Translucency Weight to 80 or 90, then set the Transmitted Measurement Distance to 1, scatter to chromatic and distance to 0.03 and SSS direction to -.65. Turn thin Walled off.
Render Settings: No magic here really but I do use: Faithful Spectral Rendering, Pixel Filter Radius at 1.0, and in Tone Mapping I put Gamma at 3.0-4.0 and then turn down burn highlights and crush black to something low like 0.15. You'll need to crank up the Saturation to 1.3 or so due to the previous settings.
Hair: super important, but if you're testing yourself, don't even worry about hair for starters... see if you can get the rest looking realistic, then worry about hair.
Environment: for me, the more clutter, the more real...
Posing: much like the models themselves, most Daz products are aimed at exaggerated styles such as high-fashion, or emotional poses, or whatever. Nothing wrong with that as that's what a lot of people like, but virtually none of them result in a pose that you'll see anyone striking in your daily life. In fact, people don't "pose" at all in average daily life... point is, work hard to create your own or modify other poses to make them far more relaxed, boring, and subtle. Use reference photos of people in real life.
Camera: be sure to add some rotational irregularities in your camera to make it mimic the skewing/tiling etc that typically happens when a non professional photographer uses a camera to take a picture.
Anyhow, hope it helps a little. See below for some new renders that leverage these techniques:
I second the "make shorter legs" part.;)
Thanks. Good write up.
Thanks Jeff!
We will make good use of this. I'm trying it out right now.
The community does need more tutorials for renders like yours. Software is powerful but it's about how to use it.
We appreciate your help and contribution! Trying to render Sina now.
Might make a new skin with the skin builder, but photoshopping some might be above what I can do this morning.
I will do something with some of my custom characters some time later but this is a fine start - Hurray for Jeff!!
Hey Jeff,
Wow thank you as usual for the info! I have a couple of questions: What do you set Rendering quality to and Rendering Converge Ratio?
I tried your settings for skin surface and they really work great! Here is what I have been using for Transmitted color and SSS colors:
Transmitted color: 0.95 0.20 0.10
SSS color: 0.95 0.45 0.55
What colors do you use and do you use maps for these slots?
Do you use Dual Lobe specularity?
Love the pics!
whatever this florentmoon person was doing with g2m back in 2016 also looked good.
https://www.deviantart.com/florentmoon/art/Iray-Human-SETTINGS-FREEBIE-By-Florentmoon-604255053
Thanks.. Quality = 1, Convergance = 95% - tho honestly I've never even looked at those settings. I never let my renders full converge as I like a little grain in them. For Transmitted color = 95, 54, 44. For SSS = 95, 45, 55. SSS Reflectance Tint = 76, 100, 92. And yes, I use Dual Lobe -- works especially well for adding greasy hilites to the face.
Wow, thanks again Jeff! That solved some issues! Do use the Scatter Transmit or Scatter and Transmit Intensity for the Base Color Effect?
@jeff_someone: Is there a particular PA's characer that will work well with your recommended setting out of the box? I applied these shader/surface settings to one of my Sangriart's characters, well, she turned into a Oompa-Loompa.
Or, is this kind of rendering too advanced for people lacking the necessary skills? Seems those who are capable of pulling off photorealism all have Photoshop/Gimp skills or use very customized skin/shader sets.
Scatter and Transmit...
I would start with one of Bluejaunte's characters... but any PA character will require some serious modification. You definitely don't need a lot of photoshop experience for this... its more about lighting, posting, etc... just takes time... a lot of time...
Thanks Jeff
This picture of Babina IMHO is incredible. No nudity here, but this guy has some, but you should see his porfolio. Please tell me you are also here.
https://www.deviantart.com/flagg3d/art/Okay-828951791
Edit: Actually there is a micro butt, so some nudity.
That's very well done. I wonder what makes it look so real?
I know a lot of people seem to be focussing on skin and faces but how do you get the chest of a lady to look real under say a shirt so it drapes off her chest rather than stick to the shape of it please?
No Postwork except cropping and framing.
Yes, I know: Fireflys on the peach fuzz. 90min render time, 60 of it to soften peach fuzz reflections.
Nice work everyone and thanks Jeff for your settings.
I've been trying out Blender. I like it more than Iray now. It has some key features that are better for rendering humans. Namely the special SSS methods (Christensen Burley, Random Walk) that look WAY better than Iray SSS. We talked aobut it in this thread https://www.daz3d.com/forums/discussion/389931/true-iray-skins-for-blender-are-on-the-way/p1
Blender also has better tone mapping. It uses the ACES tone mapping instead of the old style tone mapping used by Iray. The tone mapper in Iray was originally used for CRT monitors, so it only can look good on CRT monitors. To use ACES you have to turn off tone mapping and export your Beauty canvas to a separate program (like Natron) and tone map there. I used it in the image below.
Anyway, here is a realistic hair set up that I've been liking recently
mega updo hair bangs https://www.daz3d.com/mega-updo-hair-for-genesis-3-and-8-females
alva hair shaders https://www.daz3d.com/alva-hair-for-genesis-8-females
french twist ponytail cutout map and displacement map (set to 0.5) https://www.daz3d.com/french-twist-ponytail-for-genesis-3-and-8-females
Also, I said some things in this thread that I no longer do, like turning off firefly filter. I think that filter is pretty necessary. I'm still learning like you guys.
I forgot to mention that you need to set hair subd to 3 or some fly hairs wont show up.
Also, for blender, there is a possibly an even better hair shader for free (https://www.youtube.com/watch?v=BeqGVBfAhso)
edit: ok, the default principled hair shader that came with blender 2.8 is even better, lol
Hi David - I'm no longer sure Blender actually uses ACES. Filmic blender seems to be more about getting good highlight rolloff. But when I apply ACES to a render I've run through the Filmic OCIO, the color still changes.
Honestly, however, I'm a novice when it comes to the color-grading.
Yea i should correct myself. It's not EXACTLY aces, but it's based off of ACES (from different sources like https://www.youtube.com/watch?v=m9AT7H4GGrA) just with added contrast I think. It has a bunch of contrast options, but it doesn't let you remove the contrast. I'm guessing if they had a "no added contrast" option, it would look exactly like aces. But I'm also a novice here..