December 2019 New User 3D Art Challenge - Free Render Month: Wrap it up!
 L'Adair
Posts: 9,479
L'Adair
Posts: 9,479
New User's Challenge - December 2019
Sponsored by DAZ 3D
Are you new to the 3D World? Are you at the beginning stages of learning 3D rendering? Have you been around for a little bit but feel you could benefit from some feedback or instruction? Have you been around awhile and would like to help other members start their creative journey? Well then come and join the fun as we host our newest render challenge!
Wrap it up!

This contest is a general render challenge, an opportunity to use the things you've learned over the past year and show off those newly acquired mad skills.
I will be checking in, as will the rest of the Community Volunteers, to try and help with anything you all may need.
You may want to have a look into the challenges of this year covering different topics from composition in January, Light in February, to materials in November. There are lots of valuable tools, tips and tutorials hidden inside that will help you to "wrap it up" nicely.
Throughout the year we covered the following topics:
You can also find all the challenges for 2018 and earlier in the New User Contests and Events forums.
For a list of the current contest rules, please see this thread : Challenge Rules
Closing Date: December 31th 2019
Daz 3D is part of 
Connect
DAZ Productions, Inc.
7533 S Center View Ct #4664
West Jordan, UT 84084
Licensing Agreement | Terms of Service | Privacy Policy | EULA
© 2026 Daz Productions Inc. All Rights Reserved.
Comments
Since nearly one year I did nothing with DAZ...I started again a few days ago and I don't know if this scene would fit in the contest, but I give her a try.
Here's my start for the month.
I did some retexuring of some of the surfaces of the set, and tried to make use of DoF so that the character entering the arena was in focus, but what he's facing not only is mostly out of frame, but out of focus as well to add to the since of scale between the two.
@daybird, it's a "free" month, so pretty much anything goes—within the TOS, of course.
Without even trying hard, I see: Composition, Lighting, Posing, Scenes and Landscapes, Focus/DOF and Atmosphere. Whether or not the pose is one of your own, I love this image!


@daybird Nice start, I sure don't want to be there myself thou.
@daybird Nice start, I sure don't want to be there myself thou.
Version B of my render here. Did some more texture work, and added a lighting bolt near the creature to illuminate it a bit.
edit- forgot to mention that I tweeked the hero's head and neck so he'd be looking more in the direction of the creature.
@Shinji Ikari 9th Hi shinji, nice to read a familiar name here in the thread. :)
One question about your scene. First I thought, the curved lines on the left side and behind him are dunes, but with a closer look it seems, that should be some sort of fog? It looks a little strange, like the surface hshader do not work correctly.
What you were thinking was fog, was probably the mountains from the set I'm using. Battle Arena by Flipmode. I did use a ground fog prop as well, and did some tweeking on the settings to thin it more then the settings that came with it, that however is closer to the arena floor.
Speaking of my render, here's version c, adding some more lightning in the background (one of the bolts is so turned down it's almost not there I had to look closely to try and spot it.) and used geoshells to add some moistier to the arena floor.
I realised I'm a year (last week, damn you Black Friday sales *shakes fist*) since I fell into this little Daz obsession. And my battle with light continues... ;-)
Here is my go at this wrap up. There were quite a few elements in the scene and different lighting sources, so this was rendered with my CPU as it was way over the VRAM on my GPU (GTX 1060).
Tara and Tango Chilling
Note, the dog surfing image is under the CC0 license. The information is:
https://pixabay.com/photos/dog-surfing-water-wave-summer-2289451/, pixabay image, surfing dog, image by Andry Richardson
Free for commercial use
No attribution required
@Sisyphus1977, nice start. The only thing I'd advise is to try and get some extra light on you characters to make them a little easier to see.
I'd have to say you won this battle, Kaye Kaye. I really like the lighting here.
The image is too dark to make out all the elements, so I tinkered with it in Photoshop, just to see who/what was on the sofa, and to see what things I could recommend to help get the size down for a faster render. Here's my "too much light" result:
Tinker with these suggestions and see if this helps achieve the look you want while lowering the memory.
I definitely like where this is going. A tiger on the sofa? Me-Ow!

Hello,
so, here is the first version of my entry for December. Critique is always welcome :)
I call this scene "YOU are the hero".
Best regards
Nice start, I'm feeling the PoV here. The only thing that I might suggest is that you try to have some movement of the lady's hair.
Thanks for the tips regarding optimatization, however for this scene I had already applied them. On the girl and tiger, any bones that were not visable in the shot have been hidden. I also ran Scene Optimizer and the majority of the texture, bump or normal maps have been reduced to 512x512 or 1024x1024. The tiger has the highest map at 6000x6000. This scene is slightly over 3GB is size, but does not fit on my GPU (6GB, slightly under 5GB usable after Win10 allocates). I have found this to be an issue with DS 4.12 (both 86 Pro Version and 1.40 Beta Version). I have checked the forums and done the various roll back and upgrade dances with the Nivida drivers, which does not fix the issue. I have been chasing this since moving from DS 4.11, but as of now have not been able to sort out the fix. If I have a scene that is around 1GB in size the GPU will render, any larger and it goes to CPU, so for now I just know this scene will be a CPU render.
The good news is when I did this scene, I rendered out EXR canvases since I had some many different light sources. So in post, I am able to adjust the opacity of the various layers to change the lighting. Here is a slightly "lighter" version just by adjusting the exposure and opacity levels. I have another version rendering now and will see how it turns out in the morning.
@Sisyphus1977, Darn. I like 4.12 up to a point, but yeah, the larger memory requirement is annoying. I use the 4.12 beta with the 4.11 release still installed. I like having the option of using the older version. And when the render always drops to CPU, it nice to be able to switch and render from 4.11 on the GPU. I'm annoyed that all that optimization wasn't sufficient to allow GPU rendering. That's a lot of work. (But I suppose it also speeds up CPU rendering. Still annoyed though.)
I really do like the image a bit lighter. I think the overall lighting is just right in you postworked version.
I hope you noticed the tree on the left, before starting the next render. As I mentioned above, the trunk of the tree is cut off by the plane of the your background.
I can hardly wait to see the next render!
Lets see, lighting, dof mostly some slight material changes. Posing on her and on the little dragon on the ground.
Playing with Dragons
@L'Adair I did remove the tree from this version and placed a smaller plant. Although, the tree was placed as if it was on the other side of the wall, but I guess that perspective did not show up correctly. So after a 10 hour render, here is my next version of "Tara and Tango Chilling".
I added a slight DOF to the shot, keeping most everything in focus except the exterior and part of the window to the scene right. I changed the diffuse color for the tiger's skin as it was too washed out from the default by picking a gradient from an actual picture of a tiger and applying a gradient map to the diffuse color texture map and loading it in. I think that looks better than the prior version. The outside pool, landscape walls, pool decking and interior floor are all just primatives with various shaders or PBR textures applied. I may play with the lighting a bit more, but this is close to my final version.
Thank you! I've always wanted to do the 'luminous figure in darkness' thing. I bought the Tenebroso Lighting kit a few weeks back, and put the materials onto different primitives and sorted out my lights for iray (mostly ;-) ). Everyday is something new worked out, even with the the one I finished today. I had no clue you could click on the figure's head, move from the viewport and the whole figure moved and adjusted, not simply the head. I feel I'm still scratching the surface with Daz even after a whole year!
Hello,
so this is my second iteration of my entry for December. Thanks a lot for all the input :-)
Changes so far:
What I don't like and where I need to do some experimentation: the exhaust fumes look too straight, need to fix that for the third iteration.
Critique is more than welcome :-)
Best regards
Here's my entry for this month, I think I covered just about everything with this one:
As always comments, crits and advise are welcome.
Some really outstanding images and ideas so far this month...I'm excited to see how these develop!
Here's a new idea I had yesterday.I ment to post sooner, but here it is.
Version B of my second idea, giving the rider some cybernetic arms that were retextured, and some texure work done on the bike.
Version C of my second idea here, adding in a persuing vehicle in the background with the pasinger trying to fire at the main character as the chasing driver is going around the corner in the background.
I also did some tweeking of the main characters hands, gave her a scar, and added some expresion to her face.
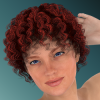
Hiya folks! I've been tinkering around with Daz for little over a week now (ten days to be exact) and saw this thread. It gave me the excuse I needed to use a model I picked up from the store (Woo for first purchase!), everything else were freebies I picked up along the way. With that said, I figured I'd make a simple render with nothing cluttered about, that could be suitable for a wallpaper. I could probably have ran the render a couple hundred more times to work out all the graininess, but this PC I'm running is up there in age (the excuse I used to keep things simple). I hope it's not too bad!
Very nice for just starting out You may find that adding some more lighting may help with the render time and the graininess. Darker images tend to take more to calculate (or seem to to me anyway) I really like it though. Please let us know if you have any questions and welcome to the site
I tinkered around with the lightening as you suggested, and that did make a noticeable improvement to my render times (although I'm still in dire need of an upgrade according to the various render times given in the hardware benchmarking thread ), so I'm very happy about that! I also adjusted the models eyes slightly, as the new lightening made clear that I had them set slightly off from what I wanted the first time around, which the low light seemed to hide. As far as iterations, I bumped it up a thousand just to get some extra grain removal, which funny enough, I tried using the the noise reduction settings, but they actually made the image look worse, so I had to scrap that idea. Here's the second render of the image, I hope it's an improvement!