Daz 3D is part of 
Connect
DAZ Productions, Inc.
7533 S Center View Ct #4664
West Jordan, UT 84084
Licensing Agreement | Terms of Service | Privacy Policy | EULA
© 2026 Daz Productions Inc. All Rights Reserved.
Comments
nice scenery
cool
1
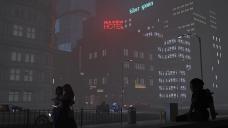
Here is another entry on a different note a night scene. done in daz with minor touch ups
.
I have managed to get a full render done at last. I raised the position of the deep blue light and ended up with some brown shadows on the man's T Shirt.
I may try repositioning this light and the paler blue light if I have time.
Nice one @Dragoneyes002. Hope that if you decide to do any thing else here, you'll have the time to do so.
Just wanted to let people know if you have those stubborn renders that ALWAYS come out dark like I do sometimes... you can now use GIMP 2.10... it has some amazing features including "exposure level" and "Temperature" that will allow you to up the brightness without whiting things out and add that touch of Daylight for when that daylight feature just doesn't work in your set. If my second entry finishes in time I will show you the before and after. but it probably has like 2 days left to render I dont' have time after that.
For people that don't know GIMP. its the open source version of Photoshop. which means "free." it's WAY better than 2.8 was but the controls are quite different in some ways.
1
there is a fix I'm doing probably be up tonight
DAZ really should implement ACES with the next update, because everyone is using it (no need to Gimp it up)
I love Gimp and always support open source :)
#DazForLinux
should have explained what ACES is (my bad) https://en.wikipedia.org/wiki/Academy_Color_Encoding_System I use ACES workflow in my other software apps and really wish DAZ will implement it
Also, I am now a day in (16 hours longer than the first time I tried this and x4 Render Quality) and the picture still looks just as grainy. if I HAD to guess I'd say the low light is doing me in, but I am at 900% on a distant light shining right into the room (I removed a wall so it would shine through). the texture shader view is so bright it's washed out and I can't get this any better. my first render had less light already looked better, so I don't think it's the light this time. Thoughts?
1
LM needs to be in the hundreds of thousands if not millions to get strong light from a source. 5k-10k is weak lighting on par with a candle
ok here is the night scene with repairs to the car interior dash
this is why they invented the ACES color space
there is a youtube Blender user who explained the need for ACES
so I have to completely white-out my scene to get enough light not to be grainy?
Assuming you are rendereing with Iray, the correlation is the more light you get the better the render results (ist rendering faster and leaves less graininess) So the way you can go is to give your lligths a good deal more power and then adjust the light in the tonal mappning tab.
There is the good news for 3delight users, which handles darkness much better ;)
So if I mess with the tonal mapping tab will that allow me to see scene and yet still have the right amount of light?
That's at least the theory, it will still be a lot of experimenting but you will get closer to the result you aim for. With a very dark scene eg like the one from @dragoneyes002 you still might have to take it to Gimp or Photoshop and sharpen the curve
I mean it's not "grainy" that's the "dust in the air" yeah that's it... No?
Impressionism?
Pointillism?
dragoneyes image is not grainy, you need to open the full image view fo that, they have atmosphere in the air.
Sorry if I lost track, but which image did you want to get less grainy, I looked back through the thread but the last image from you was the one of the dakr elf/drow in the loads of grass. Orwas there one I missed?
no I meant mine. Dragon's is awesome
1
two things need clearing up here.
1) you mentioned being able to see your scene. is that while you work on it which would be having the headlamp on a camera on or off (for night scenes its always best to create a camera with its headlamp on to work in the view screen instead of perspective view) that way you don't have to keep changing lighting in the scene to see whats happening. I tend to make two cams one static headlamp off for the main shot the other with it on to move around and see the scene lit up
2) dusty when rendering is just how the system does it in fact thats what the ratio's are Number of pixels X number of pixels......over simplified but the jist of it. there are different types of renderers such as scanline which do the individual pixels in a sweeping line hense the name Iray likes to put the dust as you call it all onto the scene at once and enhance each one more and more with each additional pass (iterations) I could get right down into the nity gritty of this but to keep this from being a book graininess is based on your settings and how much light you use in the scene (light is important because the variety of greys to Black is tinny in comparison to gradients of each color and all their mixes <<<< its in the billions making less grainny more achievable in effect color gives the rendering flexibility where as dark limits it. again that is over simplified but the jist of it.
another key factor is how much you tax the program itself. you could run Daz on a quantum computer but the program will not exceed its built in limits. that has to do with total polygons/surfaces/triangles that need to be processed. thing like photorealistic Grass such as your last pic has chews up a ton of the total amount unless its just planes projecting a texture (work around) when you add characters background props ....etc you keep chewing up the count of polygons on the way to the max the program can handle slowing the entire program down. That Aside it also has another effect on the rendering total count means more to process at every itteration which means you either bump up the render settings to accomodate the need or get a grainny result.
I get graininess is a factor of how much light I let in, but at 1500 lumens and 900% intensity that should allow for everything I need, that said I did at 10X as much light at 900%, so we'll see what that has (SHOULD even out to 135,000 lumens... more than enough. If likely won't render in time so I'm submitting an image, inhanced in post, that I DOO like. I'm adding a few things if I finish in time on the next version.
So the character has been re-materialed, and surfaces on ALL of her clothing have been surfaced, and the bow next to her has had its surfaced tweaked to show up better. I am TRYING to upload it, but after I touched it up these forums will no longer accept it so it might be a moot point. Nothing I do will let me add the picture, PNG, JPG no difference, can't add to gallery, I'd have to upload this to a third party and link it here, which is against the rules.
really advanced the look a lot. guess my only question is would you be willing to make the guys Shirt a Bright color like lemon yellow or irridesent green some color a cluber is likely to run around in trying to peacock
1
stop with the intencity. get it back to 100% and change the lumens to 100.000 then do a test render (720) you'll see a marked difference 1500 barely shows up as a candle flame.tweek it in 10k +/- increments
a;so render quality goes from 0-10,000 default is 1 I don';t even drop the quality below 5000 any more it definitely increases render times but I happen to like crisp results on some of the more involved scenes.
the latest one i posted rendered for 18 hrs @ 10,000 quality with a completion of 0% its likely that to get it to 100% would be in the region of 100+ hrs which I wont lock the comp up for that long but a quick despecle works just fine to clean it up at that level of completion (wont always work)
Note that having a very bright light is not enough - the big issue tends to be areas that are not directly lit, that require light to bounce off another surface (or surfaces) to reach them - makng the light brighter may help a bit as more bounces will retain enough energy to contribute but the real solution, unless you are prepared to wait a long time, is to add more lights to fill in the shadowed areas, then adjust the Tone mapping settings (or the finmal renderin an image editor) to get the look you want.
I just turn Quality Enable to Off.
I also set Max Time to 0 (zero) which effectively turns that Stop Condition off as well.
With both of those parameters turned off, Max Samples is the only Stop Condition. I'll set that low for test renders, and high, (or very high,) for final renders. (DS loads my default scene with these settings, and Max Samples at 15K.)
Version D of my sewer render here. Added a 4th character with some texture work done to most of her clothes, and the gear she's using as well as her hair. Don't know if there will be time to do anything else before the end of the month, so this is probably it for this month.
Hello,
I also put in the following image in my user gallery. The rendering was done with the IRay engine. Core concept of it is the "mirror book page". I took a prop called "Fantasy Book", and converted it to Iray. It is a rigged prop with turnable pages. I took one of the pages and I applied the Iray Nickle Shader to it, setting Glossy Reflectivity to 1.00 and Glossy Rughness to 0.001. Of course that is only half the way. This image is actually a composition of two renders, each version of the girl rendered seperately (and being reflected in the mirror).
I then used the GIMP with each render being a layer. At the upper layer I simply "erased" the mirror region to "transparency". Then I merged the layers and the composite Image was the result. By doing it this way the geometry is completely correct, and no pose fiddling and positioning of a second figure was necessary.
Still trying to work out many things with Daz and I must say, it's really fun :-)
@Coryllon: I'll second #DazForLinux. Last time I looked into it, I think I was able to get most of it (barring the CMS) working. Which is a little weird because I'm pretty sure the CMS is using PostgreSQL, which is quite happy on Linux.
Angel's Glare Test 1:
After spending way too long looking for wings that better approximate the source material, I gave up and stuck with Morningstar. I also switched the shaders to 'Granite Black' and 'Marble White' from the NVIDIA MDL Examples set and tweaked the posing slightly. Next steps are to adjust each surfaces' tile size and offset to attept to harmonize the detailing between the geometries, and to figure out what sort of scene I can build around this.
Guidance for the other newbs: When applying shaders, make sure you have the thing selected in both the scene tab and the surfaces tab. I spent way too long with the angel selected wondering why I couldn't apply a shader to her wings, hair, or clothes, despite having them selected in the surfaces tab. That lead to a few (╯°□°)╯︵ ┻━┻ moments.
This will be my final version. I made a change to brighten the emissive hair and removed one of the cocktails as I could not get the shadow to look right.
At the Bar