Daz 3D is part of 
Connect
DAZ Productions, Inc.
7533 S Center View Ct #4664
West Jordan, UT 84084
Licensing Agreement | Terms of Service | Privacy Policy | EULA
© 2026 Daz Productions Inc. All Rights Reserved.
Comments
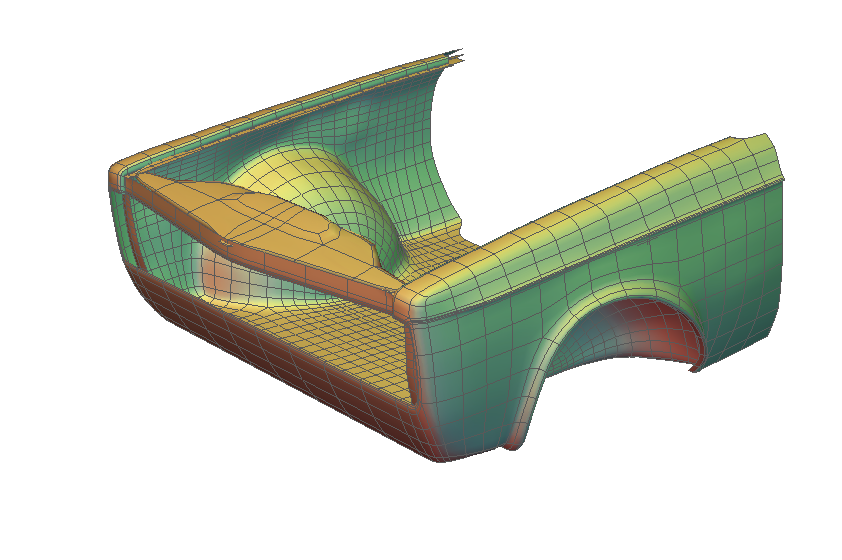
Returning to the Volvo 145 model. Here is a little progress. I still struggle modeling uniform geometric curved surfaces and making them feel even and uniform in their curve transitions.
https://shawndriscollcg.blogspot.com/2012/08/polygon-smoothing-using-baby-steps.html
@ShawnDriscoll I am sitting in a a coffee shop and bring up the link and nearly spit my coffee out laughing when a video with a set of breasts being manipulated in 3D comes up. I glance a the old woman behind me and laugh inside.
Ha!
Good info nevertheless...I think I get the concept of bringing lines close to get tighter creases versus far to get gradual transition. Thanks!
:)
Like I suggest to anyone who will listen ... :D
You should check out Max Hancock's YouTube channel. The videos on box modeling do an excellent job of not just describing the tools within Hexagon, but also good modeling practices like edge flow, control loops, etc.
@JohnnyRay @MaxHancock Yes, I have them all bookmarked and am watching them one by one. They are lengthy and full of info. Dare I say, I downloaded them to watch offline as my internet is not always the best. Hopefully nobody wants to kick me in the shins or worse for watching them offline.
Brian
Progressing some more on the front-end
Adding the hood cover
Extending back to the roof
Excellent work @Rakuda. You're getting better at this modeling stuff! ":) btw, glad you found my videos helpful!
That's a very nice clean looking mesh @Rakuda! Well done. :)
Been away for a while practicing my Hexagon skills now and again when I can.
Here are some recent hanging lamp designs.
@JohnnyRay Yes. I try to keep them clean. I want to simplyfy those meshes on the front of the car for the lights. They are overly resolute.
@MaxHancock. Always helpful. I recently discovered if you extrude a model lengthwise, it does not create as clean a UV mesh as if you draw an outline path and lathe an extrusion from a circle. Then, wow, you get a good workable UV map! That was instrumentall on mapping the blue painting on the porcelain.
:)
Nice lamps, really impressed with your flower design - Wondering what you used to create it.
One thing though, your hexagon screen grab, your bulbs do not look central.
Hello Everyone,
Got a question about hexagon force closing everytime I try to add color into my design. How can I stop this from happening? Using hexagon 2.5.2.109
@jniemiec86 Not sure. You might start another thread asking about it. I don't generally add color in Hexagon. Maybe I haven't got to that level yet? I usually do all that stuff with UV maps and color in Photoshop,or in Daz. Do you mean assigning material zones?
@WeeDangerousJohn Awesome sauce! Thanks for the comments. Do you mean the image, or the map? And yes, this is true. When I copied the parts to Daz, I arranged them and applied the textures. There I straightened out the alignment.
The image came from the below link:
https://upload.wikimedia.org/wikipedia/commons/a/a3/Owen_Jones_-_Examples_of_Chinese_Ornament_-_1867_-_plate_008.png
I just played wit the horizontal and vertical tiling until I got it right.
Modeling a Lamp
I haven't played with the lathe function very much. It is impressive with how uniform the mesh comes out. I'll have to keep that in mind for shapes where that tool would work as an option. Thank you for sharing.
@JohnnyRay Absolutely! Even when some shape is vaguely similar to a cylinder and that is a goos staring primitive, it allows for an orderly UV map.
Here is some work on a more organic model, Heliconia in a vase.
The Heliconia model can be downloaded and freely used.
https://sharecg.com/v/93993/browse/5/3D-Model/Heliconia
A simple bookshelf.
model can be downloaded and freely used.
https://sharecg.com/v/93994/browse/5/3D-Model/Bookshelf
Created this mask in Hexagon.
Now that I look at it, the nose bridge could be indented a bit on top to get a better profile.
The next challene is to figure out how to model an array of feathers to sit atop it like the reference photo below.
Update: Better angle on the nose:
Update: Redesign to include a better fringe among other adjustments.
I have a curve and I have used thickness before and now I can't for the life of me locate "thickness".
Where did it disappear to?
Ahhh, found it on Surface Modeling Tab
Ok, making some feathers for the mask this weekend, but got distracted making some numerals for a dart board with the thickness tool on a curve.
Yep, that's pretty much my whole workflow . That's ok though. Some of my best ideas were things I stumbled upon by accident.
Nice work on the numbers.
@Kitsumo Thanks on the numbers, now I have to make the dartboard.
Indeed how it goes witht the workflow... With the following evidence:
^__^
Here is an experiment observing the simple geometric variation of apartment buildings.I think it is possible to create one model that could with the help of a preset morph. material combination generate the variety of low-poly houses and apartments in a neighborhood. I know somebody has already done this, no?
The general term for them is "greeble blocks". Stonemason has several examples, but they are sci-fi themed. They work really well for when you want an areial view over a scene and make it look like you're flying over a city, or want a city/town stretching out into the background without "paying" for the weight of a normal hi-poly object.
@JohnnyRay Looks like an interesting concept. I would definitely like something more standard houses versus scifi. One of the issues in loading soome of the neighborhood sets is the weight of the whole thing in the scene. Would be nice to load low-poly for some content and higher poly for the geometry closest to the camera.
Here is something that I am struggling with at the moment. It seems like a simple enough thing, but I am not having an easy time modeling this chairback. Getting nice even geometry around the hole while also defining everything else well is a flow challenge.
I think I see what I need to do. I need to replace a few rings with radiating versions.
Update: This geometry seems to be working better. Like a spider web.
A suggestion at first glance, I would probably only have 1 or 2 rings around the hole in the back and try to get the lines running as vertically around the mesh as possible. All those radiating lines from the hole seem to be adding some distortion to your faces that you don't really need. It may make UV mapping and texturing harder.
Also you have some poles on the mesh (see below) which, because they are in curved sections of your mesh could cause you some problems when it comes to rendering and Daz Studio trying to subdivide your mesh for you at rendering time.
Thanks @JohnnyRay I reduced the model down to the example in orange. Then smoothed and added a few control loops. The resulting chair looks alright. I just want to add a normal map to give the legs some apparent ridges and shadows versus extra geometry,
Very nice. :)
Have you tried using a chamfer around the hole and the outer edge ?
@WeeDangerousJohn That might produce a more uniform result. :)
Thank you @JohnnyRay Im just a beginner among a lot of pretty expert modelers here.
Here is my further attempt at the metalworks of a dartboard.
Rough Draft: (There are some smoothing issues to work out.)
the Splines in the second ring to center need to be removed.