Daz 3D is part of 
Connect
DAZ Productions, Inc.
7533 S Center View Ct #4664
West Jordan, UT 84084
Licensing Agreement | Terms of Service | Privacy Policy | EULA
© 2026 Daz Productions Inc. All Rights Reserved.
Comments
Killer Robot Films - https://www.imdb.com/list/ls073512875/
What do you get if you cross Maximilian from The Black Hole with a Terminator skeleton ?
Raw render
Non - Photo Realistic update. Used a water-color painting filter from FotoSketcher as the base in Paint Shop Pro, then used a water colour filter From Filter Forge overlaid at about 45% transperancy.
Looking great !! Good to see Leon getting some air-time !
Bunyip, thank you very much!
Mini-Tutorials 16. - Glow & Aura Panels
1. Double click the Shader required to open in Texture room
2. In the Color - Texture Map slot, copy the map (right mouse button)
3. In the Glow slot, paste the map (right mouse button)
4. Repeat for all panels in the scene (this particular scene had lots of different panels)
5. In the Assemble Room, click on Effects tab
6. In Aura tick Enable
7. Click on Edit
8. In Aura window adjust color
9. Adjust Radius
10. Adjust Intensity
11. Click on Render button for a test render
12. Click OK to finish
Note - steps 2 & 3 some Texture Map sets will have a dedicated glow map so check the textures first
Every time I try, my computer coughs up blood :(
Seems to only allow for simple objects with low resource useage, which is something, at least... but none of the things I want to do.
Had a problem when my graphics computer died a few years ago, spent about 4 months saving up for a new one, my laptop that was using in the meantime was really just good for surfing the web or word processing. Hope you get your new machine up and running !!
After Bunyip's amazingly detailed shader tutorials, it is almost shameful that I would post ths one, but I think it is useful. This is an example of how to use a procedual shader on terrains and still isolate a region. In this case, I've isolated the part of the terrain that supports the far end of the track. Notice the red and blue area. The terrain shader is a multichannel mixer. The blender for the mixer is based on slope. Because the supports for the end of the track are almost vertical, it is relatively easly to use ENVIRONMENT : SLOPE in the blender channel to isolate the vertical parts of the terrain.
I can replace the blue and red portions with rock or something later.
All shader tips and tricks are welcome !!!
Mini-Tutorials 17. - Alien Skin 1 - Enhance C & Super Mixer
NOTE: Requires Enhance C
1. Double click the Shader required to open in Texture room
1b. In the Color Slot, scroll down to Shoestring Shaders, click on Super Mixer
2. Shaders 1 to 4 change sliders to 0 - 100
3. In Mix Shader - Texture Map, Copy Texture Map (right click mouse button), then in Shader 1 Paste Texture Map (right click mouse button)
4. Shader 2
5. Scroll down to Natural Functions
6. Click on Cellular
7. Adjust Intensity
8. Adjust Scale
9. Shader 3, scroll down to Operators, click on Multiply
10. In Source 1
11. Scroll down to Enhance:C
12. Click on Enhance:C Organic 1
13. In Function click on Membrane
14. Click on Transform tab
15. Tick Enable Transform
16. Adjust Overall Scale
17. Source 2, scroll down to Color
18. Click in Color box
19. Pick color in Color Picker
20. Shader 4, scroll down to Operators, click on Multiply
21. In Source 1
22. Scroll down to Natural Functions
23. Click on Cellular
24. Adjust Intensity
25. Adjust Scale
26. Click on Shape and choose a pattern
27. Source 2, scroll down to Color
28. Click in Color box
29. Pick color in Color Picker
30. Shader 2 Copy (right click mouse button) to Bump slot, Paste (right click mouse button)
31. Adjust Intensity to 200%
32. Shader 3 Copy (right click mouse button) to Glow slot, Paste (right click mouse button)
33. Source 2, scroll down to Color
34. Click in the Color box
35. Pick color in Color Picker (I picked a darker color)
Entry thread started :- https://www.daz3d.com/forums/discussion/323706/carrara-challenge-46-get-your-retro-on-entry-thread
Get those entries started if you have not started already !!!
Mini-Tutorials 18. - Alien Skin 2 - Enhance C & Super Mixer
NOTE: Requires Enhance C
1. Double click the Shader required to open in Texture room
2. In the Color Slot, scroll down to Shoestring Shaders, click on Super Mixer
3. Shaders 1 to 4 change sliders to 0 - 100
4. In Mix Shader - Texture Map, Copy Texture Map (right click mouse button), then in Shader 1 Paste Texture Map (right click mouse button)
5. Shader 2, scroll down to Operators, click on Multiply
6. Source 1
7. Scroll down to Natural Functions
8. Click on Spots
9. Adjust Settings
10. Source 2, scroll down to Color
11. Click in Color box
12. Pick color in Color Picker
13. Shader 3, scroll down to Operators, click on Multiply
14. In Source 1
15. Scroll down to Enhance:C
16. Click on Enhance:C Organic 1
17. In Function click on Veins
18. Click on Transform tab
19. Tick Enable Transform
20. Adjust Overall Scale
21. Source 2, scroll down to Color
22. Click in Color box
23. Pick color in Color Picker
24. Shader 4, scroll down to Operators, click on Multiply
25. In Source 1
26. Scroll down to Noise Functions
27. Click on Fractal Noise
28. Click on one of the patterns
29. Adjust settings
30. Source 2, scroll down to Color
31. Click in Color box
32. Pick color in Color Picker
33. Bump slot, scroll down to Natural Functions, click on Cellular
34. Adjust Intensity & Scale to 200%
35. Click on Shape, choose a pattern
36. Shader 3 Copy (right click mouse button) to Glow slot, Paste (right click mouse button)
Note - the settings will take quite a few test renders to get something that looks right
just lovely Veronika - beautiful whimsy
Bunyip02 - thanks again for that tut! amazing wiki this will be
Saw the Entry Thread Posted - Still Have Until May 11
Thanks, Bunyip, for yet another great tutorial.
...
All of you are invited to vote on most preferred retro version of "The Beat Goes On."
I am circling back to my retro pop music project. If you enjoy flower child pop music from the 60s/70s, please play the following three versions of the hit, The Beat Goes On. I made a rainbow and a Sonny and Cher stage, but the real joy I will get from this project is promotion of The Beat Goes On. Should I finish the project paying homage to: (a) vintage Sonny and Cher, (b) Sonny and Cher once they had their own show, or (c) Cher singing the song with Tom Jones? The fate of the globe depends on your answers. OK, that was an exaggeration, but I am curious.
The Beat Goes On
Sonny and Cher vintage (cowtastic)
.

Sonny and Cher on the set once they got their own show.
.
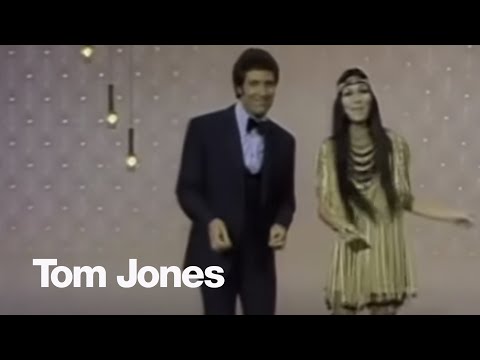
or if not into Sonny's voice, here is Cher with Tom Jones
And just because I love this retro dance mashup.
Visually I like B, but musically I like C
I like this one the best
Andrew, many thanks!
Pleasure Veronika :)
Diomede now that song will be stuck in my head lade da de dee
:)
here's anothe transgender gender pulp bender
sorry the destrusctions arent as clear as they might be
finished job
the beauty pass this has carrara's native toon filter - I also rendered out a colour pass which gave me a cleaner render
the texture work was on the bike body and the side card body
here is the bike body original - boring red - bump map breaks it up a bit
step 1 - we invert the red texture to get yummy green (the red outlines near the green are anythinggoos - will show that later)
we want to add some grunge to the green as it's too clean - so we had a mixer operator
leave the original texture as source 1
and put a colour black in source 2
I use a grunge texture in the blender channel and tile it to taste (about 50 mins on 180 degrees in a fan forced oven)
next is the anythinggoos - this is what gives those red edges on the model (already seen in the last image)
I used a red colour to define the edges - you could drop in a metallic shader instead
sorry the green writing is hard to read -
this is a close up of the textures - you can see I have gruynged up the side car the same way
here's an example with using the rust shader that comes with Carrara with anything goos
I tweaked the rust shader to make it less red
I also tweaked the noise part by dropping down the density to 5.89 - this made the rust spread out more
this is what happens when I click 'invert' in the anything goos window
Lovely render and nice instructions - great use of the rust as well !
Was going to do a tute on Anything Goos, but consider it now done, many thanks for doing this one !!!
Shaders Mini-Tutorials 19. - Alien Skin 3 - Enhance C & Complex Shaders
NOTE: Requires Enhance C
1. Double click the Shader required to open in Texture room
2. Top Shader
3. Scroll down to Complex Shaders
4. Click on Multi Channel Mixer
5. In the Source 1 - Color - Texture Map slot I want to use Mixer
6. Scroll down the list to Operators
7. Click on Mixer
8. Leave Source 1 as the Texture Map, in Source 2
9. Scroll down the list to Color
10. Click in Color Box
11. Pick color in Color Picker
12. In the Blender slot
13. Scroll down to Natural Functions
14. Click on Marble
15. Adjust settings
16. In the Bump slot
17. Scroll down to Natural Functions
18. Click on Cellular
19. Adjust Intensity to 200%
20. In the Glow slot, scroll down to Operator, click on Multiply
21. In Source 1, scroll down to Color
22. Click in Color box
23. Pick color in Color Picker
24. In Source 2
25. Scroll down to Enhance:C
26. Click on Enhance:C Organic 1
27. In Function click on Veins
28. In Source 2 slot, click on Multi Channel
29a. In Color slot, scroll down to Operators, click on Mixer
29b. In Source 1-Source 1-Texture Map copy (right mouse button), paste (right mouse button) in Source 2-Source 1
30. In Source 2, scroll down to Color
31. Click in Color box
32. Pick color in Color Picker
33. In Blender slot
34. Scroll down to Enhance:C
35. Click on Enhance:C Skin
36. In Function click on Camo
37. Adjust settings
38. In Border slot
39. Scroll down to Enhance:C
40. Click on Enhance:C Organic 1
41. In Function click on Electric
42. Adjust settings
43. In the Glow slot, scroll down to Operator, click on Multiply
44. In Source 1, scroll down to Color
45. Click in Color box
46. Pick color in Color Picker
47. In Source 2, scroll down to Enhance:C, click on Enhance:C Organic 1
48. In Function click on Veins
49. Click on the Transform tab
50. Tick Enable Transform
51. Adjust Overall Scale - must be different from setting that exists in Step 27
52. In Blender slot
53. Scroll to Value (0-100%)
54. Adjust setting
pleasure - I think anything goos is deeper than we think - needs more exploring for sure - you coul ddrop a fresnesll in there on the edges for example
great alien skin - that poor mini will be having a an existential crisis - who am I what colour am I really :)
next tip:
my elf needs armor, so i use brigda.
That looks awesome, HeadWax! Just an idea, try NOT tiling the Grunge map... I bet it makes for a better overall grunge to the surface without the repeated seems - I could be wrong. If the edges (borders) of the grunge map hit the mesh funny, then I'd use an image editor to 'zoom in' on the image to reduce the borders a bit.
I love grunging things up!
A lot of the time nowadays, instead of multiplying against a grunge map, I'll instead use a Color Gradient and use the grunge map as the Shader that controls the gradient. Sometimes I'll use an even blend between the two ends of the scale, but more often I put all manner of different hues and saturation levels all along the gradient scale and let the map do it's thing ;)
So cool! I just had Brigida out the other day! Cool outfit!
Still trying to get something in on this....
nice will check it out thanks!
thanks great idea with the gradient - i don't use them enough !
just do a pulp fiction cover :)
Dart visits the outer limits :) as an example :)
https://www.bing.com/images/search?q=the+outer+limits+show&FORM=HDRSC2