TARGET HELPERS
 VIArts
Posts: 1,539
VIArts
Posts: 1,539
What are the steps to to setting up target helpers so feet will follow them? I forgot.
Daz 3D is part of 
Connect
DAZ Productions, Inc.
7533 S Center View Ct #4664
West Jordan, UT 84084
Licensing Agreement | Terms of Service | Privacy Policy | EULA
© 2026 Daz Productions Inc. All Rights Reserved.
Comments
I figured it out, but... is there a way to keepthe feet on the floor while i bend the knees?
.
I still can't get the feet to stay on the floor. Think squats
Did you leave the Target Helpers at their default positions? If you have made them a child of the feet, it doesn't work. Default is completely seperated from the hip. If you did it the right way, you cannot move the feet bones anymore. You have to move the Target Helpers. The feet bones will follow.
Okay, suggestion? What should I do with these helpers on the toes? i made them to khee0 the toes on the ground when i lift the heel. i thought i could parent them to the foot helpers so they'd follow the foot helpers, but if you rotate the foot helpers with the toe helpers parented to them, the toes go under ground.
Haven't tried that one. You could do two things. Delete the target helpers and all related (on the modifiers tab) from the end bone and start bone. Make new target helpers from upper leg to foot. See if this works. I think this is the default way. Or adjust what you have. This means rotate / move the foot / target helper on the timeline where it goes wrong. (Finetuning). Don't forget to make a keyframe on the end where it is still correct. This means "Add keyframe" just before the problem starts.
Do you have the follow rotation for the IK tracking enabled? There are also limits as to how far you can move something, so that when you hit the joint's limit, something has to go, and it is usually the tracking.
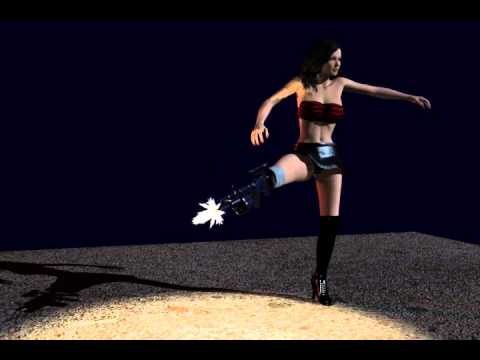
I tried an experiment a few years ago. I wanted to animate my version of Cherry from Planet Terror. I had the left foot tracking a target helper and it was locked to the orientation of the helper. Notice the subtle floaty foot movements? That's because the rest of the figure's movements transferred down the leg to the foot are exceeding the joint's constraints.
To solve that, I changed the left foot constraints to custom using the Animation menu. I left the x, y, z, settings at their default 90 degrees. You can see that as the rest of the model moves, the relaxed constraints aren't forcing the foot to move. It looks much better.
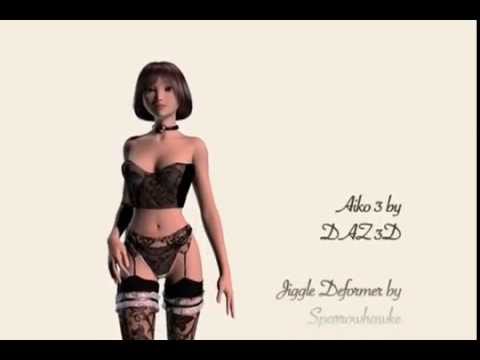
Thinking ahead, you can even make a figure pedal a bike with target helpers and spin modifiers. For the following animation, I used a couple well timed spin modifiers, and targets parented to the pedals to keep her feet locked to the pedals, and then a couple more targets parented to the handlebars to keep her hands on the handle bars. I used spin modifiers on the pedals and the sprocket. The only hand animation I did was for the head and neck to eliminate some unnaturally stiff head bobbing. All the other movements of the figure are due to the IK of the feet following the rotating sprocket and pedals.

It feels so good when you help someone without a response.
I have a life outside of 3D and my PC, ya know.
EP's first ost is just missing my head a little. Not much. it's just because my eyes aren't catching tfhse "floaty foot" in the vid yet. vision issue.
It is subtle, but look at the foot on the ground in the first video. It is moving slightly as the figure moves. The second version has more lattitiude in the constraints so that it stays locked to the orientation of the helper object. The trick is that this is a scene specific issue. those looser constraints may not look good in a different scenario.
Hmm...i'm gonna play with it and see if i get any foot disorder.
ummmm...oklay, i have the pose i want and deleted the target helpers. now,how do i know how much to mov him forward when he takes a step without moving the planted foot?
IK Helpers are created to control the motion of the figure, rather than posing the figure bones manually, you move the helpers.
they are the "rig" just like the rig for a puppet with strings,.
there's no point in deleting them,. unless you intend to use the bones to pose the figure,. and not use helpers.
the limit's on rotation in the constraints for the bones should limit the extent on motion
As an animator,. you're best subject for "how does that happen" is yourself,. try to create the motion you're working on by doing it, ..a mirror is the animators most useful tool.
You would normally judge the motion by eye and whatever "character" you're using,.EG: an older character would take smaller steps,. a younger character would take longer strides,. it also depends on the speed of movement, and the goals, or intended actions of your figure,.
walking through fields of grass and flowers ,. or walking through a dark forest would be different,. it would also be different for a child or an adult
Once you have created the keyframes for you're figure,.(Using helpers,. or posing) you'd play that animation through and then move/adjust the keyframes as needed.
Another option is to animate the figure walking "in place" then you can add forward motion and direction later.
Yeah, it's the adding forward motion I'm asking about. My dude is walking in place.
When you step with your right foot, your left foot stays put. But in 3D, it's not as simple as that because you either have to move it the right distance so it looks like one foot stays put or you get slippy foot.
So my question is, how do i figure out hfow much forwsrd motion per step to avoid foot slide?
Use the grid and a side view to judge the movement distance. Using the grid as you guide to where you want the feet, move the foot targets towards that spot as much as the joint constraints allow, then move the hip forward, adjust the targets to where you want them. Repeat the process for the next step. My suggestion would be to do two steps, in that if the character is starting the animation with the right foot leading, then the last step should be a duplicate of that first frame with the right foot leading. Once you have those steps, delete the targets and disable the IK tracking for the feet (sometimes if left on, it will try and track something else if the original target is deleted). Once you do those things, and you are happy with the steps, create an NLA clip and have it use the hip as the offset. You can then load that clip into the character's NLA track in the timeline, enable looping, and drag the clip length as long as you need it. The clip should loop and the figure should walk across the scene without foot slippage (provided there was none in the keyframed animation).
Sorry I can't provide screen shots to help right now, but I'm in the middle of a monster render. I can provide an example of an animated walk cycle created in the manner I described. Additionally, I parented a target to the hip and offset it's position a bit, and then had the right hand track it, so it looked like her hand was on her hip. The IK tracking overrode the NLA clip for her arm, and gave her a nice shoulder role. Which reminds me, when doing your walk, NLA clip or not, don't forget to take into account the hip movement/roll, and all that.
Sorry, I'm in a wheelchair, so can't check on this one, but...does the hip just go up and down, left right, or rotate around the y axis when walking? or is it always...umm...fixed?
Sorry, didn't know. There is roll to the hips. Obviously, the "sexy" walk is exagerrated. If the right foot is in the forward position, the right hip would forward. The foot that is planted on the ground in mid-step woulld be angled down slightly, and the foot that is passing forward in mid-step would be angled up sightly. The rest of the torso would need to be adjusted to counter for the rotations as seen in the video.
there are several ways to adjust the distance
in the timeline,. when you create a Keyframe for the hip,. you'll have X,Y,Z position and rotation tracks for that frame,
you can easily adjust the forward "position" distance of the hip by changing the value of the keyframes.
If you have the figure walking in place,. for something like 4 seconds,. then you can go to the 4 second point,. move your figures' hip forward (to create a key at 4 sec's)
you'll then have a key at 0 and a key at 4 sec's,. you can play back the animation,. watch the feet,. and adjust the "END" position of the hip at 4 sec's.
You could also draw an animation path,. (make the hip or figure group "track" that path) and have the figure walking, following that path,. you'd adjust the length of the path to adust the distance travelled.,. working with path's can be tricky,. but it does allow the figure to turn corners :)
the approach is pretty much the same as the keyframe method above,. but with a path to allow you to adjust the distance covered to minimize foot slipping.
hope it helps
:)
Just a test. Looks like i got jitter foot just by standing still. lol
I'm workng on fight footwork with that guy, but the hair shader is driving me nuts. it doesn't matter how dark I make the hair, it always turns out greyish, even with shininess and highlight at 0. Supposed to be dark brown. I don't think its the lighting. Any ideas?
Looks brown to me. There is a greyish fringe around the head, but I assume that is because the hair is somewhat translucent and it is lighting interacting with the hair. It looks kind of like a rim light. Can't spot the foot jitter.
Oh, sorry, the "foot jitter" is only inn the Facebook version. it eas just because it was looping and jumping back to the beguinning. Stupid moment.
i have a three-point light setup. The hair just isn't rendesring as dark as i want it.
i THINK i found the issue. Another hair i don't remember loading was inn the way. Meh, i have issues.
Sorry, where/how do you do this exactly?
I have an errand to run, but I'll try and get some screen caps up.
i can't figure out what the blazes is happening here. i selected a bunch of keys and ALT + drag to duplicate. As you can see, they frames are not the same.
i checked rotations of everything it could possibly be. Nope.
it seems to extend past those two keys, so theres something off somewhere else...
you have keys for the figure group,. and for the hip of the figure,. both of those can control the position of the figure
try selecting and moving the Figure group keys,. (shrink them all back within the first second) see if the figure changes,.. if it does,. edit or delete those keys
(NOTE (do not delete the very first keyframe for any parts of a figure/fig group))
,. check your animation again
when you're moving /rotating the figure,. you should use the hip
Sorry for the delay. Like many things in Carrara, there are a couple different ways to accomplish what you want to do.
To change the constraints on a DAZ figure, such as V4, Genesis 2, etc. Select the joint you want to change. In the case I am illustrating, I want to change the foot joint on a Genesis 2 figure.
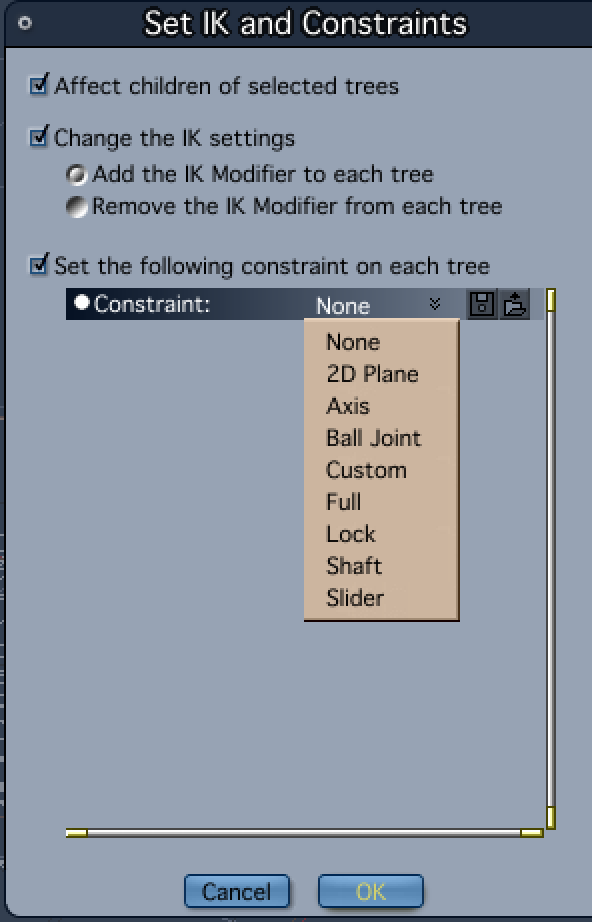
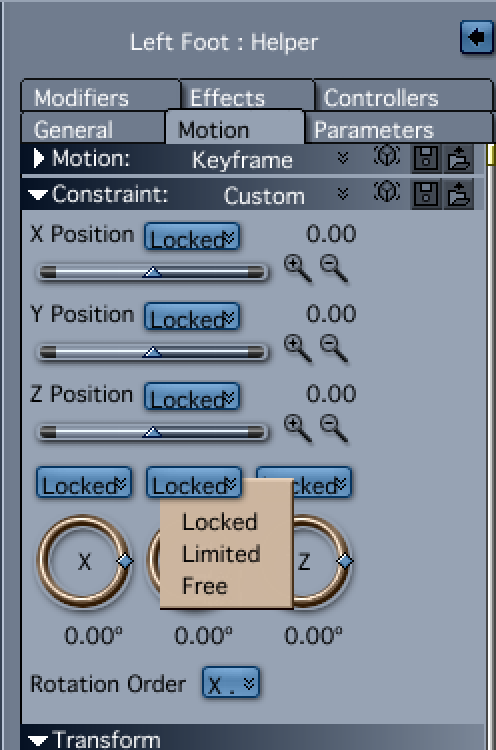
First, select the joint, and then in the Motion tab use the pulldown menu under Constraints to select Custom (or whatever method you want).
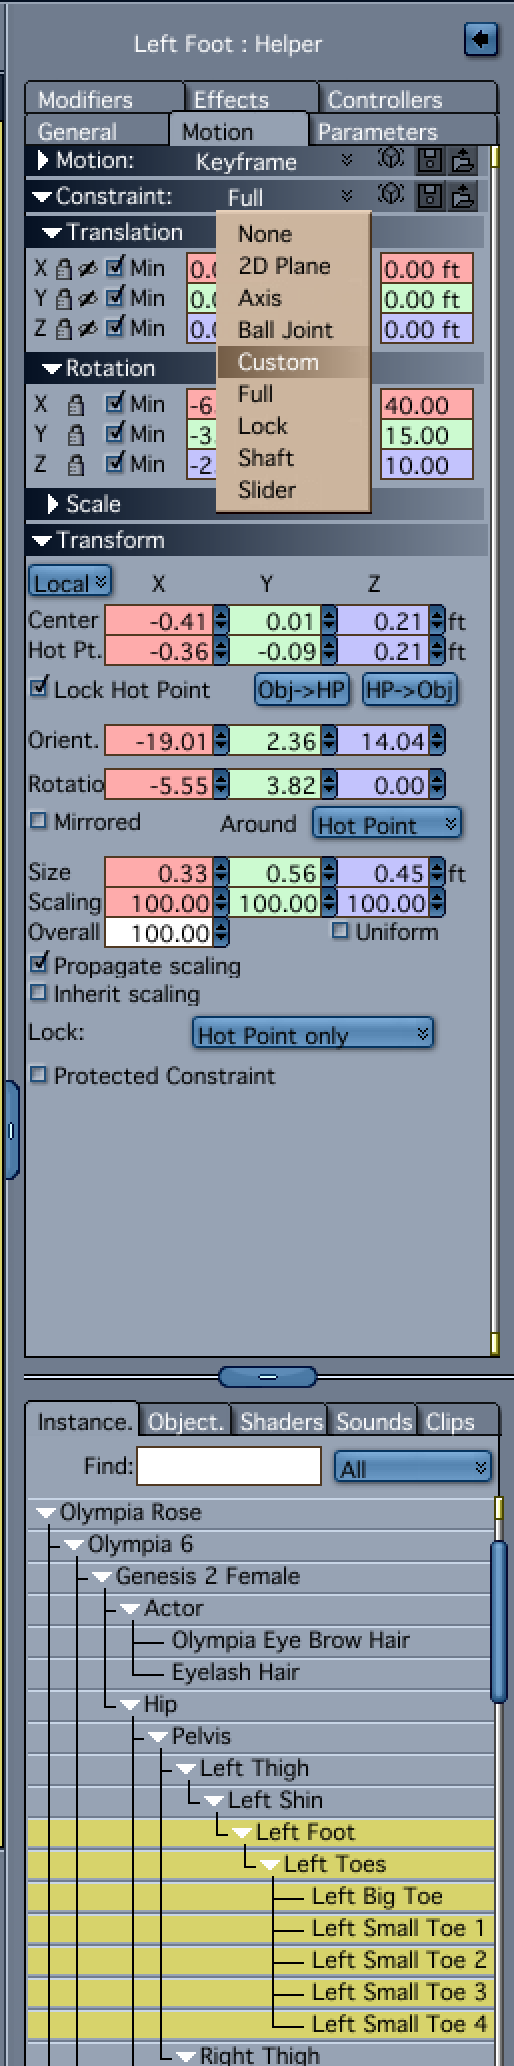
Under the Custom constraint, there will be three circular icons for X, Y, and Z that are locked. Use the pulldown menu over each one to select either Free or Limited. Limited will by default constain the joint to a positive and negative value of 90%. You can change that if you wish.
The other method is to select the joint, and then select Set IK and Constraints from the Animation Menu.
From there, a dialogue will open with a pulldown menu with the same options as the constraint section in the Motion tab. The difference being, that you can choose to have it effect the joint tree below your current selection. The process to set up the constraint "rings" is the same as in the Motion tab.