Yoda Says Use dForce To Fight Static Cling
 algovincian
Posts: 2,687
algovincian
Posts: 2,687
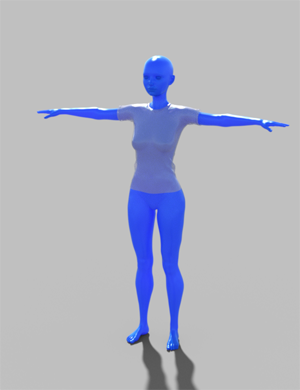
As we all know, custom figure morphs have a tendency to cause conforming clothes to cling in certain areas:

Now, while I enjoy a wet t-shirt as much as the next guy, it's not always a good look. Wouldn't it be nice if there was an easy way to create custom fit morphs for clothing that solved this problem without having to do any sculpting, or even having to leave DS?
Well, dForce can be used to setup Animated (Timeline) simulations to do just that:
1. Load a fresh G3F
2. Load the shirt you want to make a custom fit morph for and fit it to G3F
3. Scale G3F down to 80% at frame 0
4. Scale G3F back up to 100% at frame 30
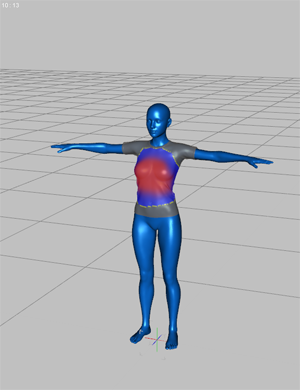
5. Dial in your custom morph at frame 30 (cling!)
6. With the shirt selected, from the Simulation Settings Pane menu, dForce -> New dForce Modifier: Dynamic Surface
7. Set the Friction for the shirt mats to .001
8. Set the Stretch Stiffness for the shirt mats to .01
9. Set the Density for the shirt mats to 1
Notes: You can also play with other mat settings to taste. For this next part, a familiarity with the Weight Map Brush is necessary and assumed. Lots of more detailed discussion/tutorials/videos on this already exist - Google is your friend!
10. With the shirt selected, Create -> New dForce Modifier Weight Node
11. Add a new Influence Weights map
12. Paint the map to look something like this:
13. In the Simulation Settings pane, set the Frames to Simulate to Animated (Use Timeline Play Range)
14. Run the dForce simulation
15. Hide G3F and export the custom fit morph for the shirt (.obj)
At this point, because we've been scaling and otherwise animating G3F, I usually start with a new scene and load a fresh G3F to use for creating the custom fit morph for the shirt (otherwise weird unintended funky stuff seems to happen sometimes for no reason). Like the Weight Map Brush, more detailed discussion/tutorials/videos on using Morph Loader Pro already exist - Google is your friend again!
16. Load a fresh scene/G3F
17. Load the shirt you want to make a custom fit morph for and fit it to G3F
18. Use Morph Loader Pro to import the .obj you exported earlier and create the anti static cling fit morph.
Hope this helps someone!
- Greg
Daz 3D is part of 
Connect
DAZ Productions, Inc.
7533 S Center View Ct #4664
West Jordan, UT 84084
Licensing Agreement | Terms of Service | Privacy Policy | EULA
© 2026 Daz Productions Inc. All Rights Reserved.
Comments
What's the reason for the scaling in steps 3 and 4?
LOL @ the thread title and thank you very much for the instructions and screenshots. Clipping to my DAZ notebook for reference!
This is done to stretch the fabric across the valley from peak to peak. Initially, I had tried to accomplish the same thing using the Contraction-Expansion Ratio parameter, but was unable to get the results I was after.
I'm still playing with this - been thinking about adding weight (density) to the shirt and changing the overall rotation of the figure during the sim in an effort to allow for corrective morphs that aren't so tight.
Also, I believe the technique can be used in other areas of the figure as well.
- Greg
You're more than welcome, Llynara. I have a tendency to make notes documenting procedures like this for my own personal use, so I figured I'd take a few moments to clean it up a bit and post it.
My hopes are that it may save somebody some time fiddling, or better yet, spark an idea and encourage people to explore this fantastic new tool - I enjoy doing so immensely!
- Greg
Very cool! Will have to try this. thanks for sharing your discovery!
Thanks a lot for this clear and detailed process. Will try asap.
Glad to see people are interested, and everyone is more than welcome. Please let us know if anyone comes up with any ways to make the results or process better.
- Greg
Book marking now Thanks you !!!
Is the weightmapping brush, I don't know, like sluggish for you guys? It reminds me of when I am into the many billions of polygons in zbrush slow, if that makes sense lol.
Haven't really noticed that behavior yet, but my brush has disappeared while painting weight maps on several occasions. I've had to switch tools and switch back, or sometimes even delete the modifier and create a new one before I can continue painting. Have yet to boil it down to simple, repeatable steps to reproduce.
- Greg
Bookmarked and trying this when I get a handle on the weighmapping brush.
Had encountered this behaviour too. One thing I can say is that if something (geometry) is in the way of the Perspective View and the surface you want to paint on with the Node Weight Map Brush the Brush disapears - maybe because DazStudio cant detect the area you want to paint on anymore.
I usualy Orbit & Pan the View a bit to get the Brush back. I even tryed to paint with the Perspective View from the inside of the Figure on the outside Weight Map - in this situation its most likely that the brush will disapear even you dont see anything in the way of your view - this is because the clipping value of the Perspective View & Cameras hide all gemoerty that is too close to the view.
The behavior I get sometimes is that it will be working fine and I'm painting away, and then all the sudden the brush (target looking cursor) disappears and is no longer functioning - the view hasn't been changed.
- Greg
Very nice. Thank you for the information
I asume its impossible to atomate the proces using a script? Does the clothing need to be dForce enabled or can this procedure be used on any clothing?
I use a G8 Model Jocelynn with some extra morphs and one of the clothing i like to use i removed because it looks so bad. (JMR Transparent nightdress)
The whole idea is to run a dForce simulation, so yes - the clothing needs to have a dForce Modifier added. I'm uncertain how much of the dForce related functions have been exposed directly in the API (or documented), or are available via the triggering of actions. Maybe you could post and ask in the scripting forums:
https://www.daz3d.com/forums/categories/daz-script-developer-discussion
Even if you could create the dForce Modifier Weight Node via script and add and Influence Weights Map, since the geometry is different for each piece of clothing, the weight map would need to be created specifically for it anyway.
- Greg
Ok so if i understand this correctly, This procedure would not work on the mentioned nightdress as its not a dforce clothing piece.
As for the script part, i understand there are a few variables like the weight map making it close to impossible to script this. The reason i ask is i have tried this procedure but failed. This is likely due to my limited knowledge of DAZ.
eg.:
3. Scale G3F down to 80% at frame 0
4. Scale G3F back up to 100% at frame 30
5. Dial in your custom morph at frame 30 (cling!)
I have no idea where to change 'frame' and what it means. I will have to dive into this more as i realy hate this breast hugging and i dont want to buy marvelous designer and manualy adjust each clothing piece. Since i try to customize most models i use with extra morphs most clothing pieces i use have that nasty hug effect.
The dForce Modifier can be added to any geometry:
https://www.daz3d.com/forums/discussion/203081/dforce-start-here
It's important to note that your results may vary based on the properties of the geometry (welding, density, topology, edge flow, etc. - this is a whole discussion in and of itself).
Use the timeline in DS to set the current frame in the animation. This video might help if you've never used the timeline before:
Hope this helps.
- Greg
Just so i understand it correct i use the animate line where i do these actions.
Also do i always need to start with a fresh G3/8 model? I always create - morph the model first then see what clothing i want to use/ looks best on her. (This would mean i have to backtrack the morphs i used)
Use the timeline tab to set the current frame to 30 and then dial in your custom morph, etc.
Sorry if the details on creating the morphs aren't clear, but the tutorial is long enough as is just going through the details of the simulation. It wasn't meant to be a tutorial on using morph loader pro. I use many different 3D packages, and I only mentioned the fresh G3F because I can't remember and often get confused about exactly how DS creates/applies morphs, so I always try to start from the base. There are other tutorials out there about using MLP and creating ERC links, etc. Also, I often forget that I'm not at frame 0 in the timeline (loading a fresh figure guarantees there are no keys set).
- Greg
I'm no modeller (and no expert), but the way I think of it, a mesh can only bend/fold along an edge as defined by the 2 vertices it connects. This makes the orientation of a mesh's edges important (especially in areas where extreme deformation like folds in fabric is occurring during animation). It becomes even more important for lower poly counts. It can have an effect on everything from collision detection and poke through to shading artifacts, etc.
- Greg
Thank you, Greg, that makes sense.
Does this still work with G8F?
Would anyone be interested in making a video of this process for the less experienced?
Thanks.