IRAY Help with Grain
 Obsidianpoet
Posts: 95
Obsidianpoet
Posts: 95
https://www.daz3d.com/forums/uploads/FileUpload/11/ce48e5b4d0c639c76a6c3f9a9cc48a.jpg
When IRAY came out I was excited because I had a GTX960 NVIDIA card. I had a new custom built system in 2015. But right at first, IRAY required a lot of shader changing and I thought nah. Then Terra Dome 3 came out and I had to have that. I think it was maybe Studio 4.8 back in 2016? IRAY crashed my system a lot and they told me that it was a bug that was being fixed after waiting forever for an answer. I pretty much never really messed with IRAY again b/c when I did nothing I tweaked on worked well...
I didn't do a bunch of renders in 2017 until recently when I started working on my comic and decided to switch to G3 from V4/Poser. I've been plugging away like usual in my 3Delight world...then that dang IBL Master came out. Turns out I can run IRAY now and my 3Delight is a lot quicker with that product. For the last few days I have been trying to work in IRAY with the IBL master and other things. A lot of my IRAY renders are pretty good and render in under 6 minutes. I think I'm just using default settings. I don't actually know, but there appears to be different tabs now than when I last explored it??? I haven't really touched much of them.
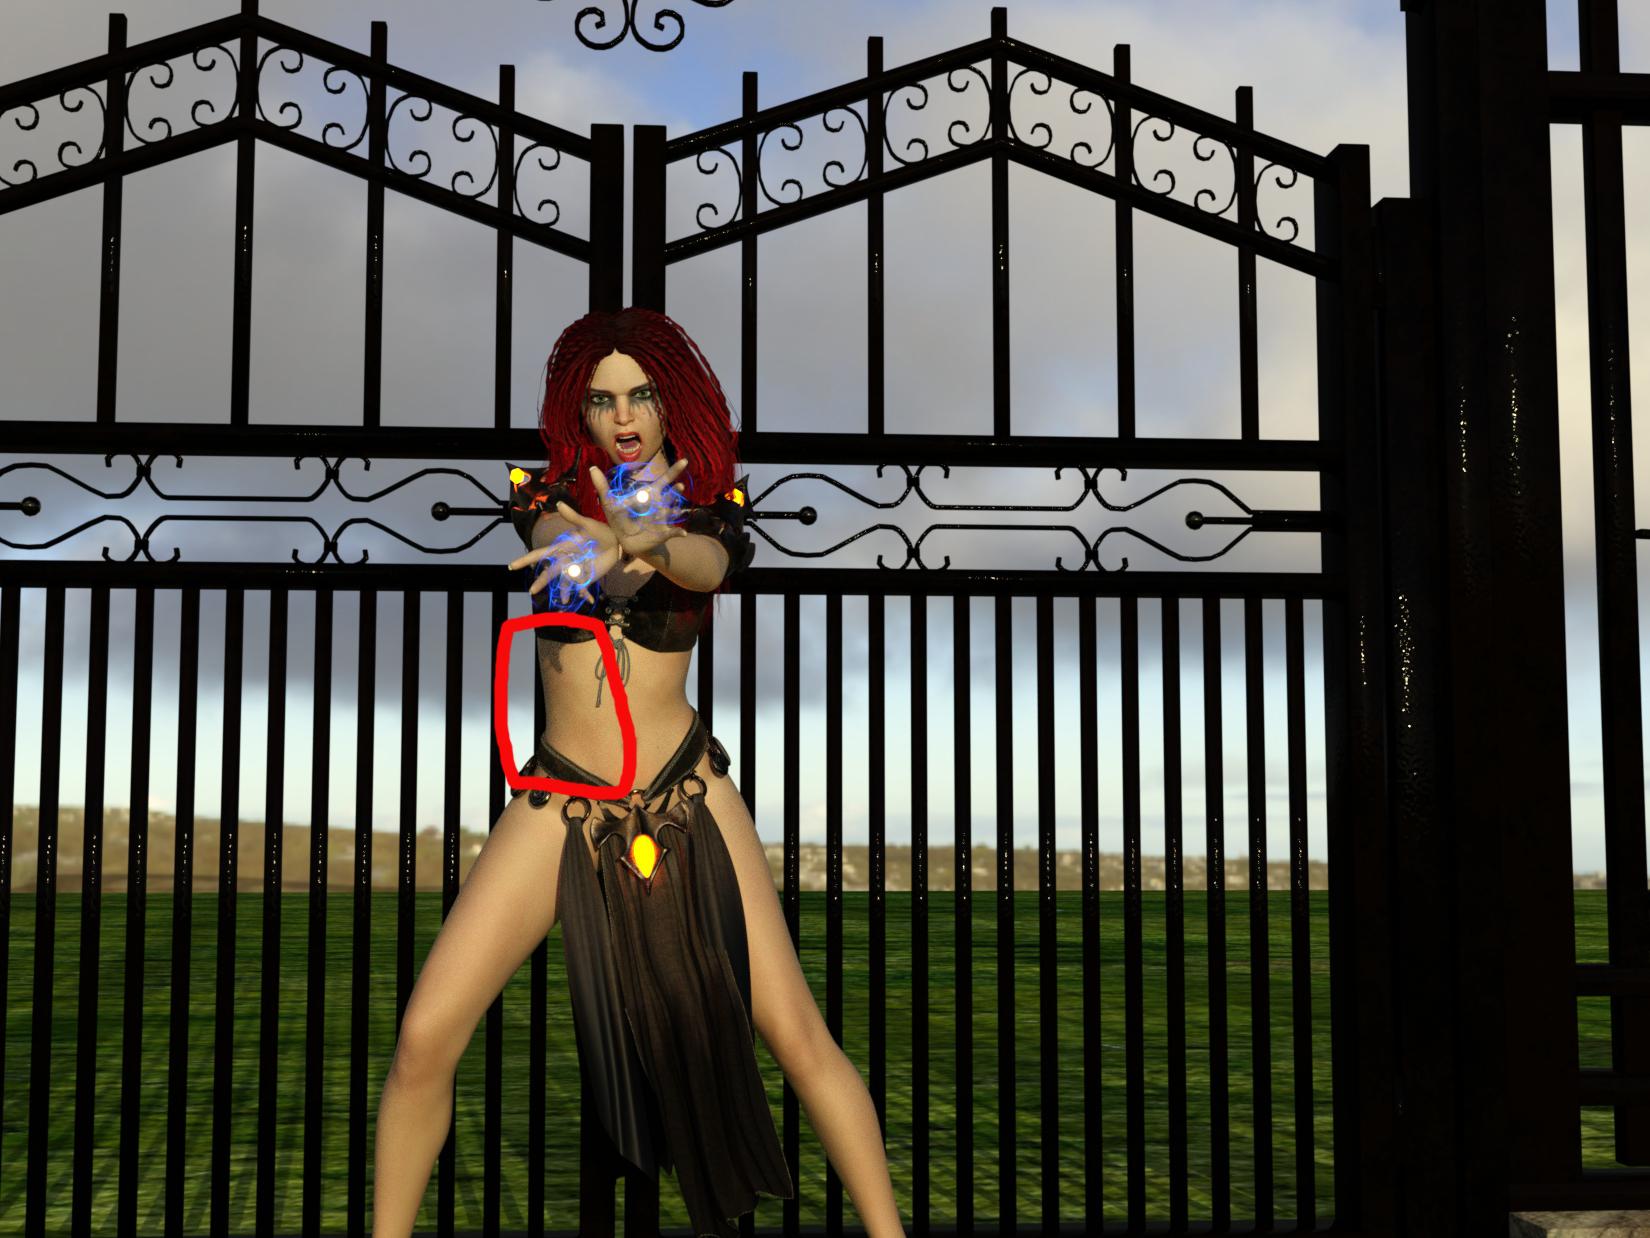
Short and the long of it, the link above, is an example of a problem I'm having with IRAY and all I can think to call it is noise or grain. I need some help in understanding WHAT I should be tweaking on to make that go away or if it is just a problem you have sometimes. These are top quality IRAY skins/characters from Rendo so it should not be a poor product design.
It's like it wasn't cooked long enough to get all the fuzz out, but I can't figure out how to make it go a little big longer, but not for hours on end. I've researched and asked in a few places, but no real reply. I am thinking a tutorial from 2015 wouldn't be all that helpful for IRAY settings in 4.10. Or maybe it would? Funny thing is, I've always liked HDRI light, but I have these same kind of fuzzy issues sometimes with 3Delight and HDRI sets. I asked for help on that before too a long time ago and didn't get any guidance other than use better character skins. HDRI, for me, always seemed to give the most impressive results. That bright white, realistic light. Surely somebody else has had these issues and knows what I am talking about :) I also had a weird problem with "white squares" showing up in one of my IRAY renders using the new Ultimate HDRI Environment sets I picked up. Maybe the scene file is just corrupted? But I work a lot from scene files since I have to save and come back to stuff.
I want to be able to use IRAY consistently as well as 3Delight. Can you point me to something comprehensive yet easy for a newbie to understand on what I need to do in IRAY to make these grainy things go away? Is there a really good product that you use that helps you without a lot of waiting around or real knowledge? I don't render huge files. Mostly 1650 to 2000 on any one side. They are usually under 3,000 on either side.
I just feel like I'm running around spinning my wheels in sand trying to understand what to do and why. It's like when I started in Poser and had to learn how to move all those dials. I don't even know the proper terminology for what I'm trying to find either!
I just need to know if there is a way to fix this, how to do it, or if maybe I'm just being overly criticial? Thank you in advance!
Daz 3D is part of 
Connect
DAZ Productions, Inc.
7533 S Center View Ct #4664
West Jordan, UT 84084
Licensing Agreement | Terms of Service | Privacy Policy | EULA
© 2026 Daz Productions Inc. All Rights Reserved.
Comments
My advice is to render it double sized, do a Noise Despeckle or Noise Median filter in Photoshop (or something similar) then shrink it.
Or render double size and turn up render setting filtering from Gaussian 1.5 to 2-3.
Ok. Sounds good. What about the convergence? Should I use more than 95%? Or is that decent if I'm shrinking it?
The higher your convergence, the less "noise" will be in the render.
The catch is the final 5% to get up to 100% convergence could double your total render time.
If you are willing to cook your renders longer here are a few settings that will help.
In your Iray Settings:
Go to "Progressive Rendering"
Set "Max Samples" to 15000 (This will allow Iray to render all the way to 15000 itterations if needed"
Set "Max Time (secs)" to 0 (This will remove the time restriction for render completion. The Default is 7200 seconds or 2 hours)
Set "Rendering Converged Ratio" to 100.0% (This will make Iray continue the render until the convergence reaches 100%)
Those three settings are all conditions for a complete render.
When a render hits any one of those three conditions the render will be complete.
For example with the default settings (2 hours, 95% convergence or 5000 itterations):
If a render hits 2 hours render time, but is only at 1233 itterations and ony up to 46% converged, the resulting noisy render will be considered a complete render.
I wouldn't worry about convergence so much as 'yeah, that looks good.' I always set convergence to 100% because I don't care, I just don't want it canceling early.
I mean, heck, sometimes I find renders are good enough below 1%. It depends on what you need, and not all convergence is the same.
Well iRay should have its own denoiser filter, you can find it under render settings. Unfortunately it doesn't work at all. If you try to use it you will just get errors in the log about a hideous "black pixel filter" getting in the way. AFAIK this issue is around from the very beginning of iRay and it was never fixed.
This is why you have to use a denoiser in post processing. Such as GIMP or Photoshop. As for the double size trick, be aware that iRay gets more memory the bigger the rendering resolution is. So it may not fit any card.
EDIT. Among other things, that's why I use Cycles for rendering. Because it doesn't have any of the above issues.
@Padone "Well iRay should have its own denoiser filter, you can find it under render settings. Unfortunately it doesn't work at all. If you try to use it you will just get errors in the log about a hideous "black pixel filter" getting in the way"
This hasn't been my experience. While I grant that the denoise filter doesn't seem to be as sophisticated as those in dedicated image editors, it does work for me and I don't get render or Studio crashes.
@Shannon McRoberts (obsidianpoet) "Can you point me to something comprehensive yet easy for a newbie to understand on what I need to do in IRAY to make these grainy things go away?"
Add more light to your scenes, then use tone mapping to set the overall brightness to the level you want. Note that using tone mapping to brighten a scene is not the same as adding more light.
I don't know .. Even if I crank up the values it seems it does nothing. So don't you get the "black pixel filter" error in the log ? And can you see any difference when applying the denoiser ? If so, please if you could post two pictures of an example with and without the denoiser even with a simple sphere, and the denoising settings you're using, it would be very interesting and useful. Thank you.
EDIT. Below my pictures with and without denoise, and the settings I used. No difference there ..
I’m convinced that the built-in noise filter does’nt work. The settings do not correspond to the problem the filter must correct. Awhile ago I started to script a solution but it is not finished yet. It’s in early stages and it is slow as h*ll, but correct the two kinds of noise problems, brighter and darker pixels.
Thank's everyone for the feedback. I also tried the built in noise filter and it didn't do anything for me that I could see. But I didn't know what slider to move, etc.
I do have Photoshop CS6 and lots of other things I can use to denoise them.
I will look into the tone mapping. I have not watched any videos on that yet.
Right now I'm just using a few sets like the IBL Master with iRadiance. I also have some of those ULTRAHD IRAY HDRI sets that seem to work well enough. I'm not quite sure what kind of lights to add, etc. Lighting has always been an issue for me in all the programs LOL.
You shouldn't need a noise filter. The problem is that the default setting for quality ends the render far too soon. I really have no idea why it's set so low.
JamesJAB has it right, but it's much easier to just go to the Progressive Rendering setting section he mentions and turn 'Rendering Quality Enable' to OFF. Iray will then use the 'Max Samples' setting in the same section to determine how many iterations to run the progressive render for.
I use anywhere from 2000 to 12000 samples. The more iterations you let the render run for, the less noise there will be. Darker scenes require more samples. Heavy SSS in the scene will also require more because the light has to penetrate the volumetric solids.
Also, I recommend setting 'Pixel Filter Radius' under 'Filtering' to 0.8 to get sharp, quality renders. The default of 1.5 will make renders blurry.
Yay. Thanks for more advice. I'm tweaking now. When I went to edit my max samples were defaulting at 5000. So I bumped it to 6000 to just test. So, does this mean that it will run 6000 iterations? Right now I'm at iteration 833, 26 minutes, 13% complete and it's looking pretty good. I'm keeping an eye on the shadows to see when the part that annoyed me goes away. I left convergence at 95% just to see for my own investigative purposes so I can learn to tweak what areas I want to get the effect I need.
The file I'm testing on is already a better render than when I started. Also, my system is not taxed at all and nothing is crashing. I have a quad-core and usually all I can do is render when I'm using 3Delight LOL.
I don't intend to use IRAY for everything, as the photoreal is kind of creepy to me at times and since I do a lot of fantasy I don't really really need it. But it's nice to be able to know I CAN use it when for so long it just didn't work for me. I have a comicon that I'm going to in July and I would love to have some IRAY renders completed of my characters.
And it's a bonus that I can render and do other things at the same time :)
So, at 6000 samples and 95% :
Whichever the render hits first will trigger "comlpete"
If you hit 95% and you are only at 3000 itterations it will be considered complete.
or...
If you hit 6000 itterations and it's only at 77% it will be considered complete.
Keep in mind that Iray can just as easily be used for "artistic" renders. There is a whole bunch of cool effects that can be had in the camera, tonemapping, and environment settings for Iray.
So I've been messing around with settings. I've tried to make a graphic to show some of the comparisions. Basically this is the same character with IBL Master in the iRadiance skies. I've found at least for me the settings I need to tweak on the most are the Pixel Filter Radius. I've locked that in to 0.8, although, I have seen where one vendor says 0.5 for detail. I saw a dramatic improvment in the fuzziness by just messing with that setting and lowering it. It didn't take a lot of the grain away, but I saw a visible difference in the hair and eyes that I didn't notice was blurry before.
Then I tried some renders messing with other settings. Convergence is 95% on all of these. Some have the render quality on, those with iterations over 200. It seems that if you just go with render quality on then you get about 200 iterations no matter what you do. I did the "two times as big" thing with the render quality on and the pixel filter turned to 0.8. It rendered in 23 minutes or so with about 200 iterations. Then I put it in PS and put a noise despeckle on it. I lost some of the detail, but the grain went away too. I also tried the max time =0 and samples at 5000 with the 0.8 pixel filter. I let it run until it reached 1189 iterations like the other free running one I tried. It's about 30-40 mintues for me to get to 1189 iterations when Render Quality is off.
The short of it is, I think I have a better understanding of what I need to tweak on to make stuff do what I want it to do. I'm glad I learned about the pixel filter radius. That has made a big difference in the details. Good news is it seems that I would only need about 2000 iterations to really reach what I wanted. I don't know if you can compare these as apples to apples, but 200 iterations with Render Quality on just isn't as nice ast 1189 with Render Quality off.
I'm extremely tired now, but I do appreciate the help.
And if you haven't purchased the IBL Master dood-dad I would highly suggest it. :)
@Padone "So don't you get the "black pixel filter" "
Sorry, I never look at the log unless I'm checking a render time for a render that ran while I was doing other things. As I said previously I don''t have rendering failures or Studio crashes.
Rendering noise is primarily due to not rendering long enough. The main solutions are either better lighting or longer renders (more samples). I have already admitted that the denois filter isn't very good, but I also rarely post process for things like noise.
Just for the sake of completeness. Below there's a Cycles render with denoise on and off. That's what I call a denoiser that does work. Also, using a denoiser is much faster than letting the convergence to complete. So you can render in a fraction of the time and it's good for animations.
I don't think I can get Cycles to render from Studio, can I? I have to use whatever will work with Studio without costing me anymore money. Unless I just looked up the wrong thing.
I find DAZ Studio too much limited for animation and fx that's why I use Blender. For still pictures DAZ Studio is fine. Anyway once you get the basics of Blender it's not hard to import DAZ assets via obj and fbx. If you ask me it's worth a try.
I find DAZ Studio too much limited for animation and fx that's why I use Blender. For still pictures DAZ Studio is fine. Anyway once you get the basics of Blender it's not hard to import DAZ assets via obj and fbx. If you ask me it's worth a try.
Doesn't Blender cost money? It was way out of my price range last I looked. I only have Poser Pro because I had a coupon and got a lightening deal on Amazon. ????Blender has always been free.
Yes, I see how the noise is less. And I see now that Blender is free. I have no idea where I found it cost money..maybe it was a plug in or something. It was a long time ago before I had much 3D experience. Oh well. So do you use Blender for the set up and just skip Studio altogether?
I mostly do still images. I don't do images for hire anymore so I only have to make me happy LOL. Sadly, vacation is over and back to the day job I must go.
Thanks again for all the help. I might have an inkling of what I'm doing these days!
I use DAZ Studio mainly to export DAZ assets to Blender. I tend to use obj for scenes and fbx for characters. The fbx already includes a fk rig so you just have to add ik handles. You may also need to fix some materials. There's also a good importer on diffeomorphic.
http://diffeomorphic.blogspot.it/
If you don't need animation then it will be easier for you to stick with DAZ Studio. You may need GIMP or Photoshop for effects but that's fine for still pictures.