L'Adair's Kitchen… (How'd She Do That?)
 L'Adair
Posts: 9,479
L'Adair
Posts: 9,479
Ever look at a render and wonder, "How'd they do that?" Me, too. Well, I can't answer that question for anyone else, but I can for my own renders. And the recent flurry of renders I did for the Skin Builder 3 render competition contain quite a few "tricks" to get the look I was going for.
Long before I found out I had a computer capable of running Daz Studio, I did product photography for a number of clients. (I used to bill myself as an iMarketing Consultant, helping my clients market both themselves and their websites…) I don't think I'd call "product photograpy" unique, but you do take a lot of "poetic license" with these images, especially in postwork. The goal is to showcase the product without any distractions, like a stray shoelace showing behind a pair of work boots.
It's taken some time, but I've learned to apply the same mentality to my 3D art. By that I mean, I no longer worry about everything looking "right" from any direction, as long as it looks right to the camera. I think my art has improved because of it. At the very least, I'm completing scenes much faster than before.
I've been told I think outside of the box. Honestly though, I suspect most of the tricks I use, if not all, have been used by others before me. But I also remember coming to this hobby with nothing but a desire to create something with 3D I could never capture with my Canon. And it was the forums that gave me the information I needed to progress beyond a single figure lit by the Perspective View "camera"! In some small way, this is me giving back, and paying it forward.
Want to peek behind my curtain? Keep reading…
P.S. Your comments and questions are welcome, and encouraged.
P.P.S Each image title links back to the gallery page, where you can see the full-size image, as well as the full list of products used in the render. I like to render my images at least 2K pixels wide, so if you want to look at something in more detail, click the link.
One of the things I've learned from doing this thread is how important it is to reserve one or two comments at the beginning for other information one might want to add, and keep together with the original post!
Here is a list of all the images featured in this thread, linked to the thread:
Her Little Black Dress
The Elder
Sagittarius
At Peace
Summer In Full Swing
Modern Matriarch
Retribution
Magic Moment
I Love My Job
Rune vs Rune
Happy Girl
The Girl 7/8 Photo Shoot
Got Milk
The Standoff
Defender of the Art (Closeup)
Asking Directions
Between Tasks
Summer Nights
Bear Creek
What Are You?
Red Roses (DOF)
Here is a list of mini-tutorials and other solutions featured in this thread, linked to the thread:
How To Get A Blurred Background In Daz Studio Using The DOF Camera Options
Extract Makeup From One Character To Use On Another
Shadows, Large Scenes and Iray, Oh My!
How To Create "L'Adair's Lightbox" (Plus a few images here.)
Ways To Hide The Mesh Of An Object
Using a 3DL Skydome in Iray
Daz 3D is part of 
Connect
DAZ Productions, Inc.
7533 S Center View Ct #4664
West Jordan, UT 84084
Licensing Agreement | Terms of Service | Privacy Policy | EULA
© 2026 Daz Productions Inc. All Rights Reserved.
Comments
First up is "Her Little Black Dress."
Secret #1: G3F is not wearing the dress. Autofitting Corvidae Dress for G2F to G3F just didn't hang right, and really distorted the beads. To solve that problem, I put the dress on G2F, shape and pose modified to mimic the G3F model, and then set to hidden. I changed the pose of G2F to make the strings lie against G3F's skin on the shoulders, and scaled the abdomen of G2F to bring the fabric around the waist closer to G3F. In postwork, I replaced two of the beads, which were distorted. They still aren't perfect, but they're not so glaringly obvious anymore. On the side away from the camera, a good deal of G3F's skin is showing, including most of her right breast.
Secret #2: The pearl necklace is also not autofit. I think I parented it to her neck, but didn't really need to. It's just sitting there, where it looks like she's wearing it. The necklace collides with her skin on the back side, away from the camera.
Secret #3: This model/figure is Arabella 7. I used Brow Remover to get rid of those obnoxious brows, changed the UV to Base Female, and ran Skin Builder 3 for all the details on the skin: I darkened the skin, added pores, veins, moles and a subtle tanline, and then gave her face a complete makeup makeover, including new eyebrows and eyelashes. Her nail polish is also by SB3. For the final touch, I created new eyes. When I was finished, I set the UVs back to Arabella 7. The UVs were so close to Base Female, there was only a small area on the legs that wasn't affected by SB3. When I set the UVs back to Base Female, the skin fit perfectly. (This was a lucky fluke. It won't work on Rune 7. I haven't tried with any other 7 base figure, yet...)
Secret #4: I used the original Ghost Lights to soften the shadows and make sure her face was a focal point.
Secret #5: The backdrop behind G3F is from Render Studio Iray, but with a "ribbon" shader from Dance of the Butterflies Poses and Props.
Note: If you'd like to get a good look at her eyes, check out "The Eyes Have It." A variation of the above image, the only change is the camera angle and post work.
Very interesting! Thank you.
Beautiful image!
You're welcome. And thank you. And thanks for commenting! Hugs.
I will be watching with interest. Some neat tricks there. I already have a question though. I'm a bit confused as to what exactly you did with the skin ( I understand the skin builder part of it, I am not quite understanding the switch UV's. If you have a new skin why are you switching? Sorry I still struggle a bit with things like this.
"The Elder"
Secret #1: This Centaur 7 for G3M (C7M) is wearing skin for G3F thanks to SloshWerks' G3 UV Swap product and SB3. One of the things I found frustrating right from the start with C7M was the lack of really pale skin in my runtime for the G3M portion of the centaur. For dark horse coats, I've got plenty of dark skins, but I wasn't able to get the perfect pale skin until Skin Builder 3 came out. This skin includes the Skin Base, which creates a complete new skin. I used morphs to make the areolae and nipples smaller, and more appropriate for a male. I also added blue veins to the skin, but they are a subtle touch, and don't correspond with the veins created using the Vascularity morphs.
Secret #2: I set up the scene with the centaur and Willow Creek where I wanted them in relationship with each other, but I rendered them separately and combined them in Photoshop. This gave both the subject and the background the same lighting, but allowed me to blur the background to his left, (our right,) and keep his head from being overpowered by the green and trees behind him.
Secret #3: The shortswords in the scabbards are just placed where they look good from the camera. I think they are even colliding with each other.
Secret #4: I used the Geometry Tool to select and hide the fiber mesh body hair that poked through the chest armor of the Nocturnal Guard Outfit.
Not a secret, but worth mentioning, all the hair on G3M is fiber-mesh. The character I used is Dale and I kept Dale's beard. The hair is Santa Claus Hair from Smay, while the brows and body hair are Oh My Brows and Oh My Body Hair from RedzStudio, available at Renderosity. I used the belly hair to soften the transtition between human and horse.
Sorry to have confused you. I'm not swapping the skin, I'm swapping the UVs. The base 7 figures all have their own unique UVs. SB3 won't work with any other UVs, so when attempting to use the skin materials for Arabella, I had to change the "UV Set" parameter to "Base Female." At the time, I didn't know if it would work or not. When I finished, the resulting maps were correct for the Base Female. Here are a couple of images comparing Arabella with her original UVs and with the Base Female UVs wearing the skin I created in SB3:
Notice the thin light line on the leg on the left? That's where the Arabella skin texture was different from the base UV's and didn't get modified in SB3. The leg on the right looks fine, as I changed the UV set to Base Female. Most of the other differences between the two were subtle and didn't cause any more seams to show. However, the following side-by-side of the face shows there is a difference in the mouth and the eyebrows are "compressed" for the Base Female, and not quite as thick.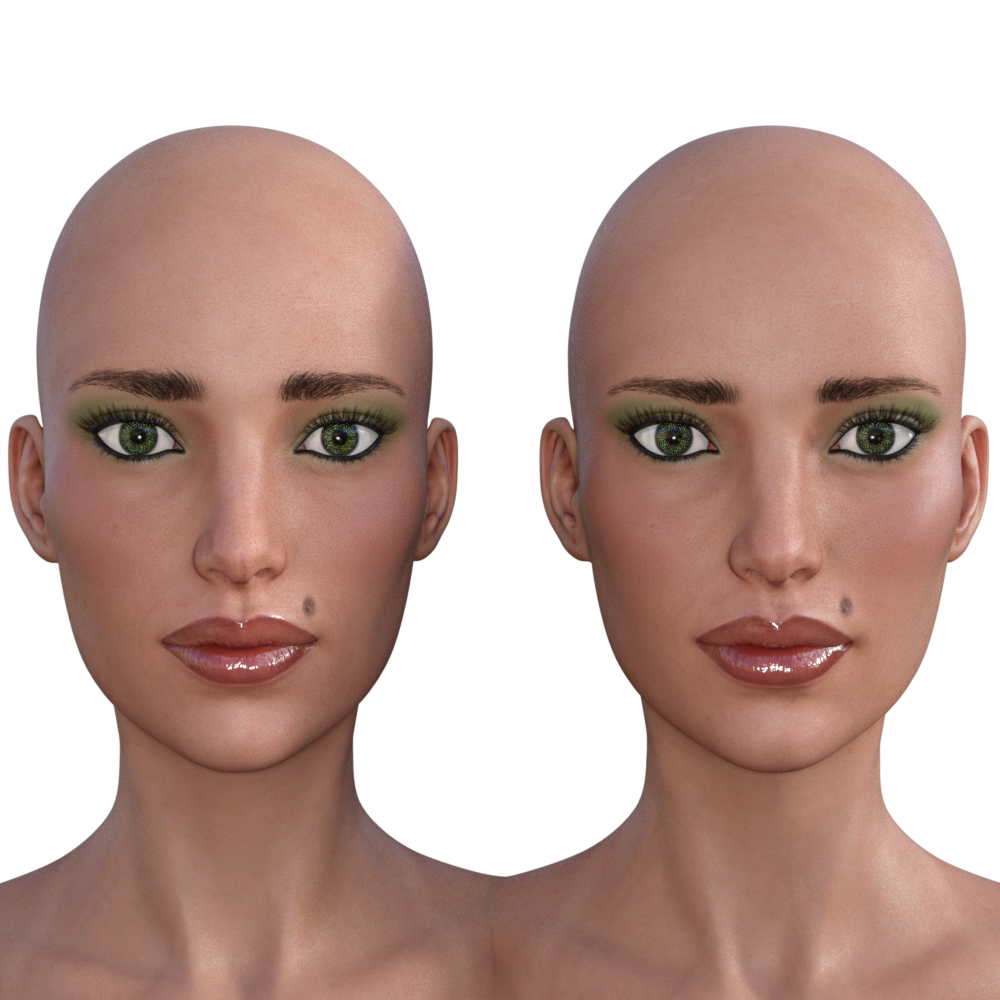
Looking at it now, I see I could have used the skin with the Arabella UVs. The camera shot never shows her legs! lol
Ah I think I understand. I'm not super good with UV's yet either, something else on my list of stuff to learn (which is never ending apparently lol)
Other than knowing to change them in the Surfaces->Editor, if necessary, I know next to nothing about UVs. It is important when using SB3 that all the material zones are set to "Base Female." SB3 will ignore and not make changes to any zone with a different UV parameter.
I added to the post you quoted, including some images I just whipped up for the post. Not sure they shed any light on "UVs" per se, but you can see some of the differences between the two UVs...
And thanks for spending some time in my kitchen. Hugs.
Thanks for your hints.
You're welcome, nonesuch. Thanks for dropping in. Hugs.
Thank you for letting us peek behind the curtain. Some great ideas that I can put to immediate use. Others that will have to wait until I gain a firmer understanding of the program.
Very interesting thread. Thanks for sharing your tips & tricks, L'Adair.
This is a fascinating read! I'm really looking forward to more. (I've done a number of "don't look at this character from the other side" renders in my time too.)
This will be quite handy, thanks a lot for posting. I agree, I changes as well from the perfect scene towards it has to look good from camera view, but then sometimes you change the view drastically and end up redoing anyway LOL
Thank you all, Worlds_Edge, Artini and MelanieL for stopping in. I hope you guys continue to think this is an interesting and fascinating thread. lol
"Sagittarius"
Secret #1: I created this image before the female version of Centaur 7 was released. By using GenX2 with the G3 addon, I was able to apply the G3F morph to the base male, and by using SloshWerks' UV Swap product, I was able to apply the skin I created in SB3 using the Aunrae Dark Elf skin textures as a base.
Secret #2: My female centaur is wearing G3M clothing. Because the base figure is really G3M, clothing for G3F has to be autofit. The armor I had modified to use with this figure looked good until I tried to pose "her"!
Secret #3: I used Skin Builder 3, as already mentioned, to create the dark skin with light/white freckles and spots. While some SB3 options do allow a "normal" blend of colors, the Freckles and Age Spots do not. To solve this problem, I closed SB3 just before adding the spots, used L.I.E. to invert the skin textures, (making them light,) and reopened SB3. (To be safe, the first thing I did was save my inverted skin, in case I needed to start over.) I then applied both Freckles and Age Spots using Black as the color, closed SB3, and again used L.I.E. to invert the textures again, ending up with the dark skin and white freckles/spots. Once again, I opened SB3 and finished the rest of my changes to the skin, and saved that version of the skin as a preset.
Secret #4: The ground my centaur is standing on is a single plane primitive with the scale set to create a very long plane. I created one morph using d-Form, to get the rounded hill behind her. The texture is from DA's stonework shaders, with tiling set to keep the texture from distorting.
Secret #5: The fog is a combination of Marshian's Above the Fog, set at an angle, and Sy's Fast Fog Iray, (one fog cube and and one prop barely breaking the ground plane,) with added fog in post using Ron's Steam and Smoke brushes.
Secret #6: The starry background is an HDRI from TerraLUNA 3, but the "stars" didn't have that sharp pin-point look, so I added to them in Photoshop. By the way, though TerraLUNA 3 was developed for TerraDome, it is a standalone product.
To give you a better idea of the layout, and scope of the scene, I've included a couple of viewport images. The first image shows the plane, the morph, and the centaur... if you look real close. The centaur is at the far left, and plane morph is only a little to the right of her. That angled something that intersects just at the front is the Above the Fog object.
The second image shows the moon in relation to the other objects in the scene. Hard to see in this image, but that moon is waaaay out there! If you look closely at the plane, you can see the Fog cube, though only where it's black behind it. The rest of the cube blends out completely with the white background.
Thank you for taking the time to give me some visuals thats very helpful!
You're welcome, Sonia, I'm glad to hear they were helpful. I'm happy to provide visuals, when I can.
"At Peace"
Secret #1: This is SC Alieta with SB3 modified skin. I reduced her by 50% to make her surroundings look larger.
Secret #2: In spite of making Alieta smaller, I had to more than double the size of the single mushroom for her to sit on. I added the Smoothing Modifier and set it up to collide with Alieta, so the mushroom appears to "give" around her feet. (Her behind, too, but that doesn't show in this image.)
Secret #3: The ground, grass and flowers is a preset from the G3D-DA Grass and Plant Pack, but I moved and rotated the grass instances to create a void, where I put the mushroom. I also moved/rotated the flowers to frame Alieta.
Secret #4: The two flowers in the foreground have been moved lower than the ground, and scaled smaller to fit the scene.
Secret #5: There is only one butterfly in the image. The other ten are instances.
Secret #6: Alieta is wearing underwear as outerwear. In the two images using the same character, for the SB3 rendering competition, Alieta is wearing a pair of shorts. But the extreme bend of her legs distorted the shorts so much, I swapped in a pair of "panties" from Yulia's Finery for G3F. and applied the same green leather shader to all three material zones as I used on the rest of the clothing.
Secret #7: The Double Trouble Braids do not have a separate material zone for the left, right and center bangs. I used the Geometry Editor to create a new material zone for the right side bangs, then created the "streak" of lighter hair in the Surfaces->Editor.
Secret #8: The background is an HDRI from TerraDome 3. I rotated it on the X-axis until enough blue sky showed in the background. That also moved the brown "ground" below the horizon of the image.
Not a secret, I created the Monarch Butterfly inspired textures for the Butterfly Wings for G3F in Photoshop, then tweaked the shader on the veins until it was black enough for the effect I needed. Lightly transparent, you can see some of the flowers behind her through the wings, (where the red-orange gives way to magenta.)
Saggitarus is a wonderful image. So dramatic! I hope to one day manage to get more than one or two things in a scene. Right now, if I were to insert the moon and a character into a scene, there is a 90% change my character would be in the middle of the moon and hard to find/extract. Thank you for showing the various view points, shows how far the objects are - something you can't always tell from a straight render.
Love the details you provided about the making of "At Peace." Seeing behind the curtain has made me realize that even those with Daz skills constantly face issues that they must then work around - such as the shorts not working. If that happened to clothing on my figure, I'd automatically think it was that I wasn't doing something right. Of course someone who is more skilled/knowledgeable might be able to fix that type of issue, but your post shows that it is not always the case.
Thanks again!
Nice one with the fairy on the mushroom. The trick to collide a not'cltohing item with a figure was new to me, that is a very nice effect!
A question for the sagittarius render, is the moon a prop or is it a plane with the moon map on it? That is what I did in this render https://www.daz3d.com/galleryimage/image/368061/nut-chons_full.png .
"At Peace" is one of my favorite! Love the atmo, her expression...
Thanks for sharing the making off.
I usually start with my main character. and leave them at world center where they load. I then build everything around them, leaving them at world center so I always know where things are. So I load the character, then load the set and move the set around instead of the character. Don't know if that will help or not.
Love the fairy and really like the what you did with the hair. I haven't even looked at the geometry editor yet but I will get to it sooner or later lol.
Nice images. I love tips threads. It's about time you had your own thread, L'Adair. Welcome. Lots of nice tips here. I even learned something which is nice. I haven't played with adding a smoothing modifier much and the mushroom thing was new for me. I'll have to try that out. Thanks.
Beautiful images and wonderful tips! Thanks for sharing. I'm learning a lot here!
Whoa! Lots of comments; Lots of questions! Thank you all for dropping by the Kitchen.
The moon is from TerraLUNA 3, It is a prop, @Linwelly, and can be turned to simulate the phases of the moon. TerraLUNA is a standalone product, but it was developed for TerraDome 3 Iray, and the prop is loaded at a great distance. I actually had to move it more than half way back to world center to get that giant moon effect, so there's no possibility, @worlds_edge, that your character would get lost it it's center. It comes with several HDRIs, literally from dusk to dawn.
@worlds_edge, fitting clothing to the models is one of the banes of 3D art, (imho.) Even clothing that is rigged well can run into problems with extreme bends. I've found being flexible in what I want my figures to be wearing saves on my stress level. Sometimes we just have say, "Good enough." And for the record, I still consider myself a relative newbie. There are so many things Daz Studio can do I have yet to figure out. It's a learning process, but a fun one. I'm glad passing on some of the things I've learned will help you with your learning process. Just make sure to have fun along the way.
I've been using the smoothing modifier/collision combination since early on in my efforts with DS. I suppose it's one of the perks of not having a manual: I didn't have anything to tell me when to use collision, so I started using it whenever I needed a slight indentation between two objects. If you look closely at the arm in Aspen, (one of the other images using the same character,) you can see her skin is very close to the bark of the tree branch. I set the modifier and had her collide with the tree! (The same with other image, but it's not as easy to see.) This trick is one I use often.
Sonia, I use the Geometry Editor so often, I've been planning a mini-tutorial for one of my posts. It has to be mini, because I really don't know the tool in depth. But I will put that information together and get it posted within the next few days. And like you, I build my scenes around the subject at world center. (Almost always, anyway.) One of the reasons I do that is the HDRI lighting is best at world center. And I always want the subject to get the best lighting.
Thank you all for the compliments on these images. I do my art to please myself, but it's always nice to hear when others like it, too.
LOL... Thank you, Cathy. I suppose you're right. Your and Sonia's threads have such a head start on me, and if I'm not mistaken, both of you picked up DS after I did! But then, I've always been a slow starter...
Hugs to you all.
Welcome to the Art Studio! Happy to have you join the club, and with such a nice thread. So organized and easy to read, and I love your first render. She's magnificent!
Thank you, @Novica. On all counts. I'm happy to be here.
I've decided I need to spend a lot more time in the Art Studio. Having threads I want to contribute to gives me the added bit of motivation I need to get creative. I've just got so much stuff in my runtime, it is overwhelming at times. But with something as simple as the Hidden Treasures thread, or your call for renders of a specific artist's products, really helps to cut through the fog and get me focused. The Art Studio is a great place to hang out, and a great club to be a part of.
Oh my gosh, I missed this post completely!
You are so right. Some times you just can't get the vision to work so you make changes, and then you have to fix all those things that weren't an issue before. Been there, done that, more times than I care to think about!