TUTORIAL - Creating a Genesis Partial Body Morph in DAZ Studio Pro 4 Using the DForm Tool by RKane_1
 RKane_1
Posts: 3,039
RKane_1
Posts: 3,039
Okay, this is a repost from the old forums but I thought it would be helpful to put here. It is not as illustrative because you cannot post multiple pics in order anymore in the new forum (or I have not mastered that trick) so I placed the links to the images there for you.
Once I get 4.5 working on my system, I will see if it needs updating but if anyone can tell me what has changed, I would appreciate it.
Enjoy!
Creating a Genesis Partial Body Morph in DAZ Studio Pro 4 Using the DForm Tool by RKane_1
with GENEROUS assistance from zigraphix whose the author (I think) of the original document that can be found here: Create Partial-Body Morphs for Genesis - http://docs.daz3d.com/doku.php/public/software/dazstudio/4/userguide/creating_content/modeling/tutorials/pbms/start
Firstly, before you begin this tutorial, it may be helpful to peruse this section of the online manual: D-Form
For this Tutorial, I used :
• DAZ Studio 4 Pro
This was obtained for free during the giveaway that DAZ had in February through April of 2012 but the cost currently is uncertain.
Opening DAZ and load a fresh Genesis Figure
1. Open DAZ Studio 4 Pro and go the the "Smart Content" Tab
2. Under "People", double click on the "Genesis" figure. Even if you intend for the morph to be used on the male or female figure, its best to start with the basic figure here labelled Genesis. You can always use this morph later when you are done on EITHER sex when you are done.
3. Once loaded, you should have Genesis in it's basic "T" pose.
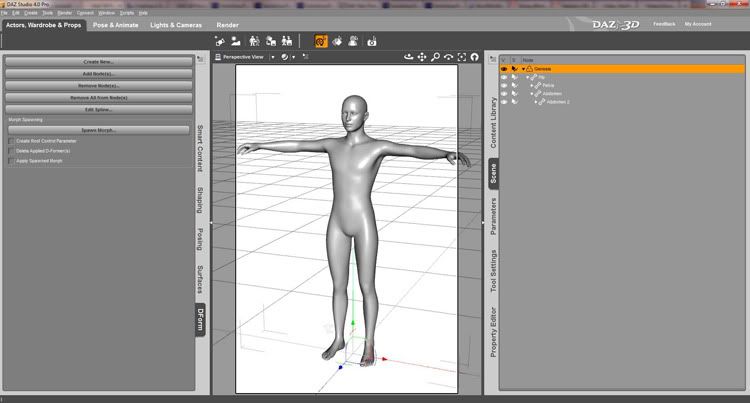
Using a D Former
4. Click anywhere on the Genesis figure or choose the Genesis figure in the "Scene" tab
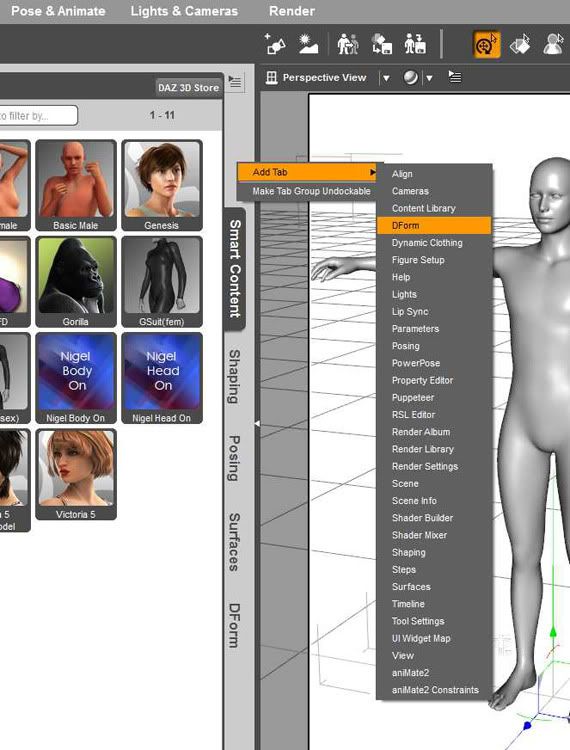
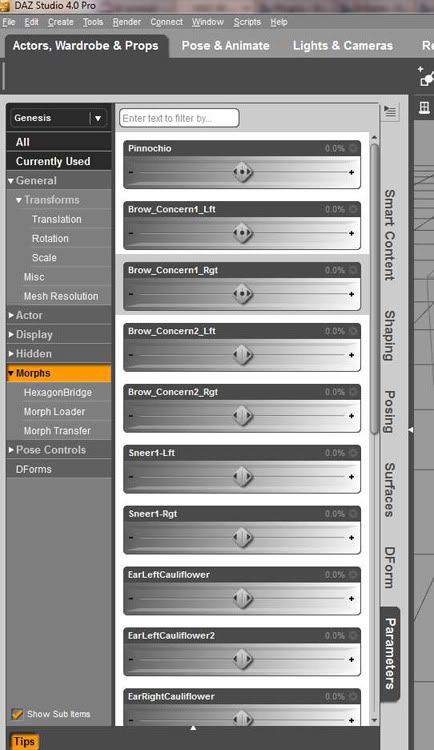
5. Open the DForm tab.
You will find this usually in the "Actors, Wardrobe, & Props" tab somewhere usually on the left side but, if you do not, you can go to anywhere in the grey are where you see the other vertical tabs and right click. This will open a menu where one of the selections is "Add Tab" where you can select "DForm" to add this tab.
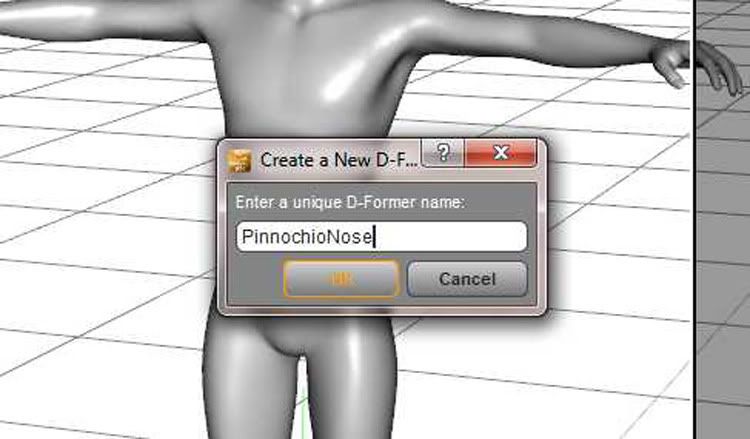
6. Click on Create New in the top portion of the DForm Menu.
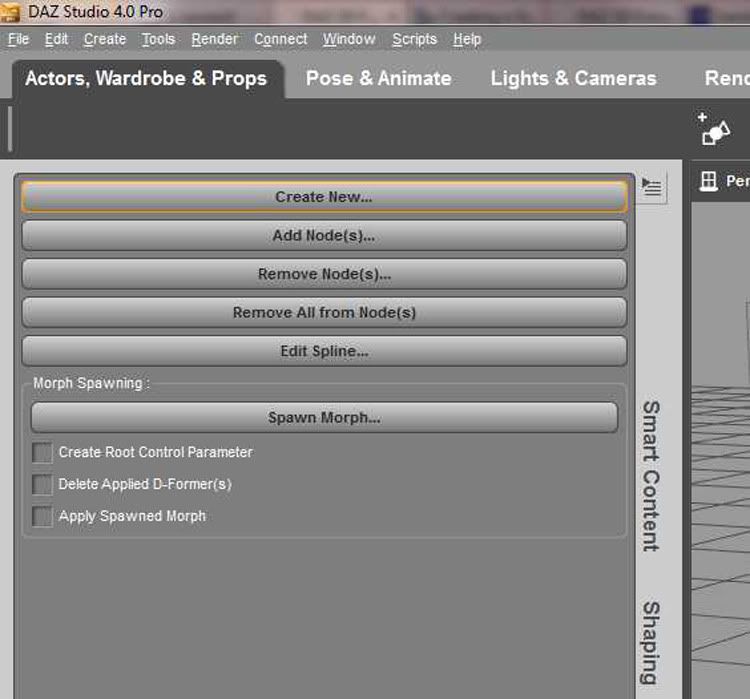
7. Name your DFormer. This can be anything memorable as you may want to save it later in case you want to use it again.
Manipulating the Field, Base, & Handle
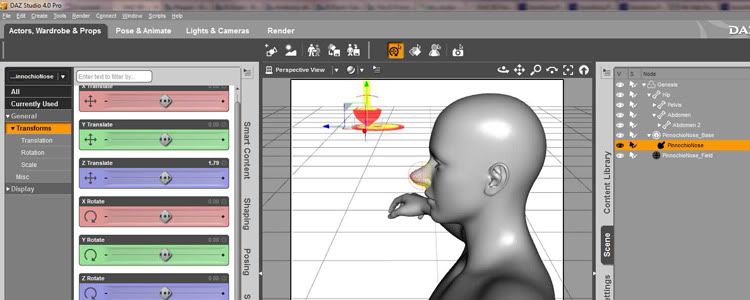
8. There are three parts of a DForm: Field, Base, and Handle.
I copied this directly from the documentation because I believes it most plainly and easily describes what is needed to know here for this tutorial.
"The Field appears as a wireframe sphere that surrounds the Base and Handle. The Field determines the size of the area that deforms when you manipulate the Handle. When you create the D-Former, the Field tries to encompass the entire node to which the D-Former is applied. You will likely have to position and shape the field to taste before you manipulate the D-Former."
"The Base looks like a flat, circular disk. It loads into the scene directly beneath the D-Former Handle. The Base defines the baseline point from which mesh deformation occurs when you move the D-Former. Move the Base to where you want the center of the deformation to occur. "
"The Handle looks just like a toy top with a long spindle. It rests on the Base when first loaded into a scene, and is listed as child to the Base in the Scene Tab.
The handle helps DAZ Studio determine how much deformation you want. The further from the Base that you move the Handle, the more deformation will occur.
-To pull the mesh, pull the Handle away from the Base.
-To shove the mesh off to one side or the other, move the translation sliders of the Handle off to one side.
-To push the mesh, push the handle down through the base.
-To twist the mesh, twist the handle along a rotational axis.
-To squeeze or stretch mesh, use the scale sliders.
-To restore the mesh to its original positions and sizes, set the handle’s translation and rotational settings to 0.00 on all three axes, and all scaling to 100%."
You can manipulate any of these with either the settings in the Parameters Tab or by direct manipulation with the Universal Manipulator but for selection, I HIGHLY recommend using the Scene Tab.
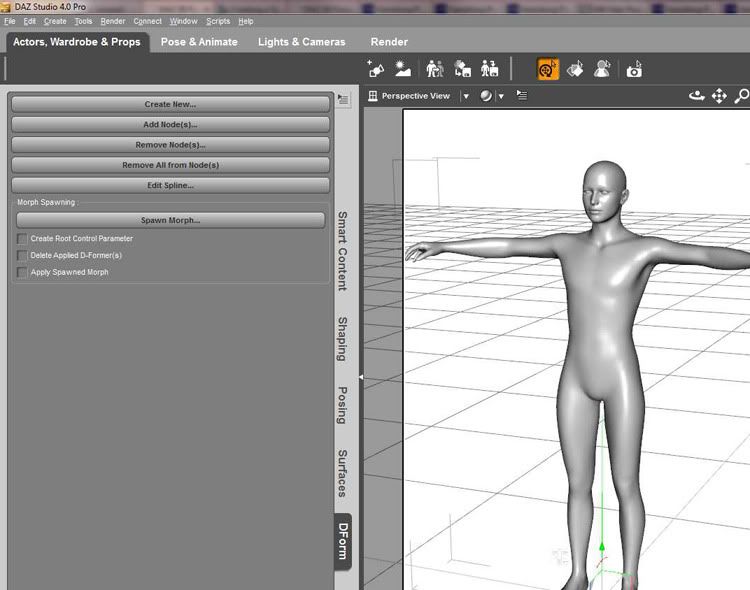
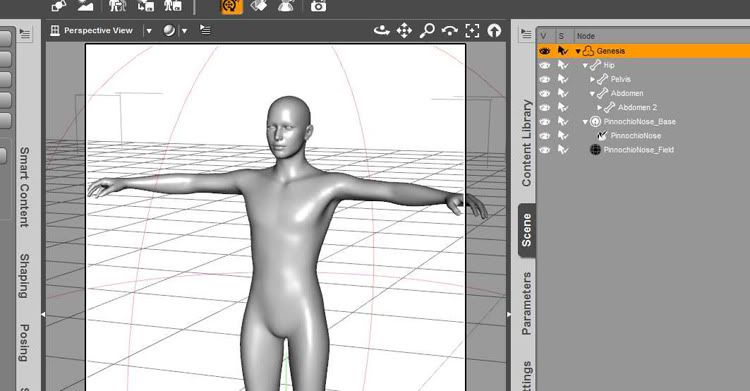
So that you can see all parts, I made Genesis invisible for this shot:
9. Click on the Field in the Scene tab and then, in the Parameters Tab, scale and place the Field so that it covers the area you wish to manipulate. It will be a a VERY large scale at first to encompass the entire figure but if you Scale it to 100%, then it will be a VERY tiny area. Here I have it scaled to 250% and I also used a combination of the parameters Tab and the Universal Manipulator to position it over the nose where I wanted it.

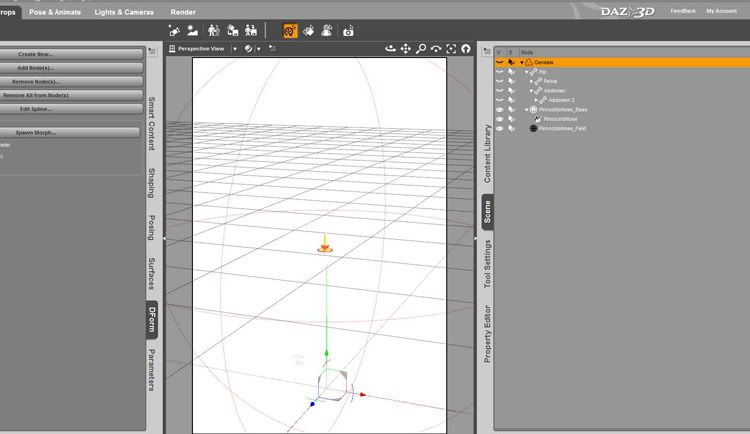
10. Next, in the Scene Tab, click on the base. Now Base Placement can make a difference when using rotate but mainly it should just be placed to where it is visible as what its relative position is usually immaterial.
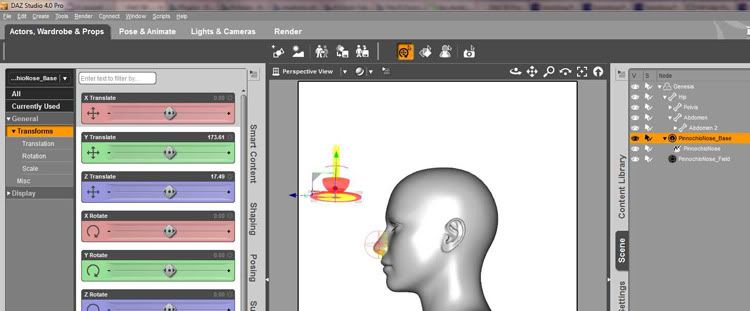
11. The HANDLE is the key manipulator. Wherever it moves, it will change the shape of what you have selected with the Field in the direction you move with the Handle. Scaling also has interesting effects.
Spawning a Morph From a DForm
14. Go back to the DForm Tab
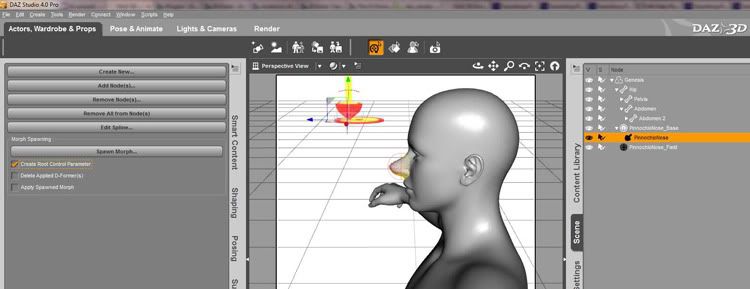
15. The settings here are important. You should always have the "Create Root Control Parameter" box marked off if you want to create a morph from the DForm. In this case, for purposes of demonstration, I will leave the other two boxes unchecked as I don't want to lose the DForm set I've made and I don't want the Morph set to 100% on the Genesis figure afterwards.
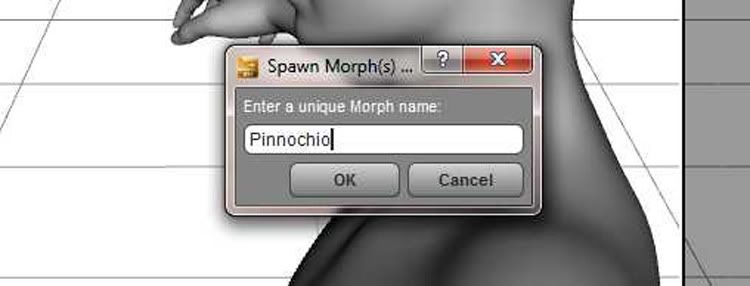
16. Click on Spawn Morph and name your Morph
17. You should verify that in the Parameters Tab under "Morph" your new Morph is there.
Saving a DForm Preset
18. So that you can load this same DForm set again if it is ever needed in the future, you can save the DForm as a Preset. Go to File -> Save As -> DForm Preset.
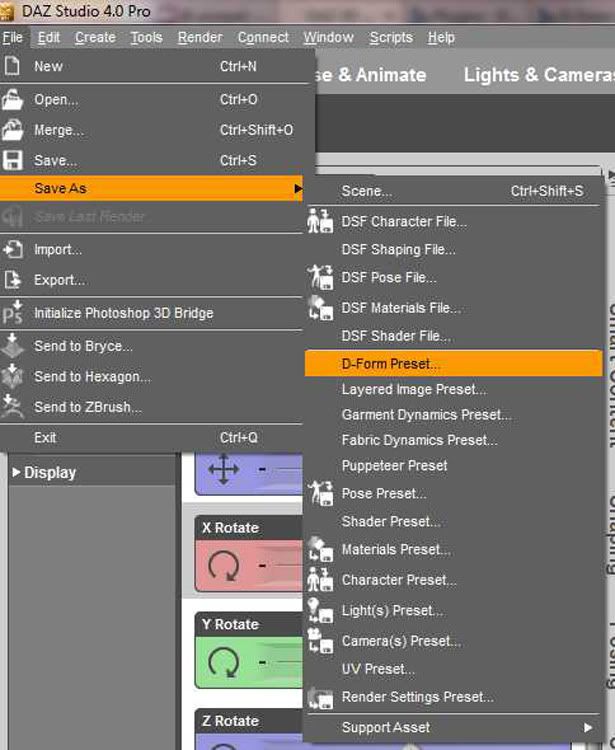
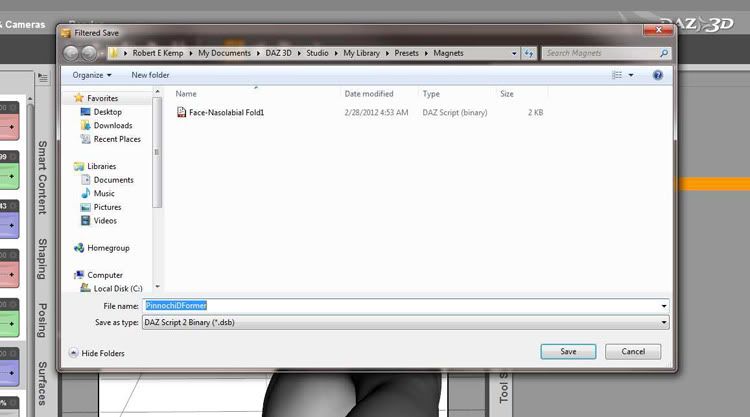
19. When this pane appears, remember you only need to save one single frame. It IS possible to save an animation with a DForm where the DForm follows or changes during the course of the animation but it is unnecessary for making a morph. Also, unless the morph is on an area which will have clothing or jewelry attached to it, then the "Also affect SELECTED Items fit to the Figure" is unnecessary to click on. Though if doing a DForm which will change the chest or torso, it is most likely necessary.

20. Name your DForm Preset.
TO BE CONTINUED...
Daz 3D is part of 
Connect
DAZ Productions, Inc.
7533 S Center View Ct #4664
West Jordan, UT 84084
Licensing Agreement | Terms of Service | Privacy Policy | EULA
© 2026 Daz Productions Inc. All Rights Reserved.
Comments
CONTINUED...
Creating a Secondary Morph
NOTE: This is NOT A NECESSARY STEP! This is merely to demonstrate that it is possible to make a group of morphs off of on DFormer that compliment one another. You may with to ready the entry for step #21 for informational purposes but if you only have one morph you want to save, then skip to step 24.
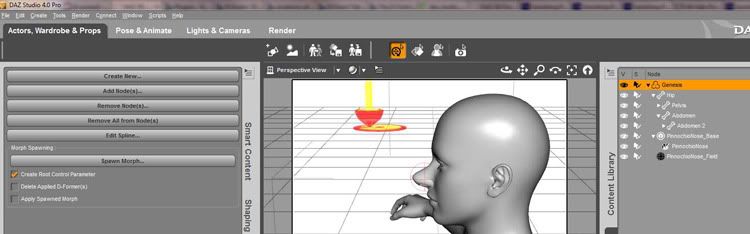
21. Now, why did we keep the DFormer around? To create a secondary morph to compliment the first one. I think the first one was too far back on the nose and I would like to make another one more towards the tip. These two morphs can be used in tandem to further the effect I am going for. So I reposition the Field more towards the tip and reposition the Handle. Here, since I am done with the DFormer and I want the Morph to be turned on to 100% when I am done, I check off all three boxes: "Create Root Control Parameter", "Delete Applied Deformer(s)", and "Apply Spawned Morph".
22. Now I save my new morph and I have a new morph as well. Had I had the first morph turned on, the new Morph would have included the deformation for that Morph as well. Now, as you see in the parameters tab, I have two different morphs.
23. I didn't need to but I find it helpful to make additional morphs in case I am not happy with the first one later, I have a little variety. Here the figure is with both items turned up to 100%.
Parameter Settings
24. In the parameters Tab at the top left of your Morph Dial is a little gear icon. By double clicking on it, it will open a window for you. For this morph I have decided it will obey limits. But I decided to turn the Max Limit to 300% for each.
Using the Property Editor
25. It is important to understand the Property Editor and what it can do for you. Find your Morph in the Property Editor. If made with a DFormer, it will be in the folders titled "Morph". and right click on the the name of your morph.
26. To change the name of your morph, right click on the morph and selecting "Label". This will change the name of the morph as it shows to you and others in the Shaping or Posing Tab. You may also change the items you may have forgotten to change in the presentation editor earlier such as Minimum and Maximum value and whether your morph should me measured by value or percentage.
27. If you click on "Label" a window will open allowing you to rename your morph.
28. To place your morph in the appropriate place so that you or others in future can find it in the shaping or posing tab, go to the Property Editor Tab and find your morph. Right click on the name of the menu and highlight the word "Grouping" and don't freak out. *smile*
29. This will open a window where ALL the Shaping and Posing Tab names are listed. Out of this, you must find the appropriate directory for your Morph. I have chosen "Actor/Head/Face/Nose/Universal/Proportions" for these morphs.
30. When they "disappear" from the Parameters tab you were working in, don't freak. Just look them up in the directory you JUST put them in.
Saving your morphs as a Support Asset DSF Morph File
31. Under the File menu, choose Save As -> Support Asset (at the bottom) -> DSF Morph File…
32. Enter your name or company name as the Author Name and a unique name for this morph as the Product Name and then Click to open the figure properties hierarchy and find your morph(s), click the check box next to it/them. Do not check the body parts, just the morph(s). CHECK YOUR MORPH(S) AND YOUR MORPH(S) ONLY. Then Click "Accept".
33. You are done! Now it will show up whenever you open a fresh Genesis and can be distributed!
Any input you give is helpful.
Please feel free to ask question about this and the process here in this forum post.
Thank you for reading my tutorial.
Just wondering if anyone has used this tutorial and, if so, if you were pleased with the result?
Was everything clear for you, step-by-step or should I clarify anywhere?
I appreciate your input.
Thanks, i like reading tutorials. I think, for me, using dform to create morphs may be better than using hex as i can work on a posed figure.
hmm..maybe there is a way to do morphs on a posed figure in hex.
Reading through, its well written and easy to understand. I just wish the images were viewable within in the post rather than having to click through - mainly because when I want to save a tutorial (yes i need to follow a few times till i get it) I "print" to .pdf file and save it
cheers
Thank you for your input! I appreciate it.
In the old forum the pics were embedded and when I that becomes available here I will change the code accordingly so it shows again.
Thanks for responding. I was starting to wonder if had helped anyone.
may god give you all many blessings for this tutorial, its answered so many questions for me and I thank you
MagicWeaver
PDF version can be downloaded here
TUTORIAL - Creating a Genesis Partial Body Morph in DAZ Studio Pro 4 Using the DForm Tool by RKane_1.pdf
http://www23.zippyshare.com/v/25311022/file.html
The Site where this PDF file is available will not allow me to download it unless I first download a plugin. I do not need another plugin of this type on my computer to download PDF files from other sites, and I see no reason to be forced into an extra download at this one just to download one tutorial in PDF format. I shall not be downloading this one because of the unreasonable requirement! Sorry!>:-(
Thanks for the tutorial, RKane_1 !
I don't get it completely yet, but hey, that's how one learns, right. :)
I've been trying to apply this to save expression poses as pose control sliders. I've gotten up to the point where the expression is saved as a slider under pose controls/head/expressions. The problem is it only shows up in the parameters tab when i have genesis selected, instead of when i have genesis Head selected.
Any ideas on how to do this, or maybe i'm just doing it wrong ?
Hi BlackFeather1973
I think after you made "pirtial head morph" for genesis, and saved it in
poze controller ,head expression section, did not you ?
if you made new pose controller eg "ctrlSmile" type Modifier/Pose
on Head Hielalchy , and ERC freezed with your hand made head expression morph,(Pirtial Head morph)
by property editor,you can show the poze controller when you select the head by pozing tool.
all genesis (triax figure) shape morphs can be assigned genesis root node onlly.
though we can set Path as "Pose Controls/Head/Expressions" as same as product expression morph (PHM) .
usually these pirtial morph (which you made) are set as hidden parameter,
and when you select pirtial body parts by poze tool, they can not visible.
what we can see in " pose controller>expression "when select genesis head,
are not pirtial body morphs. they are controller to change value of pirtial body morph by ERC.
(usually we can not clearly find the difference of controller and hide pirtial body morph,
because often they labeled as same name.but actuall names are different, and they are not same,,
(eg Smile controller =ctrlSmile, actuall Smile pirtial head morph PHMSmile )
ctrlSmile is controller of PHMsmile.
Lets check the documents,
http://docs.daz3d.com/doku.php/public/software/dazstudio/4/userguide/creating_content/assembling/tutorials/custom_parameters/start
A couple of questions:
1. Did you make the expression morph for just the head, or for the whole figure?
2. Have you tried selecting just the Genesis head and making your pose morph that way?
My reason for asking this is because I believe it could not hurt to do a little experimenting with this feature to see what can be done with it. I would hope morphs could parented to specific body parts so that they only affect the ones you wish to target, in this case the figure's mouth.
If this does not work, at least you will have learned something about what is and isn't possible.
I am planning to try this with machine type models to see what can be done. If you try this on Genesis or another figure or animal, please post your results so that we may learn from you.
Thank You.
1. make pirtial head morph. to whistle expression, import it to ds, by morphloader
as Name PHMwhistle , Property group Pose controlls/head/expression
2 check the "PHMwhistle" in parameter tab, Pose controlls/head/expression
then change parameter setting by click small gear.
I change Path name to apply my sign TK,(for easy to serch,,) but not need
check "Hidden", then TYPE "none" . because it is hide parameter. no need to show in Pose tab, or Shape tab.
and save it as morph .
3 set the PHMwhistle value 100% to Make controller by ERC .
. select genesis root,in 3d view, or scene tab,
then open property editor, (it take so long time to load every parameter,, TT)
right-click genesis, In Hierarchy (right side of the property window) >ERC freeze
4 , ERC freeze option window may open.
thre is section " Freeze properties."
it must be only checked your Pirtial head morph name.
to make new controller (property) .
change Property Selection .
Figure "Genesis"
Node "Head" (when select the node by poze tool , you can see the controller in pozing tab, or parameter )
Now porperty may be "Xtranslate," it is wrong .
you need to make new controller(property) , click "Create new "
5 new property window open,
set Property type, Path, Name, Labell.
I choose "default Path",
by click triangle of right side. then select
Pose Controls/Head/Expression.
"Path" will auto pasted the default path.
"Name" CTRLwhistle"
"Label" "CTRLwhistle" (you may change the Label as you want, but I set same as real name, because I can find clearly,
this controller is not PHM)
Obey limits Yes
change Display as percent No.
cleck "create"
(but these parameter can be changed after you made controller by controller setting easy, so not need to worry)
see my picture please.
6 return to ERC freeze Options window, Property must be changed to the name which you setted above.
in this case,"CTRLwhistle"
check off "Restore Figure Rigging" of Adittonal option, then click accept .
Not finish yet,, need to set type to controller ^^;
7 after make new controller, in property editror,
hieralchy . you can check the Controller you made under the Head node.
(check my pic)
8 now you can find the new controller in paarmeter tab, Pose controls >head>expression
when you select "head" by pozing tool. but it can not be shown in pozing tab still.
so you need to adjust setting by parameter setting. (right little gear)
Name CtrlWhistle, OK, Path Pose controls >head>expression OK,
but need to set type "Modifier/Pose"
so you can see it in pozing tab.
9 after check the controller,, save it as morph again.
when save it as morph, (you must select the controller under the Head node ,Poze controll.
(not genesis root node poze controll ^^;)
Hope it may some help.
Kitakoredaz, you are amazing ! Thank you, thank you and thank you !!
That is exactly what i needed, it worked from the first try.Thanks to you and RKane_1 i finally managed to do this.
- Does a happy dance -
Mage 13X13, i wasn't making my own morphs, but i want to have the face expression poses from my library available as expression sliders. I load the expression on a zeroed genesis, send that to hexagon, zero genesis again in DS and send the genesis with the expression from hexagon back to studio as a morph.
As far as experimenting goes, i couldn't agree more. I started with ds to learn to make all these cool illustrations and renders, but i find myself spending much more time on experimenting and fiddling. Best fun i ever had.
I am happy too, it work,,;-P (I know you can do well ^^ ,,, you know more than me @@;)
then,, I think you may plan to adjust "the expression" more fit to your favorite characters of genesis
not only zero shape genesis.
actually, ,some expression not fit well other character shape.TT)
often need to make adjustment morph for character . (may call Morph controller morph=MCM)
Now You have made controller of the expression, and made pirtial morph which fit to zero genesis already
so that you can simply add delta morphs for your character and expression.
But without documents, I felt some difficulity when make new adjustment morph for character, or How to set ERC,
(I can not use Auto ERC freeze in property editor , about this case, it cause some trouble .
so need to set ERC manually, in property editor)
when you feel to make MCM for your character,, I recommend to read Advanced: Creating Morph Controlled Morphs
(Thanks daz tutoriall too !! and hope to finish manuall ^^;
though I learned many from forum and, kind user tutroialls ^^;)
(take care,,, :gulp:
"the morph (eg MCMwhistleAiko5beta(not arrived yet,,) need to work when you change controller of whistle , and when apply "the Aiko5beta morph"(Character1) .
but if you do not change the Aiko5beta morph value,, the morph must not work to other character)
Thank you, RKane_1 (eta: and zigraphix!), for this tutorial! Following through this made it very easy to make my first DFormer morph; extremely useful for fine-tuning the way clothes fit! Now off to do some tailoring. :)
I too have learned to make morphs using the D-Former tool. The whole thing can actually be done within the DAZ Studio app. The ones I have made are for Genesis' head and ears. I have many more planned. I am working in DS4.5 Pro now and I have found that it is different from earlier versions that offered the D-Former feature. I do have DS 3 Advanced and DS 4.0 Pro available to me but I hardly ever use them anymore. lol
I found several tutorials other than this one that when I combined what I learned from them with what I got from this thread, The ease of making morphs became clear to me. This to me is one of the most fantastic features of DAZ Studio! Thanks for the generous sharing of information.
Well I'm resurrecting this thread to ask if there is a way to save these morphs created with the DForm so they are useable in Poser?
Great question. I wish I knew. Perhaps Richard Haseltine can answer the question better than I since my experience is so limited with Poser.
A CR2 exported from DS will have the morphs, but that isn't distributable. The ExP Exporter will save out a morph expansion for the DAZ fourth generation figures, requiring Poser users to run the DzCreateExPFiles-figure batch file after installing. Users of DS 3 could use DeltaX's morph tools to create Inj/Rem poses that use the existing Community Channels (but there's always the risk that the channel used will be one the user needs for a different morph)
Thank you, Richard for your speedy reply and your expertise! :)
Just wanted to add a slight change for Daz Studio 4.6 on step 19. Saving the d-form. This is as far as I have had time to get.
If you change the colors of the dform slider and add a pretty icon pic next to the slider, it goes back to the gray slider when called back up after saving. Perhaps others will have the time to go into that further, I have to much on my plate for now.
Good question. I am involved in a project at the moment and I hope someone can take the time to investigate this and post the answer here.
Here's hoping anyway.
If worse comes to worse I can turn my attention to this later this year.
Using DS 4.8 things are diffeent after step 24. How do I save the morh to use on other figures? I tried saving the morphed figure as a character, but it just returned to the base figure prior to adding the morph, and without the morph option.
Help!
I don't think that is the way, then again, I don't know much near that step.
The morphs I tried to make, were not the best (I failed at that step, lol). And I don't know how it all works that well.
you need to go threw a list-tree-thing, and check the morph to save in that window. Also the text fields near the top are important, as it is for the name of the folders the morph wil go in. I had done this many months ago, and don't remember much more then that. Sorry I can't be of any more help, perhaps some one else will know more about the details of what those boxes are for.
I think there may be a help page for this as well, possibly. Yes.
http://docs.daz3d.com/doku.php/public/software/dazstudio/4/userguide/creating_content/packaging/tutorials/saving_morphs/start#custom_or_dialed_morphs
Parameter Settings now contains a lot of the options that were in the Property Editor pane.
Thanks for the help and I saved that document page.
No. I am confused. I cannot find the Property Editor. There is a Property Hierarchy pane, but no Property Editor one. So although I can do everything upto step 24, that is as far as I can go. The 'saved' morph I create is saved for the specific character and reloads when I open that scene, but if I load another base character or try to save the morphed character as a character itself, it does not have the morphs.
Step 31 is where you need to go to save as an asset that will load with the base figure.
Hm, nice, but.. how mirror the editing to work both sides at same time?
You have to change the placement of the base, dformer and field in the opposite across the X axis, I believe. So whatever your setting are for x you make them the polar opposite, making negative, positive and vice versa.