Daz 3D is part of 
Connect
DAZ Productions, Inc.
7533 S Center View Ct #4664
West Jordan, UT 84084
Licensing Agreement | Terms of Service | Privacy Policy | EULA
© 2026 Daz Productions Inc. All Rights Reserved.
Comments
Trash really is one of the best ways to make a set look more authentic. imperfections. just like in real life.
Thanks for stopping by @FirstBastion! I'll take this opportunity to mention a number of your products that are city scene props or are city scenes themselves. I own a number of these and most others are wishlisted. Most of the techniques I'm discussing in this thread can be used with these products as well. I've been contemplating how I might merge Divided Highway into River Front.
City Props
City Scenes
Buildings for City Scene
If I missed any, feel free to mention them.
Creating a Distribution Map to Scatter Objects
I did some testing of using a distribution map with Ultrascatter. This examples uses River Front as a setting but can be applied to any type of city product.
1. Create a primitive plane at size 288 and 48 divisions. This matches River Front’s block and sidewalk spacing.
2. Position the plane just above the low poly or city block sidewalk so the sidewalk texture is replaced by the white of the plane.
3. With the plane still selected use the geometry tool to highlight all visible sidewalk squares around the block. The beginning of this is shown in the image below, where the red circle is the geometry tool and the orange sidewalk squares are what's been selected so far. Be careful not to select polygons underneath the buildings. I did this while using the Top View but you can use other views as well.
4. Assign the selected blocks to a surface called sidewalk.
5. Raise the plane vertically until it’s above the buildings and you can see all of the plane.
6. Select the default surface and make Diffuse Color black. Leave the sidewalk surface white.
7. Set the render Aspect Ratio to 1:1 and Pixel Size to 1024 by 1024.
8. Using the top view, position the plane so it just fills the render preview box and render. You’ll end up with a B&W image as shown below.
9. Take the image into Photoshop, GIMP, or another image program. Using a paint brush or other tool, make the edges of the sidewalk black. I used a brush that has a gradient to it so it’s not a sharp black-white division. See image below.
So how does this distribution map work? Wherever it is black, no instances will be scattered. Wherever it is white, an object will be distributed randomly. Gray areas have a reduced probability of getting an object – the darker the gray, the less likely. With the map from step 9, the black under the buildings prevent any object being placed there. The black along the sidewalk edge by the road will not get an instance. The gray areas near the road are less likely to get an instance. The white of the sidewalks by the building will get the majority of the instances. Net, you get a greater distribution of debris near the buildings where they would naturally accumulate in a city.
Scattering Debris using a Distribution Map
Now we are ready to use the map we created in the previous post.
1. Launch the Ultrascatter script. On the first tab Distribution, pick the object you will be distributing instances upon (in my case, another plane but not the one we used to make the distribution map).
2. In the lower right of the dialog box, you’ll see the spot to put the distribution map. Check the Distribution Map box, click on browse and load the image we created in step 9 in the previous post.
3. At this point you can scatter objects all around the block. Note that the distribution map applies across the entire object you selected. Ultrascatter does not differentiate by sub-surfaces. If you want instances to be in a more limited areas (e.g., the area where your camera is focused), make a surface selection using the geometry tool as discussed in steps 2 & 3 of this post.
4. There is an interaction between the distribution map and a surface selection. If you scatter instances using the map without using a surface selection, you will get something like the following image, where the instances are evenly scattered wherever there was white in the distribution map. (I realize that these images are not black and white but shades of gray: the light gray equals white on the distribution map and the dark gray equals black.)
5. If you use a surface selection, the surface selection overlaps only a portion of the distribution map. If the area of overlap is black on the distribution map, no instances will be scattered. If the area of overlap is white on the distribution map, instances will be scattered everywhere within the surface selection but not outside of it. If the area of overlap is part white and part black on the distribution map, instances will be scattered wherever the overlap is white but not where it is black. In the image below, you see a distribution map that is projected onto a plane. There is a wavy white line on the left of the map. There is a surface selection on the left hand side as well, the area outlined in orange. The right hand side of the selection surface cuts through the white area of the distribution map, so instances were scattered only in the white areas to the left of that line.
Here is a render where debris was scattered using a surface selection and a distribution map. Compared to my earlier Trashy City post, the instances are closer to the walls of the buildings. It can be a little hard to tell since I didn’t use an extreme amount of debris.
To better illustrate the interaction, I created another example. The render below shows a closeup of the corner from the image above. There's a few instances that ended up in the corner.
The image below is a screen capture showing the distribution map (white and black area on the sidewalk) and a smaller surface selection centered on the corner of the building (outlined in orange). You can see a lot more instances in the corner below than in the corner in the image above. Two things are at work here: (1) the same number of instances in a smaller surface selection will make it look more crowded, and (2) the distribution map is concentrating them nearer the building.
This image is a render of the above setup. Lots of stuff in the corner. Click on the image for a larger view.
All of this is a bit complicated to explain and I may not be doing it justice, so if any questions, please ask.
Go to Main Menu
Busy Corner
I'm going to do some renders with Stonemason's Urban Sprawl series. I have all 3 sets, the latter two are available in the store but the original was retired a year or so ago. This is a corner scene set in Urban Sprawl 2 The Big City. It uses the Lorenzo and Loretta lorez figures I've been showing in River Land.
I also found these figures used by Joepingleton In Urban Sprawl 3. Render can be found here.
And luci45 has a very nice render as well.
Comparison of Urban Sprawl 3 and Dreamland Models in River Front
Here's a look at Urban Sprawl 3. It comes with 5 city blocks in both Iray and 3DL versions. As far as I can see, there is no preset scene where the blocks are already assembled into a unit, so this is something you have to do for yourself. The spacing is 9500, so it's pretty easy to move blocks into position using multiples of that number. This size is fairly close to River Front's block spacing which is about 9866, so the Dreamland Models blocks that load are of a similar scale. The size similarity is somewhat deceiving because of how the products are designed. The Dreamland Model blocks are 1 big square with streets along the outside edges (on right in image below) while the US3 blocks have a smaller central block with streets in from the sides, and a partial block of buildings along the outside edges (on left in image below). The benefit of the US3 design is that you have buildings on both sides of the street after loading just one block, so you are ready to render an image looking down the street, but that advantage can disappear depending upon the position and orientation of the camera.
The US3 blocks do not have the same street pattern. Blocks 01 and 04 have one square of buildings in the center with adjoining partial blocks on all 4 sides and an eight block in each corner. Blocks 02, 03, and 05 have a long rectangle of buildings in the center. You can easily see the street pattern in the screen capture below.
One thing you'll notice in distant views is that many of the US3 buildings in the background are high rises compared to the Dreamland buildings in the foreground.
The US3 streets are 1-way with 3 lanes. The RF streets are 2-way with 4 lanes total. The US3 lanes are about 20% wider. I found the RF lanes to be a bit tight for most of the vehicles I was testing, so the bigger lanes are a plus.
I wondered if the building heights are compatible and they look like they are. This view shows a 4-story building from US3 on left and a 3-story building from DM on the right. Doors and floor levels appear to be of similar heights.
One big difference between the two product lines are the look and details. RF is quite clean, with fresh sidewalks, streets, and building textures. There's some details that load, like stop signs at corners and billboard trees and it also comes with electrical poles with wires you can add. But if you want other common street elements like mailboxes, litter, trash cans, etc., or you want buildings/streets with more variegated textures, you'll have to add that yourself. US3 comes with much of that already in place. The trees are 3D models, there's litter in the gutters, trash bag piles by buildings, mailboxes, street signs, etc.
Click on images for larger views. Note these were all 3DL renders just because they render faster.
One way to think of these products is that if you want to build your own city, River Front is a good setting, and as I've shown in this thread, can accept not only Dreamland models but also other products including Urban Sprawl 3 (more on this in a future post). US3 on the other hand gives you an instant city with lots of the tiny details already in place, which is most helpful if your focus is on rendering a city scene with people and vehicles added.
Go to Main Menu
Very cool! I loved seeing US3 in River Front!
I have more I'll be posting soon.
Hospital
Any big city has a hospital, so I picked up 1stBastion's Buildings Hospital Emergency this week and incorporated it into River Front. It's not a perfect fit but it works pretty well. It's wider than a standard block so I positioned one of the driveways at a street intersection. There's a few elements I need to work on (a wire missing its pole, a curb cut for the other driveway entrance) and the backside had one tower missing it's back (I filled it in with a cube with a copy of the adjoining material). I also got his police station, divided highway, and Front Drive neighborhood, so that gives me lots of additions to grow the city.
Go to Main Menu
I like those 1950's cars- many were still on the streets when I was a kid, and of course I see photos from when my mom and dad owned them. Nice job Rich!
I remember those cars too, plus some Plymouths from the 40's that my grandfather use to drive.
More Urban Sprawl 3
Two more scenes from within the Urban Sprawl 3 set. The police car is one of the US3 props.
I found the color of the 3DL grass that comes with the set to render a funny white, so I reduced the diffuse strength and selected a darker green diffuse color.
Divided Highway
I recently picked up @FirstBastion Divided Highway. It comes with 3DL and Iray materials. I was wondering how to integrate it into River Front since it needs to be embedded in the terrain and it came to me that the perfect spot was the river, which is a nice long narrow space. I loaded the Divided Highway set, grouped all its elements, turned off its lights (as I already have a set in the scene), hid it's skydome, hid fb_floor-center item (to show all the highway's roadbed), and moved the group to -3000 x / -7067 y / 30,000 z. I also found a perfect spot for Urban Sprawl 3, along the river in the flat industrial wharf area, where there are no roads to interfere with those that come with US3 product. Here's a 3DL render using Camera 10 from the Divided Highway set:
Click on image for larger view.
Here's an aerial screen capture showing the location in River Front:
I'm going to kitbash some fillers for the Divided Highway walls so it can also be rendered from above. Not sure how complex that might be at this point, as they have a number of nooks and crannies.
I've recently been posting some Iray spherical renders. I did one of the above highway scene. Click here to see it. Use your mouse to scroll around up/down and left/right.
Sweet RG!
Work Site
Building exteriors need periodic maintenance, and in large cities, that means it often impacts sidewalks and street lanes. FirstBastion has several products that give you the tools to set up a work scene: Traffic Cones, Pylons, and Lane Dividers, Crowd Control Barriers, and Job Site Scaffolding. This render shows just a portion of the various props in these 3 sets.
Ride the Bus!
I picked up Nimos Transit Bus in the vehicle sale the other day. It's made for Bryce but it also comes with an obj version. The bus looks really good in Bryce, for which it was made. I tried to export it to Daz Studio using the Bryce bridge but it comes in broken up into individual parts all with the same name and with odd coloring. I next imported the obj file into DS, and while it too has the odd coloring, it retains the correct surface names so it is easy to fix:
After you complete all these steps, save the bus as a Scene Preset and you can easily import it into any scene.
Here is a Bryce render:
And here it is in Daz Studio after adjusting the surfaces:
Rigging the Bus Doors to Open
The bus model in the previous post does not have operating doors. I decided to see if I could rig it so the doors would open. I have never tried to rig a prop before, so I searched and found a short tutorial by Design Anvil which I followed. I spell out the steps I used here so others can follow along with this or another prop.
One thing to note: this turned out to be relatively easy for this bus, because although the model is one big object, the doors were not welded to the bus body. It may be harder with other props depending upon how they were constructed.
1. Select the bus in the Scene pane.
2. From the menu bar, select Edit/Object/Rigging/Convert Prop to Figure.
3. Select Triax Weight Mapping as the rigging type. This will create a hip bone in the middle of the bus.
4. Select the Joint Editor as the active tool in the Tool Settings pane.
5.Select the hip bone. Right click in the viewport and select Create/Create Child Bone. This will put the new bone atop the hip bone.
6. Give the new bone the name Side Door - Left. Change the rotation order to YXZ.
7. Go to the Joint Editor in the Tool Settings pane. Set the center point to -95, 0, and -152 for the X, Y, and Z positions. This puts the bone on the left edge of the left side door. I also set the end point X and Z position to match the center point.
8. Repeat steps 5 - 7 but name it Side Door - Right and position it at -95, 0, and -91. This puts the bone on the right edge of the right side door. Be sure to select the hip bone first. Otherwise, it will attach a child bone to the first door and you’ll end up moving the second door when you move the first.
9. Repeat steps 5 - 7 but name it Front Door and position it at -95, 0, and 418. This puts the bone on the right edge of the front door. Again, be sure to select the hip bone first.
10. The image below shows all three doors with bones positioned.
11. Select the Node Weight Map Brush as the active tool in the Tool Settings pane. Make sure the Polygon Selection icon and Geometry Selection icon are highlighted (the two orange icons near the top of the image below).
.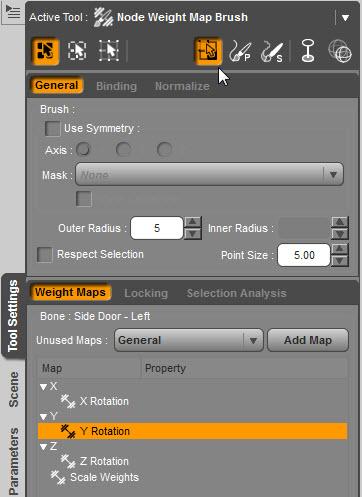
12. Select the Side Door – Left bone in the Scene pane. Then left-click on left side door to choose a polygon. Right-click in viewport and choose Geometry Selection/Select Connected. This will select all the polygons of the door.
13. Click on Y Rotation under the Weight Maps tab. Right-click in the viewport and choose Weight Editing/Fill Selected and choose a value of 100%.
14. You now have one door rigged. Test it's operation by sliding the Y-Rotation parameter dial. You can see in the image below that the door can now be opened.
15. I observed that after the rigging is complete and you slide the parameter dial with the mouse, you’ll see the bone rotate (the white brackets in the image below) but not the door itself. However, when you release the mouse button, the door will swing into position.
16. To rig the right side door, right click in the viewport and select Geometry Selection/Clear Selection. This ensures you don’t have one door’s polygons mingled with another door's. Then select the Side Door – Right bone in the Scene pane. Repeat steps 12 - 14 for the right side door.
17 Right click in the viewport and select Geometry Selection/Clear Selection. Then select the Side Door – Right bone in the Scene pane. Repeat steps 12 - 14 for the front door.
18. You now have the 3 doors rigged to rotate with the Y rotation dial. Test to be sure each door operates independently. If not, you may not have cleared the polygon selection and/or selected the correct bone in steps 12-14.
After you complete all these steps, save the bus as a Scene Preset and you can easily import it into any scene.
EDIT: After I wrote this, I learned more about rigging a prop. Here is a link to a more detailed tutorial on rigging props.
Very cool. That bus has been on my wishlist for quite awhile now. I wasn't too sure how it would work in DS. I'll have to try and pick it next time it's on sale again and try rigging it. I love the construction scene setup.
For some reason I never noticed the bus before, probably because it was for Bryce. There's also a Intercity Coach that I didn't get until I checked this one out but I will as soon as it's on sale again.
.
Thanks! Those FirstBastion sets are great for adding city details.
as to gathering all the stuff in one spot... I do use an unconventional system... but it could be easily used for specific stuff
I have about 100 folders and install stuff into them ...
I just install all the dreamland stuff into one folder ... in my case it's 67 movie set (6 for buildings -7 for contemporary time period)
then I just add the directory to my content... mine comes up under Poser because I got the stuff along time ago...
Thanks for the tip, that's a quick way to do it
A Different Type of Big City
What is meant by "a big city" varies a lot by the historic era you're considering. An assemblage of buildings that we would consider just a small village today would have been thought to have been a big city 2000-3000 years ago. A new product released today, Medina Cityscape Generator, creates big cities but of a different style than the 20th and 21st century ones I've been working with so far in this thread. I've just started taking it for a spin. Here is my first render using one of the presets, Medina Cityscape 06 Subset 1 Iray combined with the sky preset Sunlight 03. The scene rendered quickly, less than 8 minutes for 1200 x 900 resolution.
When you load the subset, don't be fooled by the fact you only see a couple rows of buildings in the viewport (see image below). Most of the instances are hidden to allow for smoother camera operation.
Also, be sure to follow the advice in the Scene Tab to set the Iray Render Settings for Optimization/Instances Optimization to Memory for Iray renders.
I've been disappointed by many Daz products that have missing or incomplete documentation. This is not one of those, as it comes with a 28 page PDF you'll find in the ReadMe folder.
This shows a street level view of the previous Medina scene. This took much longer to render (a little over 26 minutes) but not bad for Iray. There's actually better building detail than I was expecting. Positioning the camera is a bit tricky as most of the buildings are not visible in the viewport, so I used a small Aux Viewport set to IPR rendering to see where I was in relation to the walls.
Thanks for having a look at it! I'll thank Ansiko for the details, he wanted to add more, I wanted to have less. Obviously the final compromise it a nice compromise.
Thank you GRCincy for having a look at this!
I agree!
More Medina
I previously showed a large city that was one of the presets in Medina Cityscape Generator. Here's a small village I generated myself using the scripts. The setting is Easy Environments Eternal Sands. Since Eternal Sands is 3DL, I selected 3DL props in the cityscape script.
As with modern cities, "extras" make it more believable. In this case, some of the extras, like the palm trees and awnings, are placed by MCG while building the city. The people are also generated by MCG but uses a separate script. You could add other details yourself using a script like Ultrascatter or Instances Plus. Some sheep or cattle, a fountain, scrubby plants could add to the scene.
Awesome thread! I love city scenes. I'm glad to see you combining sets too.
Thanks. I have some more sets to combine too when I get the chance.
Intercity Coach
Since I was able to import Nimos Transit Bus into Daz Studio, I purchased Nimos Coach. In my college and early adult years, I spent many a trip on these going to school, work and ski resorts. Much more comfortable than a school or transit bus but still not my favorite form of travel. This version has the requisite bathroom in the back, storage bins overhead, comfy seats, and luggage racks underneath the bus floor.
As with the transit bus, this coach was made for Bryce and requires similar steps to make it useable in Daz Studio. You'll need to follow steps 1-9 in this post except using the coach's image names. For step 9, I had to create my own opacity maps for the logo and decal. The images decal1.png (used for the surface Logo) and decal2.png (used for the surface decals) have an alpha channel in them but DS doesn't make use of it. I used GIMP (Photoshop will have something similar) to extract the alpha channel into it's own opacity map.
1. Open GIMP.
2. Select Colors/Components/Decompose from the main menu.
3. Select Color Model RGBA and check the box Decompose to Layers.
4. In the Layers pane, hide the R, G, and B layers by clicking off the eye. This leaves only the A layer open.
5. Export the black and white image as imagename_opacity.jpg.
6. Inside DS, select the logo or decals surface and import the image you made into the Opacity channel. Now the white background of the deal and logo will be hidden.
After you complete all these steps, save the coach as a Scene Preset and you can easily import it into any scene.