Bump and Normal Map Comparison Examples in Carrara
 Headwax
Posts: 10,562
Headwax
Posts: 10,562
Hi, interesting conversation in the free software thread about the (non) usefulness of normal maps in Carrara. (see http://www.daz3d.com/forums/discussion/comment/2051906/#Comment_2051906)
For my own satisfaction I decided to sit down and explore Normal maps in situ.
I was quite happy with the results and will be using Normal maps much more now.
Of course the testing could be more structured and I am happy for other examples ;)
-----------------------------------------------------------------------------------------------------------------------------
Method :
I made an object and textured it. (see the first picture)
The object was made of a few different objects - mainly half spheres attached to a plane. It also had a cone, and also a 'ladder" shape that sat on the plane.
I textured the different bits. I made the camera 150 mill to reduce distortion and set it directly above the mesh.
In the render room I rendered a texture pass with no shadows, a depth pass and an object index pass.
And also a Normal Map pass.
In Photoshop I used the depth pass and the object pass to isolate the individual parts of the original mesh to make the bump map.
In the assembly room I then placed two planes side by side and used the Normal Map on one and the Bump Map on the other.
I rendered these planes with distant lights, firstly with the light on the left, then on the right - to see what difference the two planes would show.
I also rendered the plane with a displacement texture (the depth pass) out of interest (see first image)
After comparing the Normal Map and the Bump map renders I decided the bump map I'd made wasn't clean enough (it had moire patterns) and cleaned it up a little in Photoshop.
Conclusion From This Test
Conclusion - for mimicking sloped surfaces on a mesh surface the normal map in Carrara is far superior when compared to the bump map - even with the cleaned up bump map.
Not only does it show the slope of the 'mesh' more, it also delineates the light source more obviously.
Neither Bump or Normal Map showed up the 'not' sloping parts extending past the surface adaquately (the purple ladder object)
------------------------------------------------------------------------------------------------------------------------------------------------------------------------------------------
Images
Image below: shows the original mesh (in centre of image). Beside it are bump mapped and normal mapped planes for comparison.
Below it is a plane displaced with the Depth pass described above.
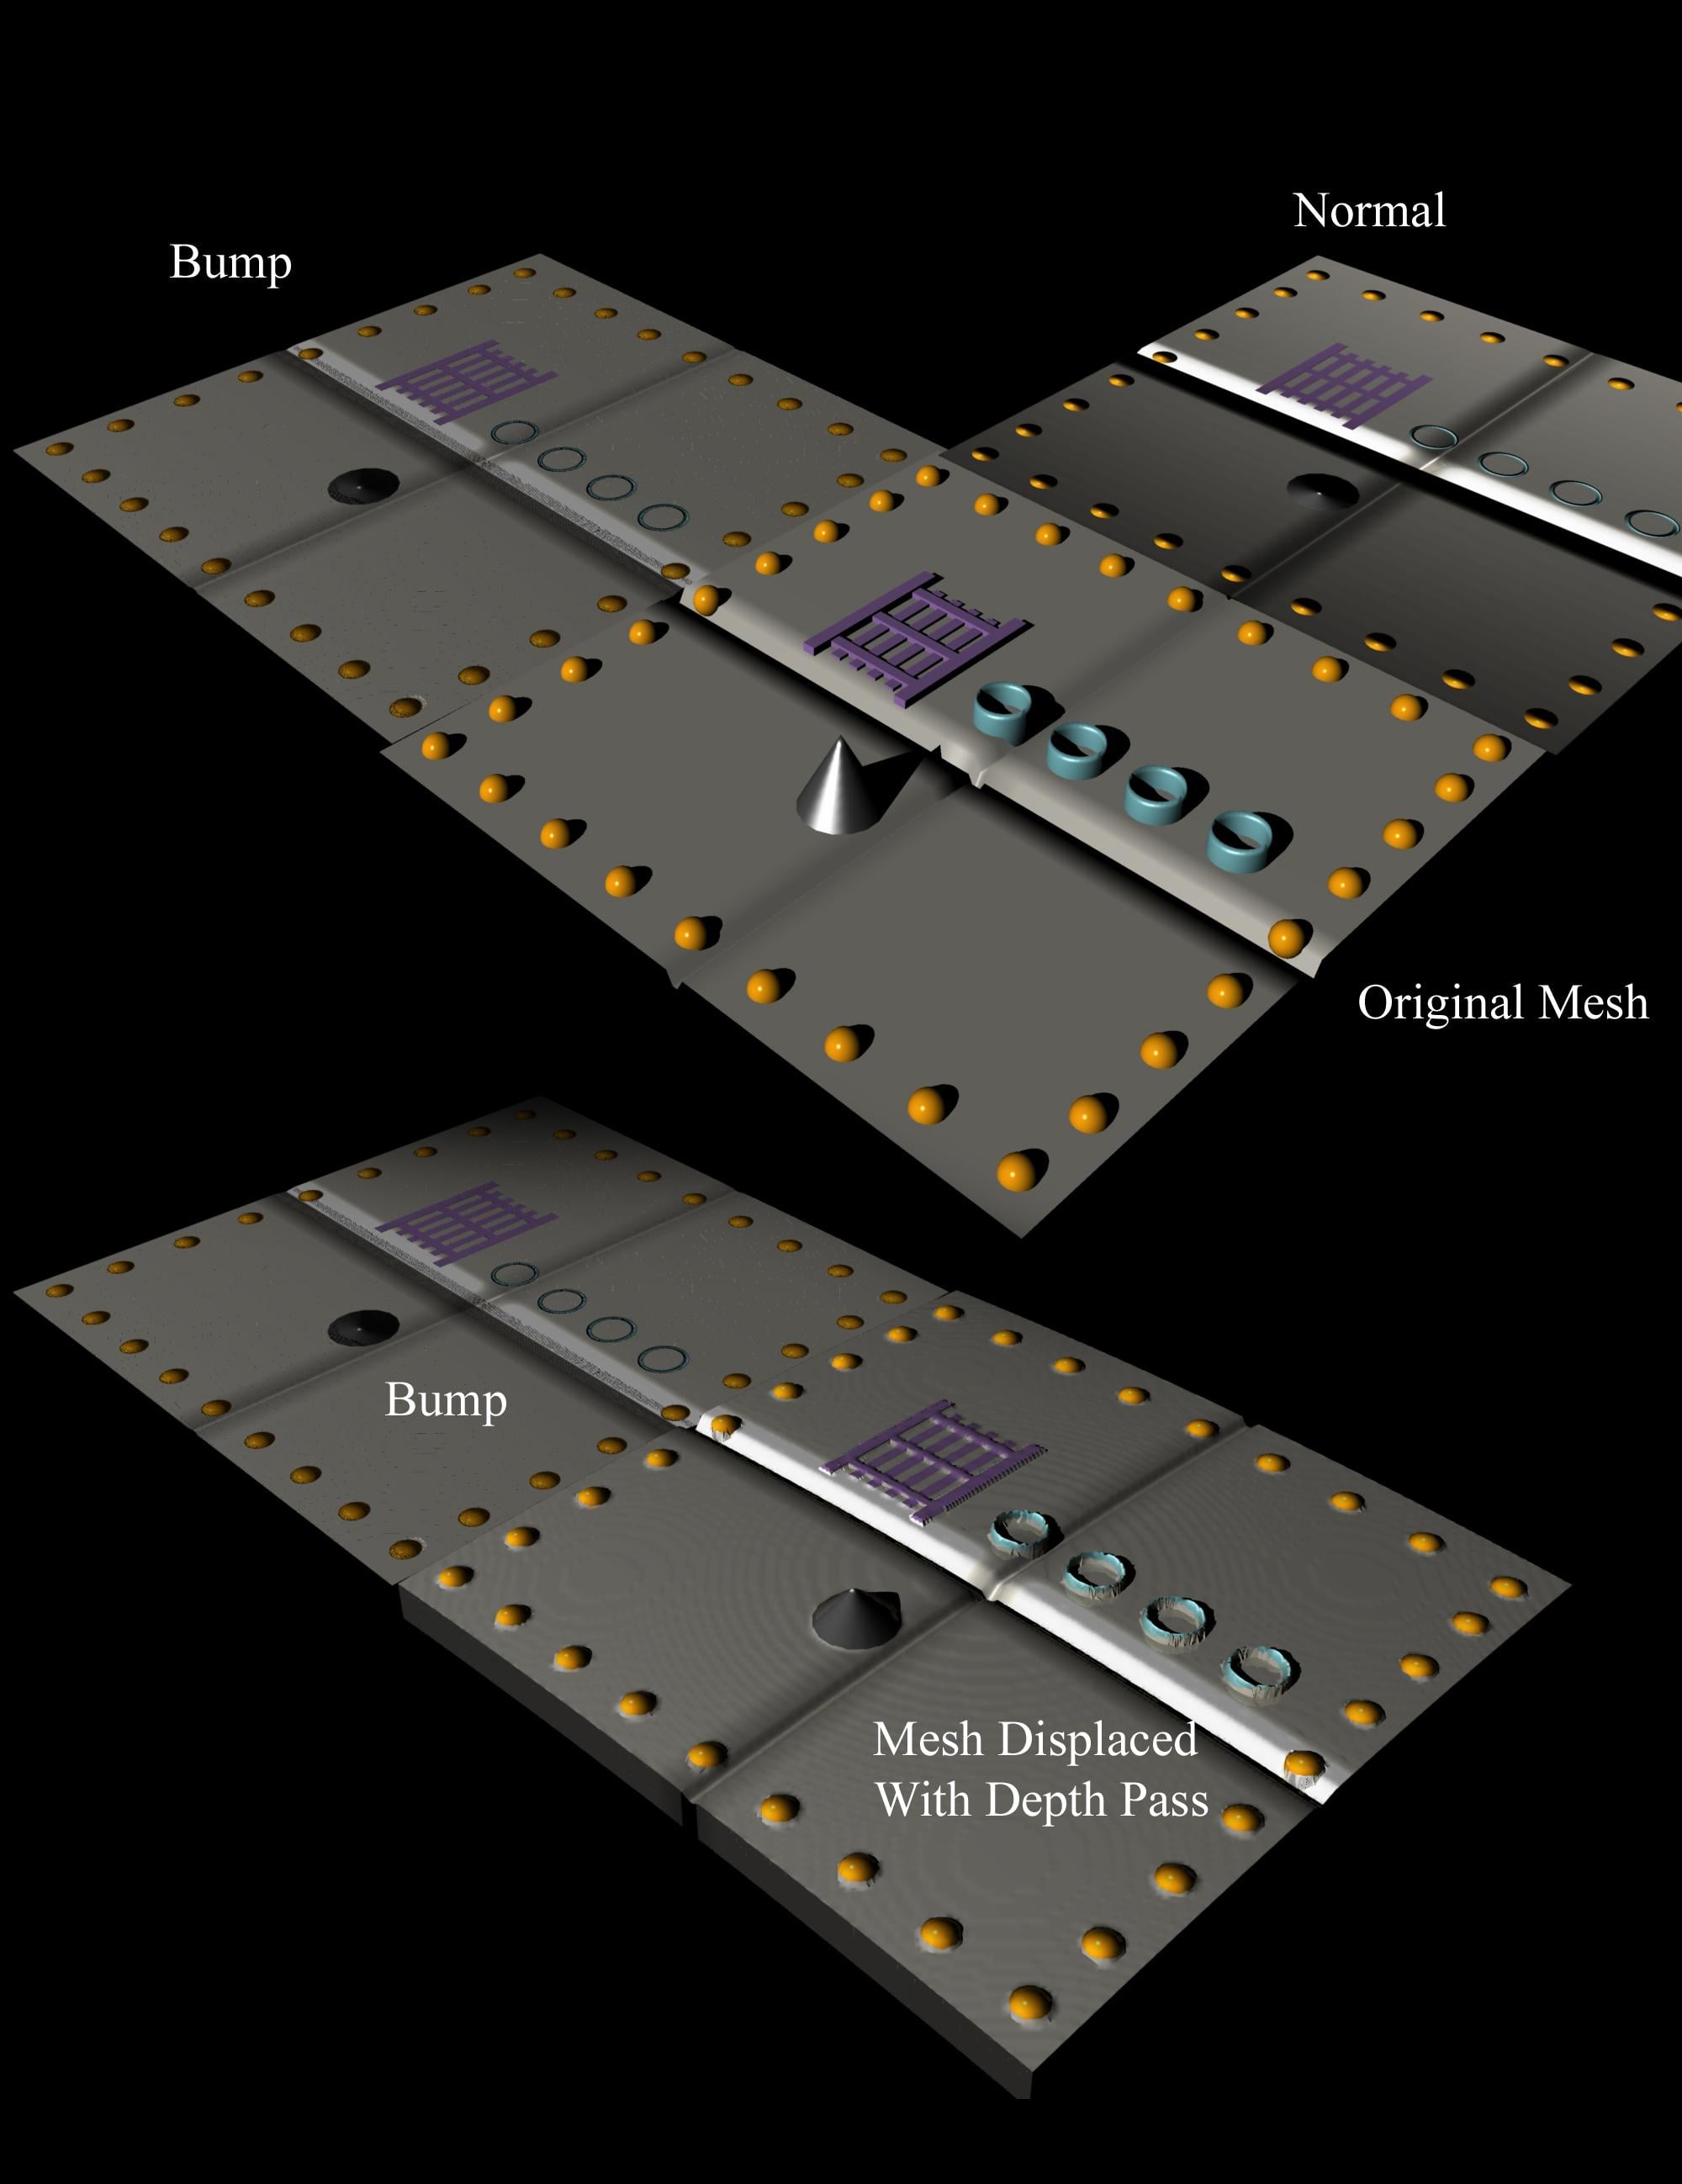
Image below compares untextured planes 1 with normal map, 1 with bump map.
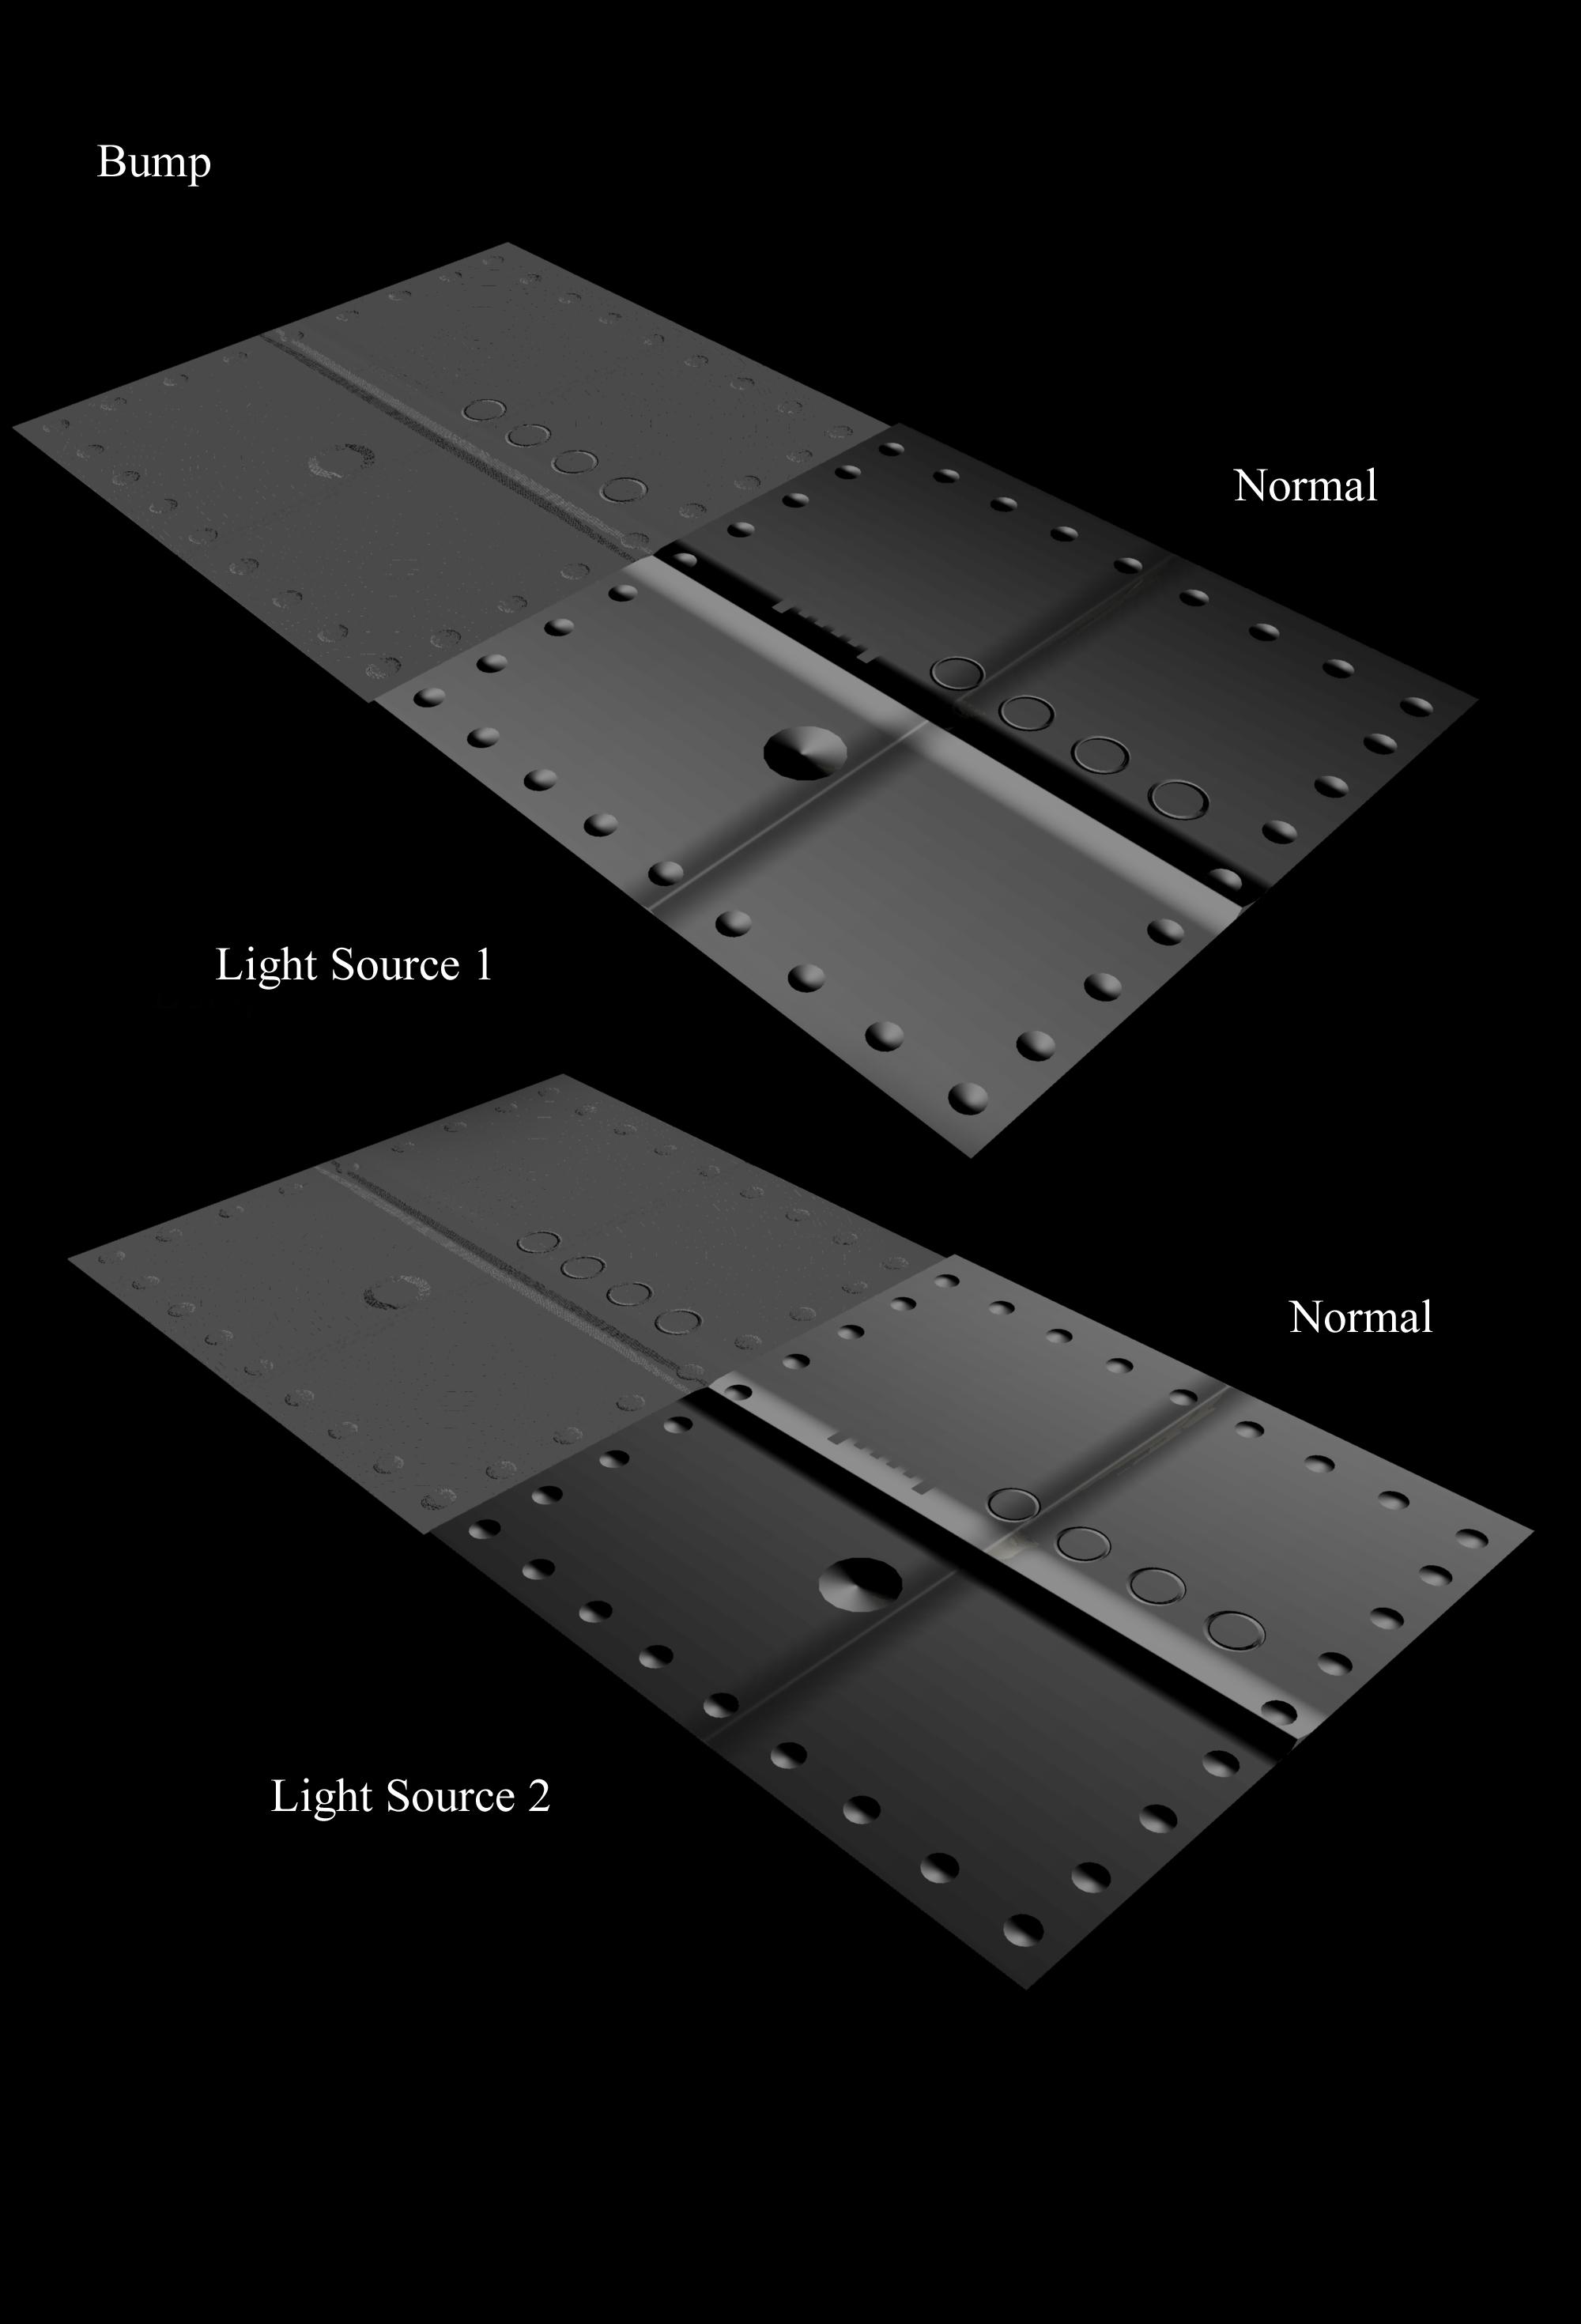
Image below, rendered plane with 'improved' bump map. Still not as good as Normal map.
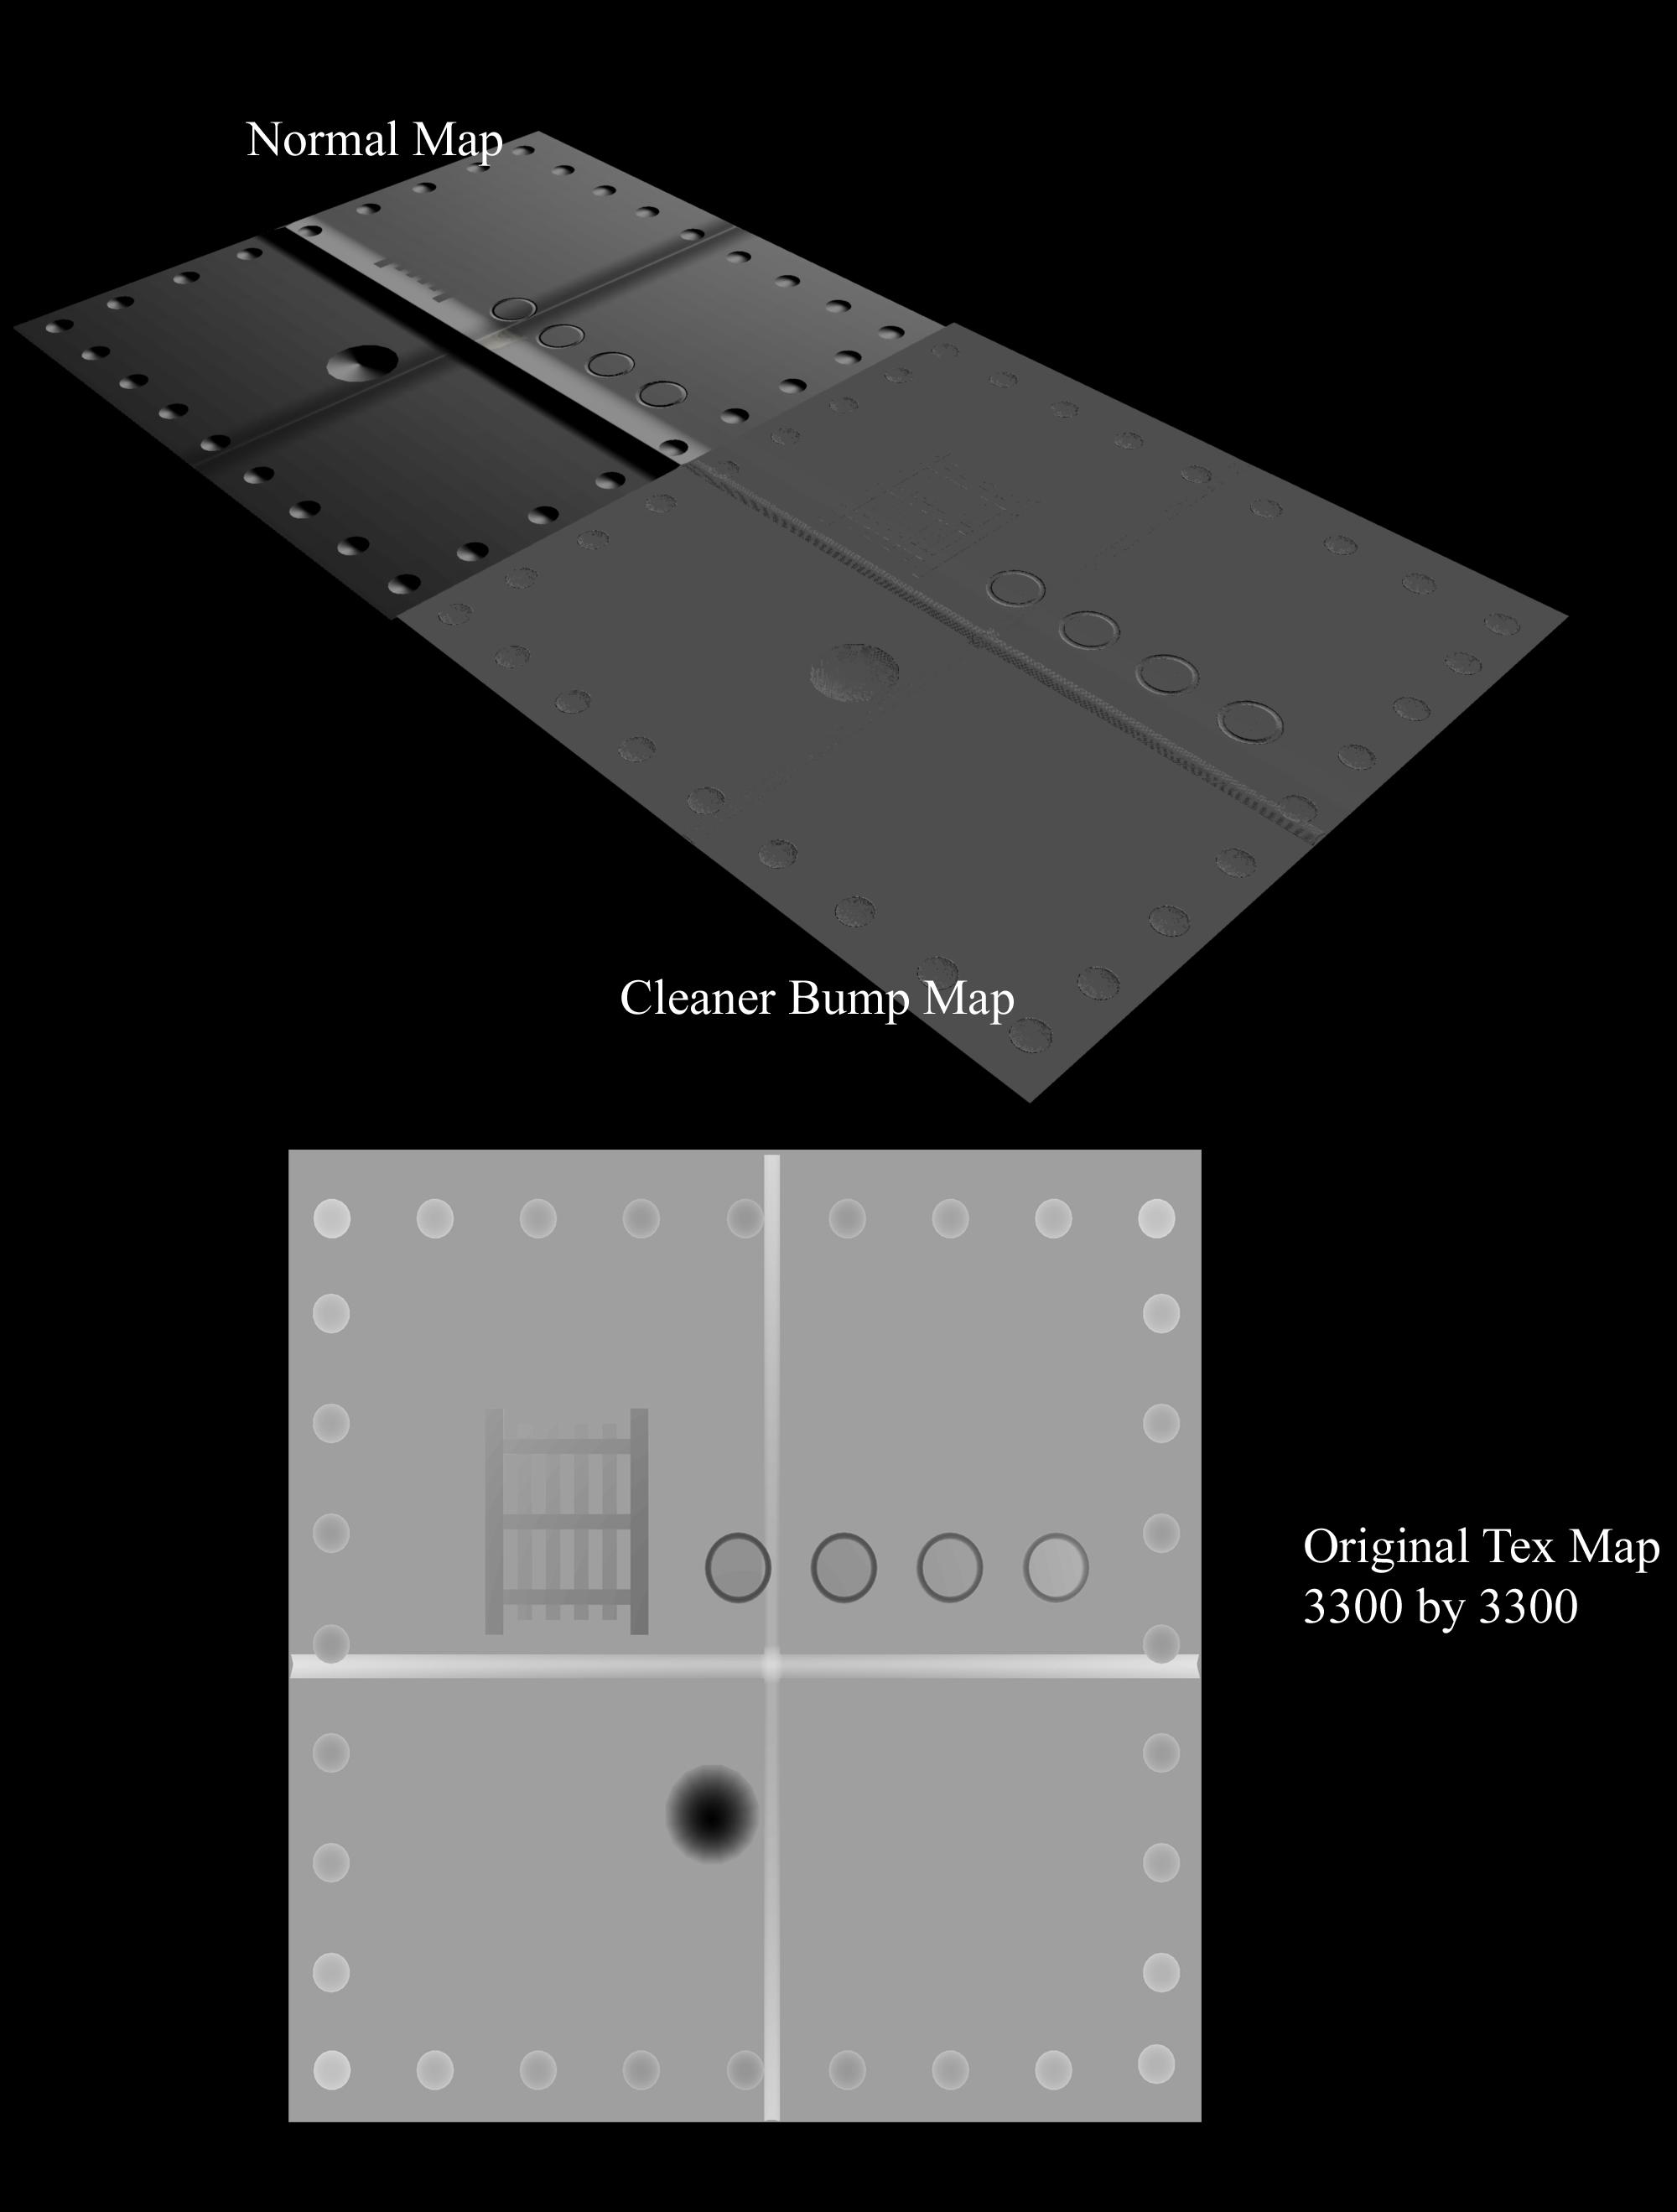
Image below: Textures used in renders.
s/FileUpload/2d/39df25744a2773db316cfbc83d3ea2.jpg
Daz 3D is part of 
Connect
DAZ Productions, Inc.
7533 S Center View Ct #4664
West Jordan, UT 84084
Licensing Agreement | Terms of Service | Privacy Policy | EULA
© 2026 Daz Productions Inc. All Rights Reserved.
Comments
Very interresting infos, I'm completly ignorant of these techniques, I use to work directly on the meshes (brushes, etc...)
If I understand well, you made the original texture in PS, but could you explain how you make the others and the name of each one below of your post?
Thanks!
I think you were applying the bump map with too little bump dialed up, I think the differences are far less than your examples would indicate. I downloaded your textures and set a higher bump level and the results are much closer (normal on left, bump on right). You are correct that there are more artifacts on the smooth surface due to the way you generated the maps. Notice that the "ladder" looks flat on the normal version while it shows depth with the bump map.
Hi Dudu, thanks.
:)
THe textures are rendered in Carrara for the most part.
I built the mesh (see bottom picture)
and then rendered out different passes.
Below Image:
Top left is the depth pass. This gives us the height. Closer things are blackest.
Interestingly can see the periphery of plane is further away from the camera than the centre of the plane.
So you can use this to make a displacment map in the texture room.
Top right is the texture rendered also in Carrara without shadows.
Bottom left is the Normal map - also rendered in Carrara.
Bottom right is the bump map I made from combining the depth map pass and mucking around with the object index pass.
Hi Dudu, thanks.
:)
THe textures are rendered in Carrara for the most part.
I built the mesh (see bottom picture)
and then rendered out different passes.
-----------------------------------------------------------------------------------------------------
Below Image:
Top left is the depth pass. This gives us the height. Closer things are blackest.
(Interestingly can see the periphery of plane is further away from the camera than the centre of the plane (because its whiter). I used a long focal length lens to try and stop distortion .... )
So you can use this bepth pass to make a displacment map in the texture room.
Top right is the texture rendered also in Carrara without shadows.
Bottom left is the Normal map - also rendered in Carrara.
Bottom right is the bump map I made from combining the depth map pass and mucking around with the object index pass.
Below image: Mesh
Thanks for trying that PhilW, that's why I uploaded the textures as well :)
I was using Bump at Max which was 250 percent.
Best to compare without the texture maps though I think.
Cheers !
Thanks for trying that PhilW, that's why I uploaded the textures as well :)
I was using Bump at Max which was 250 percent.
Best to compare without the texture maps though I think.
To my eye, for the sloped parts, the Normal map is a winner.
Cheers from here !
Thank you Andrew, like Phil I downloaded your textures files and will give a try tomorrow evening, after that, I will try to make my own textures passes for the first time in my life.
Have a nice day (it's the night here)!
Have fun :) let us know how you go.
Yes the sun is shining here, time for a surf :)
Maybe the best answer is - if you can - to derive both bump and normal maps from a source model and use whichever looks best for that particular use.
But this discussion started with utilities which convert bump maps into normal maps, with the background assumption that normal maps were somehow better. And I would maintain that a normal map derived from a bump map will only at best be as good as the bump map that it came from, and that therefore there is little point doing that for a general rendering environment, the main benefit of doing it being to use it in a games environment.
Head Wax suggested to compare without the texture map (bump on the left this time):
P.S. It was stated that bump can go up to 250, that is as far as the slider will go, but if you type in a value, it will go higher.
:)
Nice render PhilW, thanks. And yes it was about the software, you are correct!
Cool study! Thanks for doing this. I've often wondered what I would do with the new (as of 8.5) Normal Render option. Is that what you did, or is it also offered as a multi-pass element?
We have a Normal Map engine selection as well - like, instead of using PR.
Hya, it's in my render room in the drop down menu that lists draft, photorealistic, non-photorealistic etc.
Not sure where it came from!! I thought it came from ths http://www.daz3d.com/advance-pack ;
But i was wrong.
Interesting the different result PhilW and I got, I wonder if it's because my renders are oblique and Phil's are more full frontal?
I think I just increased the level of bump so that it better matched the normal map one.
Thanks head wax for these experiements. I had no idea there was a way to render a normal map in 8.5...I have no idea why I still haven't upgraded from 8.1, lots of surprising features in 8.5...
I work with 8.1 too and I was ready to ask if it is the "Normal Vector" option that one must use ?
I have an image with a green base color rather a blue one, is it the same thing?
I was wondering what DAZ studio does in its shaders as unlike shaders my other 3D softwares it has both bump and normal map channels so does it blend, overlay multiply them or can both affect the mesh in render? Do they cancel each other out in any way or add as I said above?
I don't know what DS does, you could just try it and see. Octane Render has channels for both, and it used to be that one cancelled the other, but they now allow both to be active at once. I think the same may well be true of DS as some sets come with both types of map, but I'll let you try first!
I can't remember now... it's either that Iray likes Normals maps only, or that it doesn't like Normal maps
I know I could try but saw little difference to my untrained eye
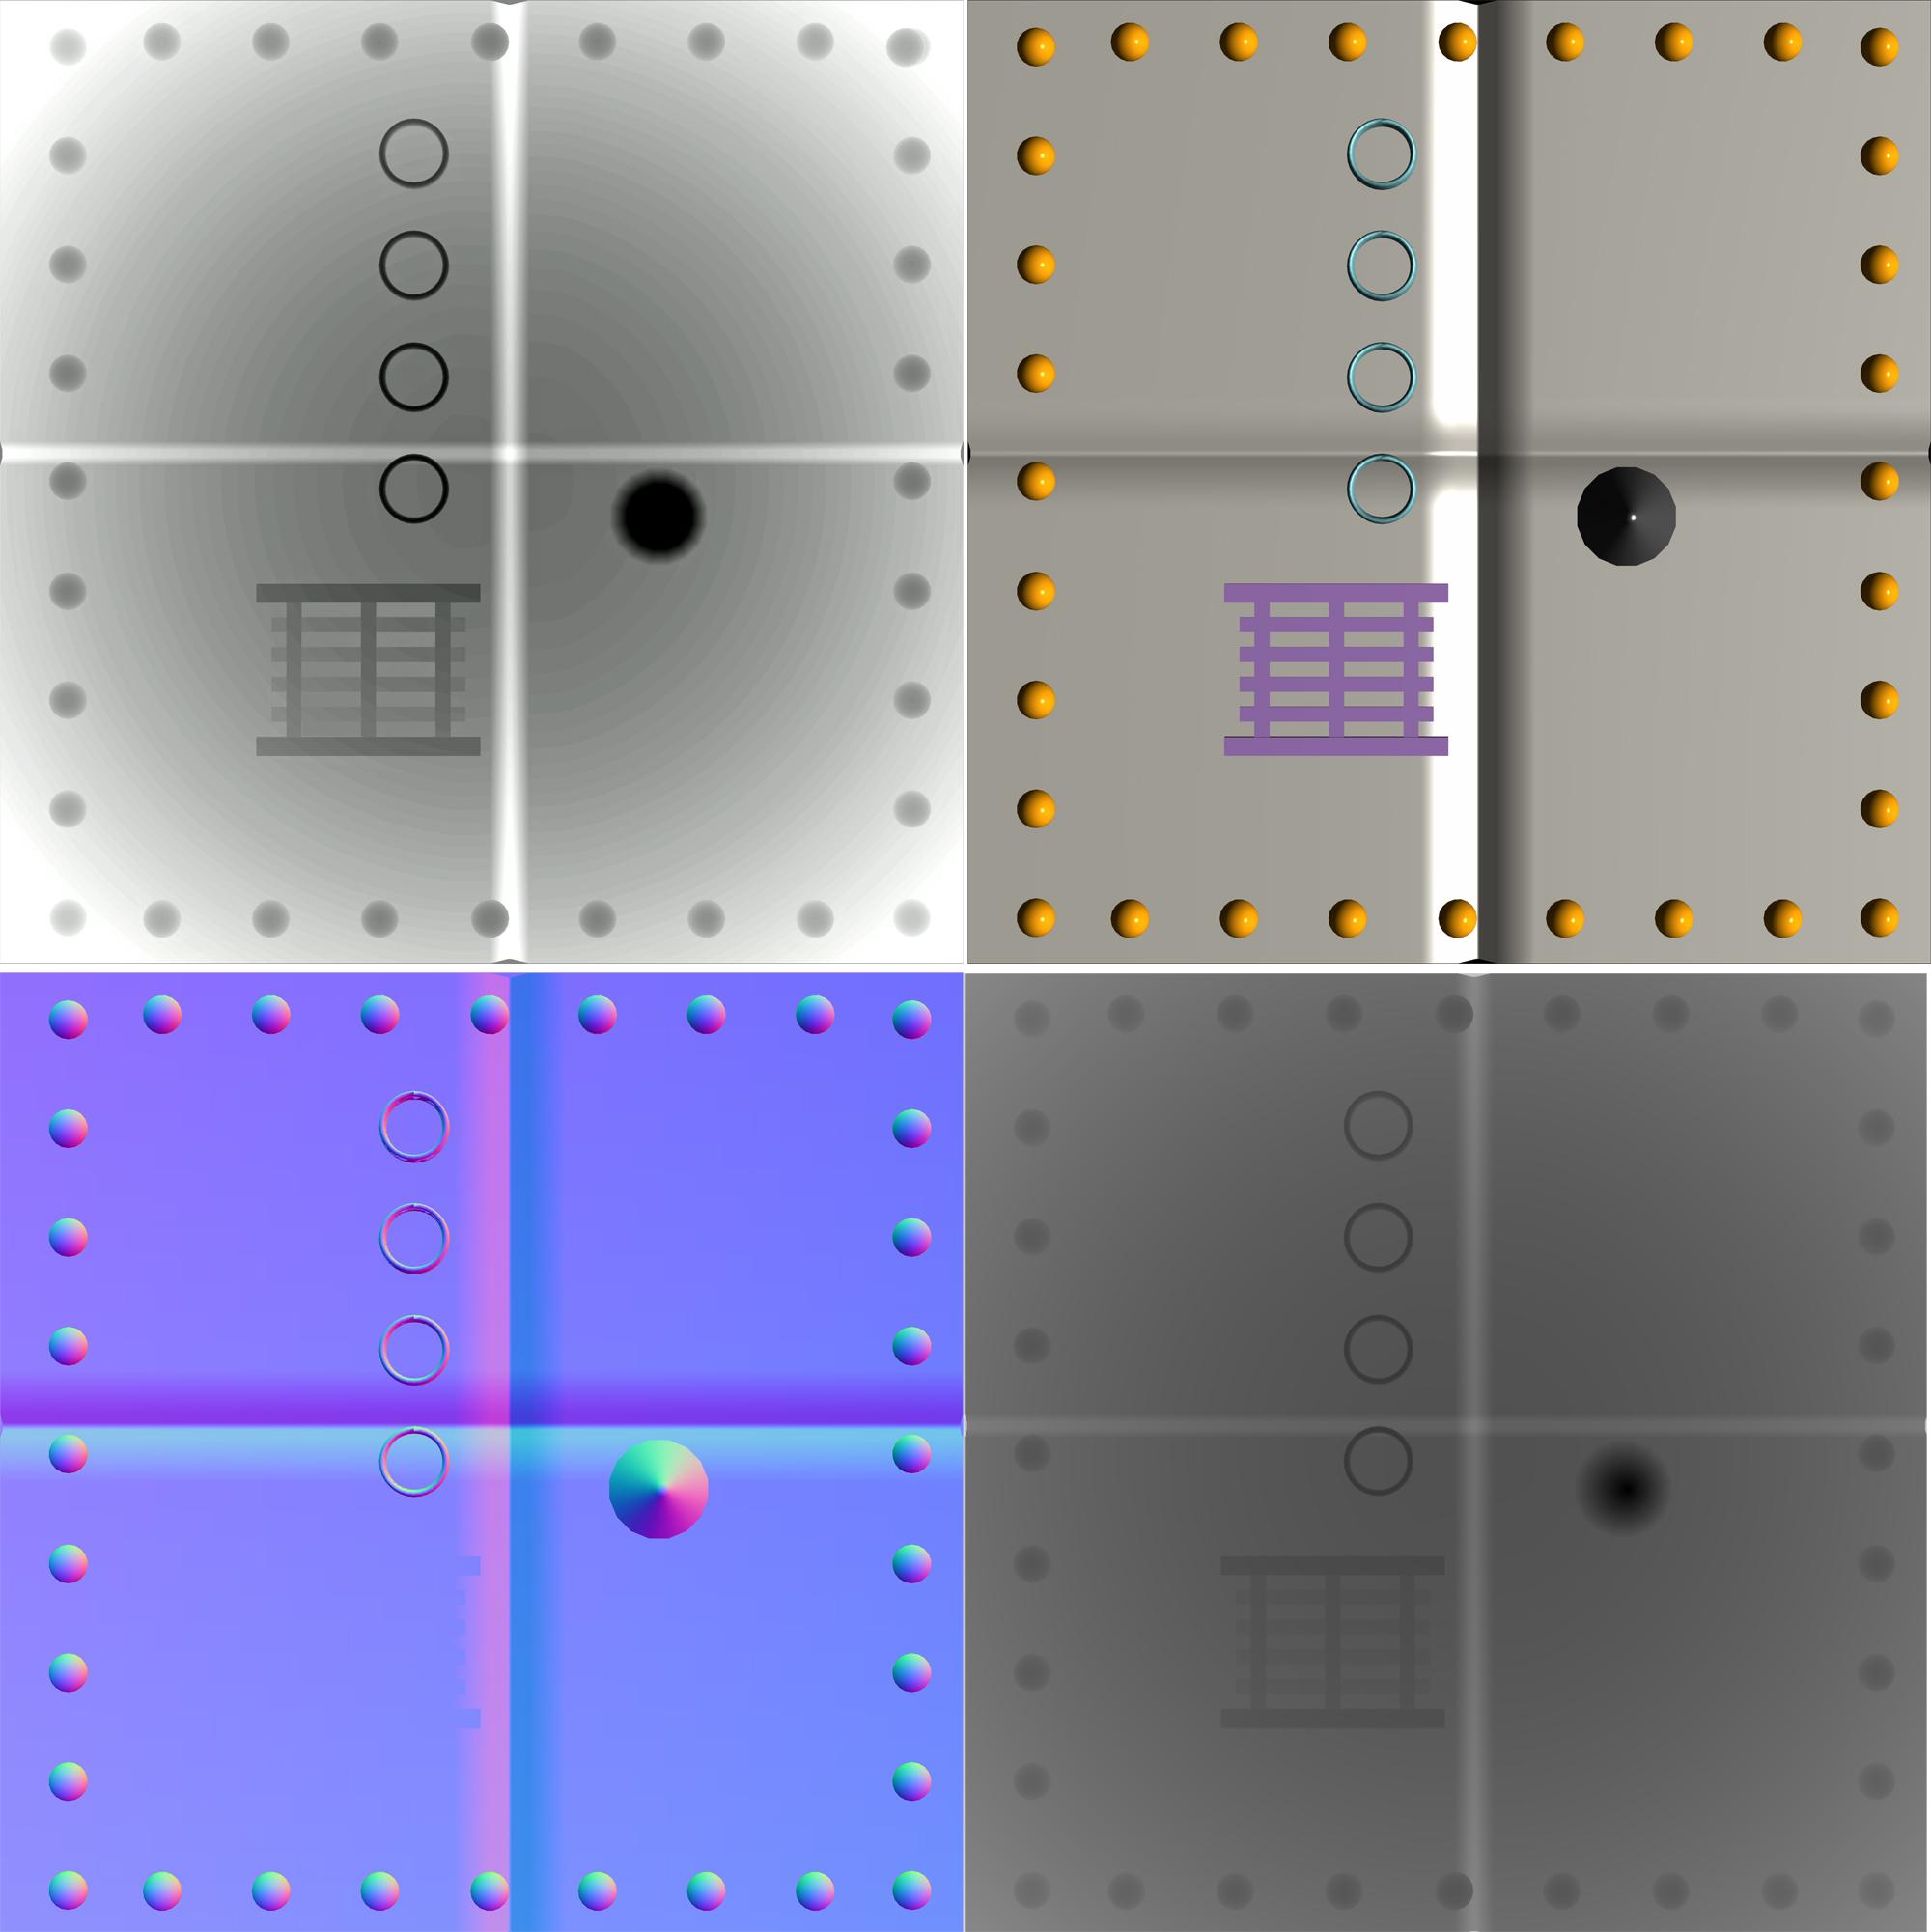
OK, I just tried with some really obvious maps and I could see the effects of both the bump map and the normal map at the same time. The five by five spheres are the normals and the finer detailed circular maps are the bump map. Both mapped onto a primitive flat plane. I noticed that the Normal Map does not have a strength parameter - that is as it should be since it encodes slope information directly.
oh I was thinking the same map
yeah looks like it adds or multiplies
I would say it adds the effects of both.
Hya Dudu, I think its the mainly bluey ones that Carrara uses.
pleasure, I am using 8.1 though I have 8.5 , so the feature is in 8.1 .... can't remember if it was a plugin I bought sorry.
edit: I'm pretty sure it came with Baker by Inagoni
very interesting
Thank you Andew, it should be nice to open a thread to explain each option in the multi-pass layers tab...
There are a few free programs on Sourceforge to create normal maps: https://sourceforge.net/directory/os:windows/?q=normal map
kewl works.
would much rather have a decent bump or normal map with a plain shader,
than a texture map for like buildings and greebles.
noiseless bump maps though, thinkin, better off with making clean maps with digital medium, than photographs?
noise and light pollution in photos.
Prior versions of Carrara 8.5 don't nativelt support Normal maps - you'd need to use Deeper, by Inagoni
Deeper
How did you set it up, Add or Multiply? Carrara can do either - perhaps even both ;)
I think JoeMamma2000 did a thread on Post Work processes (Compositing and Post Work - What is it, and why should I care ?) that covers all of the different passes. Just recently, PhilW did a fine explanation of many of them in a thread... was it Misty's Deep Thoughts thread?