Creating a custom Carrara character and morphing in posed position
 Diomede
Posts: 15,442
Diomede
Posts: 15,442
Was going to put this as a reply in another thread but think it is worth its own. The original question had to do with creating morphs for Daz and Poser figures, but then the question of all-Carrara figures came up. Here is the bare bones basics of creating morphs for a custom Carrara figure in the posed position. I begin with creating the character because adding an initial morph is important.
For fun, I am going to start with a low poly toon ChickenAlien.
1) I modeled a simple chicken alien toon mesh in the vertex modeler. Standard stuff - like creating material zones, etc. This isn't a modeling tutorial so I will just show the initial mesh. Yuck! But it will suffice.
2) I created and saved an initial full body morph (FBM). To do so, I entered the modeling room and the morph tab. The first thing I had to do was create a morph area for the morph. In this case, I selected the entire chicken alien mesh. I clicked "create" and a dialog came up prompting me to name the morph area. By default, it was "morph area 0." I renamed it "all" and saved. Once the morph area was ready, I used the drop down menu to the right of the current morph area (All) and selected "create target." A dialog appears prompting for a name. I chose FBM All Edit for the name. Click "Edit" next to the empty morph name (FBM All Edit or whatever) and the mesh will turn green. Use the vertex modeling tools to adjust the mesh as desired. Remember to save and validate the morph so that it is properly stored. Once saved and validated, a new morph channel appears with the slider set to zero. You can return to the assemble room and test your new morph. The morph will appear in a list under the "general" tab.
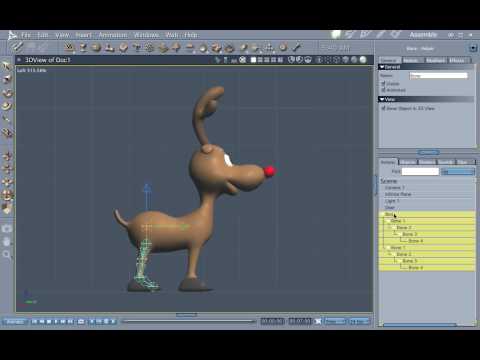
3) Rig your mesh. This isn't a rigging tutorial but the basic work flow is to use the directional cameras in the assemble room (and select the mesh and hit "0" as needed to zoom properly) to place the diamonds where you want joints (knees, wrists etc.). You can just rig one side (ams and legs) then use duplicate with symmetry for the other side.
4) Use the "animation group" under the animation tab, not the normal group under the edit tab. I group my mesh and my skeleton and save to the browser without attaching, but that is personal preference.
5) Once the mesh and bones are ready, click Animation from the top menu of the Assemble Room and choose attach skeleton. You can now pose your figure. Normally, you would want to edit the joints, weight maps, etc..
6) Adding morphs in general. Even when the skeleton is attached, you can select the mesh, enter the vertex modeler, and add new morphs to any existing morph area under the "model" tab.
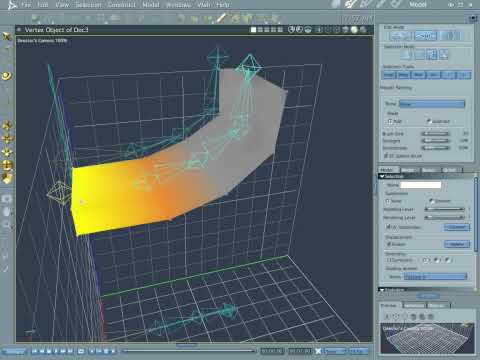
7) Editing morphs in the posed position. If the figure is posed, you can select the mesh, enter the vertex modeler, choose animation mode, and edit morphs. Very handy!
8) You can also edit bone influences and weightmaps in the posed position.
Daz 3D is part of 
Connect
DAZ Productions, Inc.
7533 S Center View Ct #4664
West Jordan, UT 84084
Licensing Agreement | Terms of Service | Privacy Policy | EULA
© 2026 Daz Productions Inc. All Rights Reserved.
Comments
And here is toon ChickenAlien running
Thanks!
you added the morph area before attaching skeleton?
you just have to do that for the 1st morph? the rest can be added after rigging is done?
to do it in poser, used to create morphs for a few body parts, then would create 'full body morph' to dial them in all at once.
"you added the morph area before attaching skeleton?"
Correct
"you just have to do that for the 1st morph? the rest can be added after rigging is done?"
Correct
"to do it in poser, used to create morphs for a few body parts, then would create 'full body morph' to dial them in all at once."
If you wish, you can still model your mesh in any program (Carrara, Wings, Hexagon, Blender,...). And, you can still rig it in Poser or Daz Studio. Then you would have the options and limitations of Poser or Daz style rigs.
Note - a model does not have to be a vertex model or a single polymesh to be custom rigged in Carrara. For example, you can load facet meshes from the object browser, add bones, attach the skeleton and pose. For example, the Chester Harlequin character is a combination of facet mesh objects from the browser that I added a skeleton to. Same for the ape wearing a shirt riding the horse.
http://www.daz3d.com/forums/discussion/comment/386760/#Comment_386760
Diomede,
You've got me curious now. :)
Do you have pre-made, by you, skeletons -(the bones)- that you made for other characters you've designed and just add those? Or do you start from scratch adding bones for each of your new creations?
Please excuse my silly bone-newbie questions. :)
A little of both. To the extent that the basic humanoid proportional shape is roughly the same, it can make sense to apply an existing skeleton to a figure, group the mesh and the skeleton together, and then scale the group up or down to make the figure taller or shorter. Editing might not be a big deal. On the other hand, a comic style hero might be 8 heads tall compared to a less stylized body type of 6.5-7.0 heads tall, or an anime heroine might have much longer legs, or a mythical dwarf might have shorter limbs in proportion to the body, etc. In these cases, it makes more sense to start a new bone skeleton from scratch. Somewhere, there should be a thread in which Wendy (sad) explains how to take a model with the same proportions as Michael 4 or Vicky 4 and then use Daz's existing skeleton to pose the figure (just turn off th visibility of the M4 or V4 model).
The biggest chore is not constructing the bone skeleton, it is editing the weight maps after attaching the mesh. That is why some folks prefer Blender because existing weight maps can be saved and copied to new meshes. Add copying and transferring weightmaps to the list of desired Carrara 9 improvements (right?). However, because editing joints in the posed position is so easy (either with morphs or usng the weight brushes), I find Carrara more than satisfactory for my comic-style still images.
EDIT: the answer to your question is Yes. I have some saved bone skeletons that I made myself that I can load for a generic character.
I should also say that I have some generic low poly humanoid body meshes saved. I did not have to use that yucky ChickenAlien mesh. I could have started with the following saved low poly humanoid and matching low poly skeleton. I am going to replace this with a better mesh (better edge flow) as per some links offered by Desertdude. But this was my old starter mesh and skeleton. See that the bones are named? Fingers have multiple joints? The faceless hero!
On the other hand, I started my Brash Lonergan project over from scatch. The hero and heroine will be from scratch based on new and better meshes and rigging. Other characters on a case-by-case basis. I think it makes sense to have a company of character actors who will play various parts, sort of like the same support actors show up in many John Ford movies.
Pardon my simplistic questions. I expect to create from scatch some skeletons... but of course I'll save any that may be useful for future characters/actors. I'm planning on starting with something rather simple like a gumby character or perhaps a flour sack. Odd that I've not started anything before... maybe I'm a bit odd. :)
Currently I've a few vertex ojects that are in progress. Hopefully I'm half thru learning nearly all Vertex room tools/options. Perhaps I'll take on a character for animation before moving on and learning/re-learning all the Spline room tools/options.
Regarding the naming of bones: Is there a text file or .PDF which describes basic bone naming for a reference to the human character? Even a Forum, this or another website listing of the bones would help myself and other beginners.
BTW: While I've only been watching/entering Carrara Challenges for a short time I always enjoy your using your custom characters... oh and the objects and art of course. Keep them coming!
Good thing it was a chicken alien and not a chickenman.
@Chickenman - I would never, NEVER, presume to try to supplant Chickenman. Love him. Absolutely love him.
@Wgdjohn - back when Poser was the hobby industry standard, there were naming conventions for figure body parts. If you used those names for body parts, then the saved Poser pose files could be used by your figure. Those names were case sensitive, such as Abdomen was not the same as abdomen. Here I've attached a screenshot of the bodyparts of the original Vicki and Victoria 4. See how similar the names are, although Poser allowed for different "internal" and "external" names. I'm sure there is a list of those old naming conventions somewhere. However, for your own use wholly within Carrara, go ahead and choose names that are meaningful for you. Or, you can rig in Poser or Studio in order to use their pose sets in which case the names might matter to you. Here is a link to Studio's rigging wiki. http://docs.daz3d.com/doku.php/public/software/dazstudio/4/userguide/creating_content/rigging/tutorials/adding_bones_for_rigging/start
Thanks for the link. I'll not pester you more until I'm into my own proget and am stumped.
thanks for sharing the workflow Diomede !
itching to try it.
Here are some related video tutorials
Cripeman toon reindeer
Cripeman bone influence
Marcelo nested groups and IK chains
Yes, thanks for sharing these techniques and links. Doing corrective morphs in the other app I use (barely, anymore...) is so, so frustrating. I really want to get back on this horse and try again...er, something like that.
This is also great to know and very encouraging
DesertDude, thanks for all of the video tutorial links on edge flow for humans. Very helpful.
RE: Naming conventions for body parts. I knew I could track it down. These are the body part names to use (and parent/child hierarchy) if you want to rig in Poser and use its pose sets. They are case sensitive.
.
You're welcome, I'm glad you find them helpful. I know I have to go back and watch again (and again) - it's been a while.
Thanks for the reference bone tree pics as well as the video links and your descriptions.
Good info in this thread.. I struggle with weight painting and getting my bones right. Following with interest
What an AWESOME thread! diomede... this is TOO COOL!!!
Carrara also defaults to quaternion rotation. Anyone up for rigging an OBJ of Genesis 3? ;)
Carrara rigging is much more fun that you might think if you've never done it. It's really quite intelligent at it's initial guess for weight maps too. Try it out for a Toon house or car. Even the road (bouncing off the ground as the Toon car screams by!), trees, other supposedly inanimate objects!
Some animation techniques can even use characters that are not rigged for articulate limbs, fingers, and such - but just rely on stretching and bending an otherwise static mesh. Well by giving a static mesh like that a simple bone system running through it, it makes it fun and really easy to just grab the top area (head) and move it around, stretch it, rotate it, etc., leaving the rest of the figure pretty much as it was - depending upon the weight mapping. The default weights would work beautifully for that example!
Anyways... Great freaking thread diomede!! Thanks for this!!!
I went back and edited instruction number 4 in the first thread. Animation group is preferred to a standard group because Carrara allows saved NLA clips (poses and animations) for an animation group. You will find the animatio group under the Aniation tab from the top menu of the Assemble room. The standard group is under the Edit menu in the Assemble room.
Caution
When creating a Carrara custom figure, keep the mesh / meshes and the skeleton out of any groups at first. Attach the mesh / meshes to the skeleton. Then select the skeleton and mesh / meshes to create the animation group. This preserves the functionality of "fit to" in the animaiton group properties tray.