[Tutorial] Converting Custom Genesis 2 UVs to Genesis 3
 RobotHeadArt
Posts: 917
RobotHeadArt
Posts: 917
Using CaymanStudios's Legacy UVs for Genesis 3 products it is now very easy to bring legacy textures to Genesis 3. The only major issue is that you have to have matching UVs that there is a product for such as Genesis 2 Female (sold at Rendo) or Victoria 5 sold here. What if you want to transfer a skin that there is no UV product for and most likely won't be such as Gia 6 UV or Mei Lin 6 UV? If you attempt to use these textures with another UV you will have distortion and visible seams.
There is a solution to this, using the map transfer functionality inside DAZ Studio you can convert these custom UV maps to standard base UV maps such as Genesis 2 Female. Here are the steps.
- Load your character that has the custom UVs. I'm using Monique 6 in this example.
- (Optional) I run V3D's Iray Converter for Genesis 2 at this step since it's easier to tweak before transferring to Genesis 3.
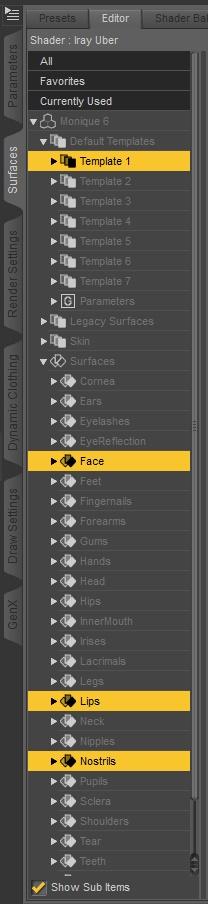
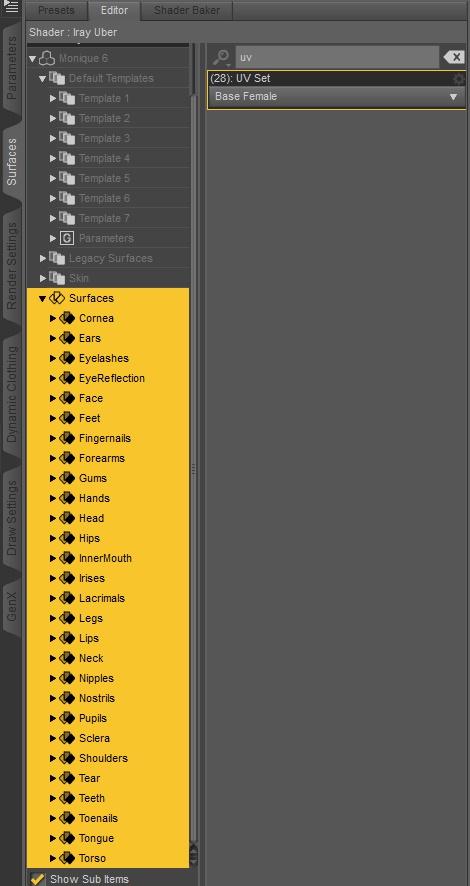
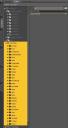
- Go to the Surfaces panel and expand the Default Templates and the Surfaces nodes.
- Click on Template 1. You will see that the surfaces Face, Lips and Nostrils are all highlighted.
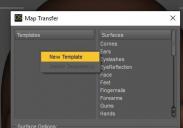
- Go up to the menu with the triangle next to the pane dock area and choose Map Transfer...
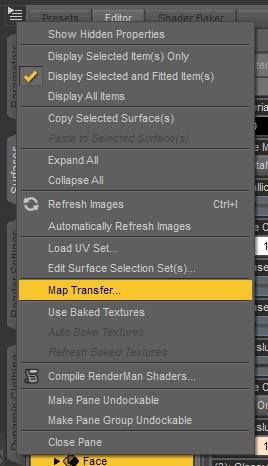
- In the blank space under the Templates column, right click and choose New Template. Do this seven times so that you have Template 1 through Template 7.

- Select Template1. In the right use ctrl+click to multi select the surfaces Face, Lips, and Nostrils. Drag and drop these over to Template 1.
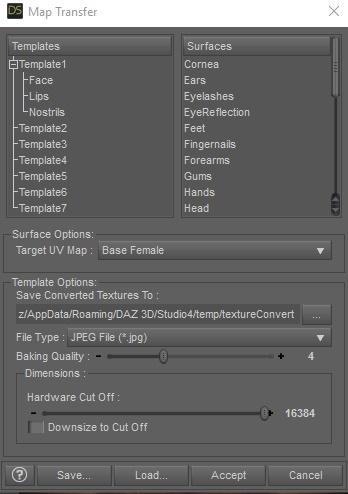
- For each of the templates add the same surfaces from the numbered template to the corresponding template. When you are done, all of the surfaces should be assigned and the Surfaces list should be empty.
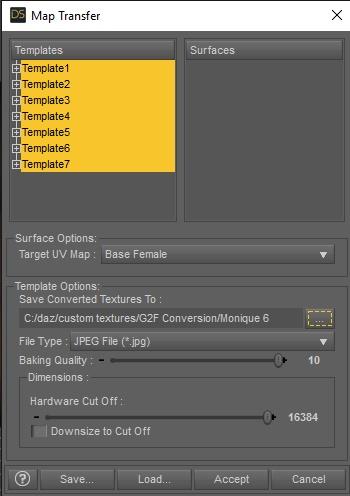
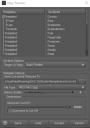
- Select all of the 7 templates. Change Target UV Map to Base Female. Set the Baking Quality to 10. Change the Save Converted Textures To: path to the location of your choice. Do not leave the default as it is a temporary folder that will be deleted.
- Click Accept and wait for the baking process to complete.
- If you navigate to the output folder you should see all the converted texture maps.

- In the Surfaces pane, select all of the surfaces and change the UV Set for the surfaces to Base Female. The character should now look distorted or have visible black or white seams.
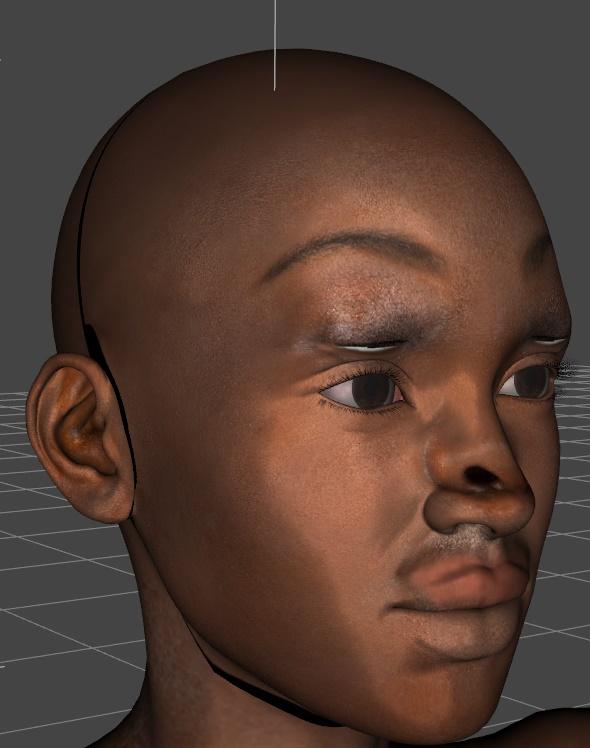
- Now comes the tedious part. Click on Template 1. Scroll down to the first surface parameter that has a texture map. In my example, since it has been converted to Iray it is the Base Color. Click on the texture map and change it from the default value to the same texture name but in your converted folder that you had previously created. In this case I choose Monique6_face.jpg. You will need to do this for every template, every surface setting that uses a texture map. So I continue down the line changing the Glossy Color, Base Bump, Normal Map, Top Coat Color, Top Coat Bump. Once I am done with Template 1 I click on Template 2 and continue doing this for all seven templates. As you do this you should see the character in the Viewport becoming less distorted and the seams disappearing.
- You may come across some surface settings that show a solid color box indicating multiple different texture maps are in use for the selected template. In that case you will need to individually select the surfaces and set the maps manually instead of setting it for the whole template.

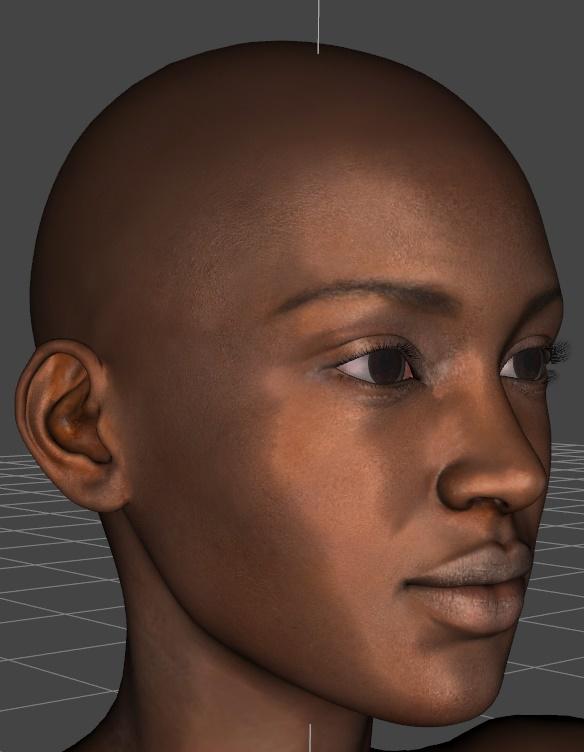
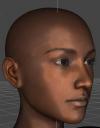
- All of the seams and distortion should be gone from the Viewport.
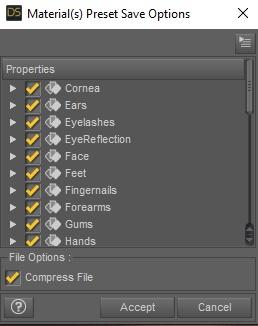
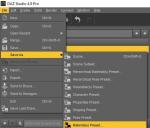
- Now to save all this work as a surface. Go to File, Save As, Material(s) Preset...
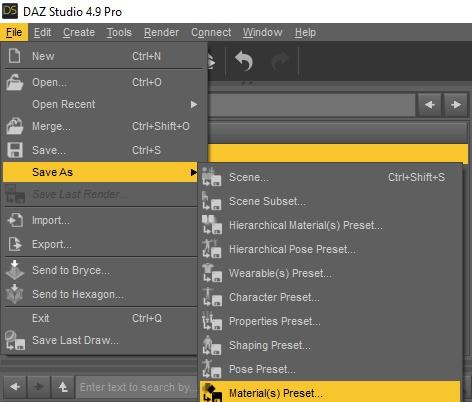
- Give a file name and click Save.
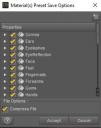
- On the popup leave everything checked.
- Hide the Genesis 2 character from the scene or move it out of the way.
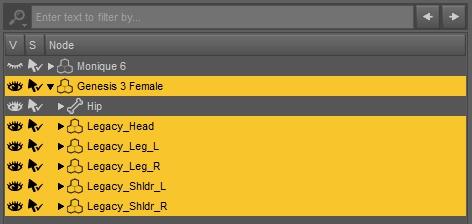
- Load the appropriate Genesis 3 base character and select it. In my example I will load Genesis 3 Female.
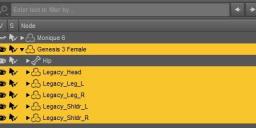
- Use the Legacy UVs _Prepare G3 script to load the geografts on the character. In my example I will be using _Prepare G3F.
- With the Genesis 3 character and its geografts selected, navigate in your content library to where you saved the material preset. In my example I left the default path so it goes to DAZ Studio Formats\My Library\Presets\Materials\. Load the material. The materials will load with seams and distortion but this is normal as we have not yet completed the conversion.
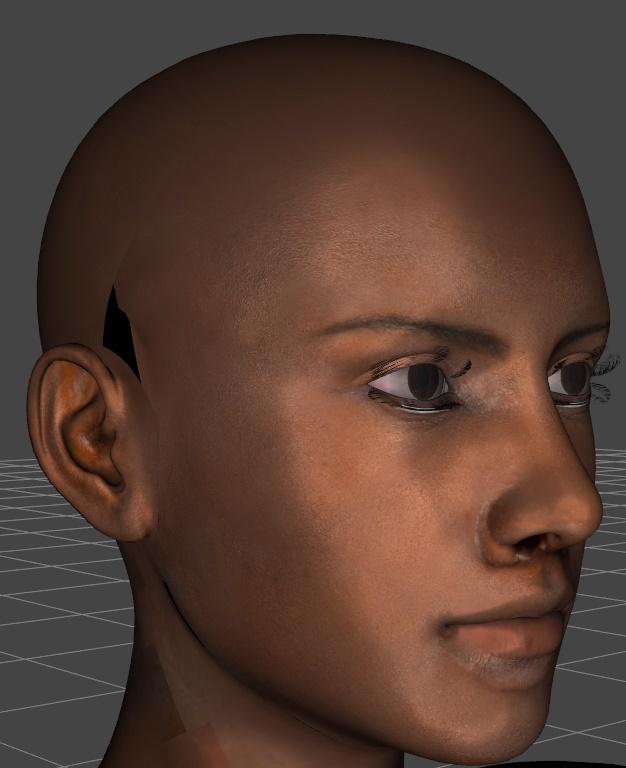
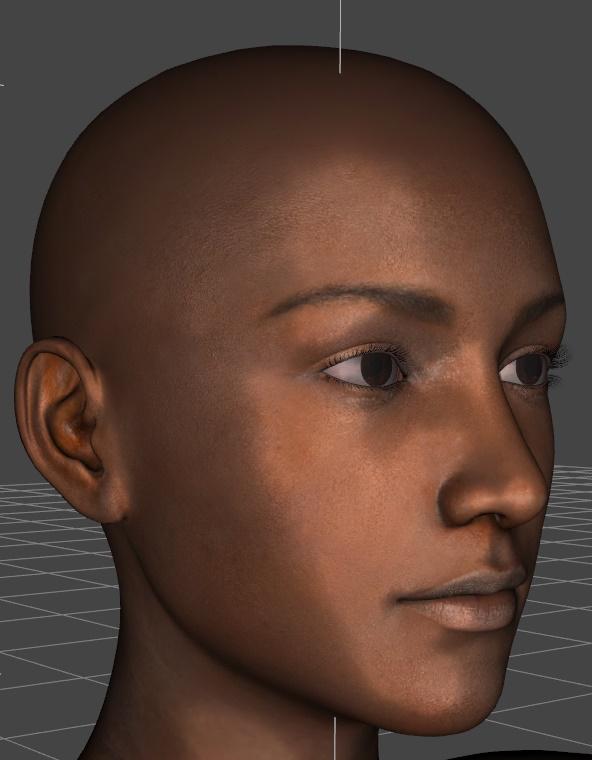
- Run the Apply G2 UVs script. In my example I will run Apply G2F UVs. The seams and distortion should go away.
- (Optional) Apply the shape you want to the character. In my case I will use SloshWerks's Genesis 2 Legacies product to apply Monique 6's head and body to Genesis 3 Female. I also adjust Genesis 3 Female's scale to match that of Monique 6's scale parameter.
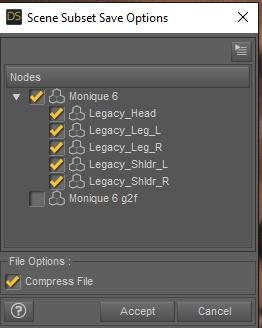
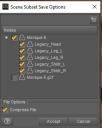
- Go to File, Save As, Scene Subset...
- Give a file name and click Save.
- On the popup, make sure your converted character is selected and all of the geografts selected as well and nothing else in the scene selected. Click Accept. In my example I have renamed Genesis 3 Female to Monique 6.
- Complete!
With any conversion there may be some loss of detail or minor distortion. The more different the UVs are the more distortion there can be. I do see some minor distortion on Monique's maps around the corner of the eyes and tips of the toes but I didn't notice any on Mei Lin or Gia's. YMMV.


Daz 3D is part of 
Connect
DAZ Productions, Inc.
7533 S Center View Ct #4664
West Jordan, UT 84084
Licensing Agreement | Terms of Service | Privacy Policy | EULA
© 2026 Daz Productions Inc. All Rights Reserved.
Comments
RobotHeadArt, this is excellent. Thank you for providing this.
I have compared the UVs of the other Genesis 2 characters that I have with the Base Female and Base Male UVs and can say that if you already have the Legacy UVs for Genesis 2 Female and/or Genesis 2 Male, for most of them you only need to bake new textures for Templates 1-3 (Face, Torso and Limbs), because the UVs for Templates 4-7 (Inner Mouth surfaces, Eyes and Eyelashes) are identical with the Base Female and Base Male UVs. That should save a bit of time.
The Template 4-7 UVs for Aiko 6, Girl 6, Lilith 6, Monique, Mei Lin 6, Ninive 6, Olympia 6 and Stephanie 6 are identical with the Genesis 2 Base Female UVs. Belle 6 and Giselle 6 have different Eyelash UVs, and Gia has different Inner Mouth UVs.
Also the Template 4-7 UVs for Darius 6, Gianni 6 and Lee 6 are identical with the Genesis 2 Base Male UVs.
Thank you!!
Hoorah, Gianni 7 wearing Gianni 6's skin - at last, my poor old computer took ages to convert the new textures and then I had all sorts of weird problems turned out due to putting the Legacy UV contents in Materials rather than Anatomy.
Guess I'd better do the rest of my non-standard UVs while I remember how to do it.
Thanks again for the brilliant tutorial.
although a long tedious process, without it I'd be in a pickle .. thanks so much for clueing us in!
I was unable to get Map Transfer to work—all my new images turned out pure black, except for the normal maps—until I switched from Iray to the 3Delight render engine.
Does Map Transfer require you work in 3Delight? Or did I miss something? (With 3Delight set up as the renderer, hitting "Accept" in the Map Transfer window only closes the window if I've applied the Iray Uber Base to the figure.)
My word, this is amazing. Thank you, as it allows me to transfer all my V4/V5 textures over to G2F Base Female.
I've never experienced black maps being output. I have the materials Iray and the render set to Iray.
Do you have an Nvidia card with Cuda cores? I only have the built in Intel Graphics on my computer and render everything CPU Only. Perhaps that is an issue...? I just noticed the information in the popup window always mentioned 3Delight, so I decided to try that way...
I do have an Nvidia card but even then, having a CPU should cause the render engine to render the same output, just at a different speed. Have you tried just doing one of the templates like the face (template 1) instead of all of them? Can you post a screenshot of your map transfer window setup?
I did. And when it finished doing one, it moved on to the others. I had the image format set to TIFF, and when it completed the one template in TIFF, it went on to do the others in BMP. I had to cancel the operation to get it to stop. (I had all the templates in the template column, but I'd only selected Template 1.)
ETA: Added Screenshots...
My Map Transfer window, (Baking Quality is left at 4 to speed up renders. As for the black images, changing the quality setting made no difference):
The information Popup window, (notice the references to 3Delight):
The resulting images, attempting to transfer just Template 1:
Render Settings are default for the Iray renderer.
I should mention, the above screenshots are taken from DS 4.8. However, I got the same results using DS 4.9 Beta.
I came across a post in another thread on the Map Transfer tool, where someone else was also getting the same results. The post is from December 2015.
I think I'm going to run this past tech support, see if they can shed some light on it.
This is such a great tutorial! Thank you so much! :D
... but Brodie 6 got shorter arm maps, it shows a blank area between the shoulder and the arms.
It looks like the texture is simply not applied to the geografted parts.
@Leana I found my mistake, I put the shoulder in the wrong template. Now it's solved.
With Swap UV, it can convert Female <-> Male textures.
I use it in order to convert Female L.I.E. Tattoo to Male UV.
Legacy UVs _Prepare G3 script
where do i get this ?
That's part of CaymanStudios's Legacy UVs products
@RobotHeadArt - I have the CaymanStudios Legacy UV converter from V6 to Genesis 3. Can I use the method described here to use Gia 6 maps on G3 or do I need the G2-> G3 Converter?
You would need to convert the Gia 6 maps to Victoria 6 UVs instead of Genesis 2 Female. There might be more distortion going that way, I'm not sure as I have never tried. Once converted to V6 UVs it should apply.
I own 2 products from rendo by CaymanStudios
Legacy UVs for Genesis 3: G2F
Legacy UVs for Genesis 3: V4
So the UVs for Gen3: G2 would be the one I'd use?
The Map Transfer utility allows you to convert UVs within a Generation only. So if you have an obscure Genesis 2 UV like Gia 6 you can only transfer it to another Genesis 2 UV. Genesis itself (Genesis 1) does natively support V4 UVs. So if you want to use a Genesis texture use Legacy UVs for Genesis 3: V4, and if you want to use a Genesis 2 Female texture use Legacy UVs for Genesis 3: G2F.
...
ok, great, thanks!