the return of mcjLagEffect and a step by step example
https://sites.google.com/site/mcasualsdazscripts/mcjlageffect
https://sites.google.com/site/mcasualsdazscripts7/mcjlageffecttutorial
mcjLagEffect is a free script for Daz Studio initially published in spring 2010
Typically it replicates the animation of a figure onto a skirt with a short delay, and this gives the appearance of dynamic clothing
but it works for anything that dangles and accepts a d-form
in the case of the fish tail
i used mcjCycleFilter Synth/Current on the XYZ Rotations of the d-form to amplify the swings
Daz 3D is part of 
Connect
DAZ Productions, Inc.
7533 S Center View Ct #4664
West Jordan, UT 84084
Licensing Agreement | Terms of Service | Privacy Policy | EULA
© 2026 Daz Productions Inc. All Rights Reserved.
Comments
damn casual you can have ideas !
did you try this for female breast movement ?
yes it works with anything that can be grabbed by a d-form
in fact the person that requested the step-by-step tutorial used it for a skirt, breast bounce but had trouble with hair
https://www.youtube.com/watch?v=9GuIoywh3pE&google_comment_id=z13zsdhremy0djjxn04cizqbhunuurfw2cg
someone could also create the delayed animation on something like a primitive cylinder
then use that as a guide to animate morphs like "Breast Lift"
this would make gentler deformations than d-forms
someday i'll incorporate it in mcjLagEffect, it will then be similar to that other script that is based on "real" dampened oscillations
i mean you could have the movements of the chest in space directly control the "Breast Lift" morph strength
Mcasual I love this. Thank you so much for updating it!!
I've been playing with it to use it on hair but so far I haven't had the same kind of effects. I'm guessing because is an object that tends to fall with gravity? So maybe if I put a null at the person's hip... but what if they fall upside down?
wecome
note that this script doesnt make any gravity simulation, it just animates one thing ( usually a d-form )
the same way as another thing ( usually the hip or head node ) but with a delay
the lag-behind effect gives us the illusion that this secondary motion is the result of the first motion
--
sometimes the hair wigs are props, sometimes they are figures
when they are figures, they may be "rigged" in a way that makes them stay somewhat like glued to the shoulders
so that could be a reason why mcjLagEffect and your D-Form doesnt have the expected effect
-
what works best and is easier to understand is when the wig is a prop or figure that basically behaves like a stiff prop
example this is the aiko3 mitsu hair, install the d-form base near the top of Aiko's head
i install the d-form fiels at the tip of the back hair
as a safety precaution, i zero all the rotations on the d-form base and on the d-form field
to be continued ...
( the animation is presently rendering )
i selected the d-Form node, ran the script with an "orientation-only delay of 6 frames i think
it was not too bad
but to get perfect looping animations, i used my mcjCycleFilter script
i also used it to amplify the hair swings
and i used it to remove the back-forth animation ( XRotations) because the hair were entering her back
then i used the d-Form panel/tab's Curve editor so that the D-Form was stronger for the length of the hair
and i X and Z Scaled the D-Form Field so be sure the whole tail was "caught" by the d-form
render complete
to be continued ...
wecome
note that this script doesnt make any gravity simulation, it just animates one thing ( usually a d-form )
the same way as another thing ( usually the hip or head node ) but with a delay
the lag-behind effect gives us the illusion that this secondary motion is the result of the first motion
--
sometimes the hair wigs are props, sometimes they are figures
when they are figures, they may be "rigged" in a way that makes them stay somewhat like glued to the shoulders
so that could be a reason why mcjLagEffect and your D-Form doesnt have the expected effect
-
what works best and is easier to understand is when the wig is a prop or figure that basically behaves like a stiff prop
example this is the aiko3 mitsu hair, install the d-form base near the top of Aiko's head
i install the d-form fiels at the tip of the back hair
as a safety precaution, i zero all the rotations on the d-form base and on the d-form field
to be continued ...
well the results are not very very good i'll see if i can improve
i found the problem !!
there was a keyframe on one of the Mitsu hair morphs!
this explains the snapping
because the D-Form Animation curves are all smooth and loop well
Tada !
The animation with the aiko hair is better than I've been able to do - and that video has hair moving in the way I've been trying to do. I am thinking, "What trouble! It looks awesome!" I at least can get hair to always point down sometimes, which gives me room to tweak the animations with little movements later.
I don't normally parent hair because I'm often using hair that doesn't belong to the model and I don't like what autofit does to the shoulders. (Although a3 doesn't have autofit.)
Sometimes when I run your script nothing happens. Sometimes it does. Sometimes I run it and it works but it won't work again and I have to restart my work by reloading. =^-^= But yours is the first script I've ever used so I'm also still learning the ropes.
I just went through your instructions. The only thing different is you're using a cylinder where I was using a null. I just tried the cylinder method on a skirt. I don't have any fancy MMD dance sequences, just a simple one where the character moves in place. I loaded that then changed it so the character turns around. When the character turns around, the skirt does move (finally )... it folds in on itself for some reason.So weird. LOL. But it does work.
Maybe you could put multiple deformers on the hair to make it move more naturally.
Okay to keep things from folding I go into the animation and I tell the deformer to rotate on limits no larger than 75 either negative or positive. That solved the folding and things are swishing just fine.
I got the hair to swish more by parenting the null to aiko's chest. I'm not sure why that made a difference.
And now it's time to tie my computer up with some senseless large render or something.
Hey Jacques,
Thanks for the followup! It looks like you're making more progress.
Spearcarrier,
I used the mcjlag effect much the same way that it is shown here with some slight differences. 1. I'm using a stranded hair, "Alicia Hair for Genesis 2." So, it might just appear to be more free than the solid form looking hair in the example. 2. I have the base of the D-former set near the chin of the figure. It is parented to the hair. 3. I have the D-former "handle" translated down about a head length into the body. It is parented by the head. 4. The field is set to affect from about the eyebrows down to the hottest part at the tips of the hair. Mclag is set to "orientation & Position." I believe that I could tweak this by shortening the width of the field and not get such a crazy, rubberband effect. Part of that must also be caused by the fairly long lag time of 7 frames.
For some reason, I do not get much effect at all when I do just the "orientation" setting. And, I could not get any good movement from using the D-former base as the follower node. I only get results when I use the D-Former handle as the follower. Could it possibly be a difference in Daz 4.9 from the earlier versions? I'm sure a lot of it is just that I don't know what I'm doing.
On a completely separate note: Is there any way to add better OpenGL shaders and control to Daz? I get pretty decent results from the Basic OpenGL setting. The Intermediate setting loses textures and creates mosaic shadows. I'm just wondering if there isn't a better setting or shader out there that can match the OpenGL render speed. I have to say that I really like rendering a frame per second. :)
Eric
I like you're thinking on this...I'm going to give that a try....perhaps a 2 or 3 frame lag on the crown / bangs and a 7 frame lag on the tips.
Eric
That's some impressive hip wiggling in those heels.
Thanks for updateing this.
if you go in Daz Studio's wimdow-top-menu Edit/Preferences/Interface tab, there's a "Per pixel Shader" option, when that's on
there's some VIewport and Basic-OpenGL render improvements
notably, if you apply an image ( a spherical panorama for example ) to the Reflection channel of a surface it gets that nice fake chrome look.
Also, surfaces with specular maps look better. And the lighting on large low-poly surfaces look smooth
there's a few drawbacks -
when per pixel shader is on, if some surfaces have their normals reverse because the modeler ( we wont name names ) made a mistake, that surface will render all-black
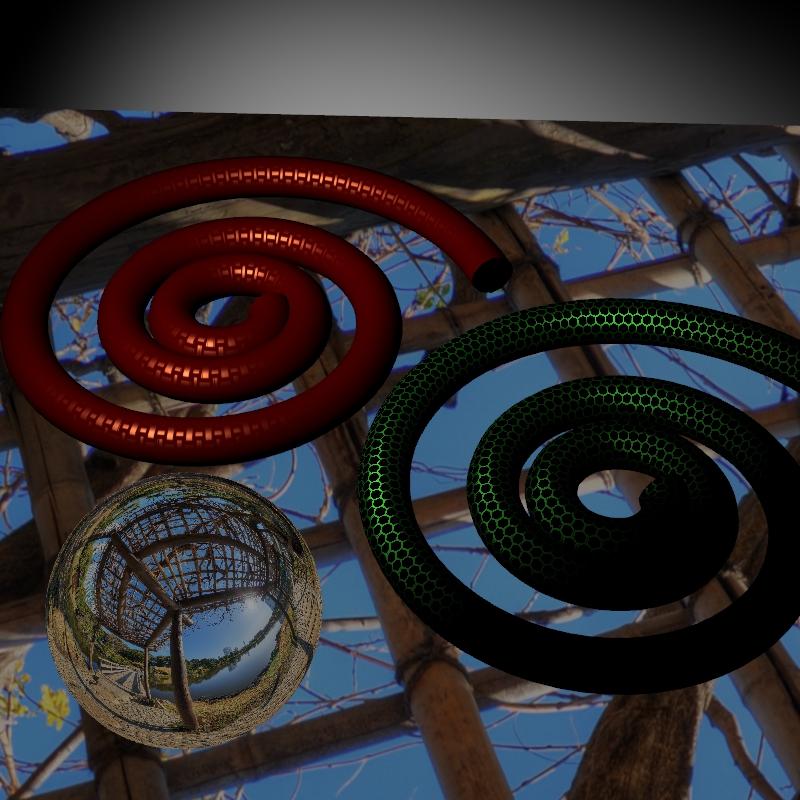
Below:
the soft lighting at the top on a simple 6-facets cube would not look like that at all without per-pixel-shader
the floor and ball have a panoramic image on the reflection channel
the red spiral has an image on the specular strength channel
i stabilized the feet and re-added the opacity map on the hair, and the dress semi-accidentally became sheer
cdpro_2831bbd99 - I'm sure it's not 4.8 or 9 because I also didn't get much movement until I parented the null into the chest when only using orientation. I'm going to go try your settings here now to see how they work for me.
I have found one limitation with it. The dance animation I have doesn't move like the ones mcasual shows. The dances moves a little and holds a position while moving their hands or whatever. So the skirt never settles back into place. The script still saves a lot of time, though, so no complaints. Just an observation.
When I first was trying it I put in a negative number for the lag effect and I remember being pleased with the result. But it won't do that now.
Right on. I'm going to check out the Per Pixel Shader right now. :)
BTW...that hair and hip shake is looking good.
I actually gave up after a while. If there's anyone that can break a program it's me, and it became more frustration than it was worth it. Great for simple things like skirts, though. I may return to it in the future.
And edit: I think I got it. And I'm going to forget how so I'm telling you.
The answer was in a sphere and taking off of the instructions I was given earlier in this thread. When I followed those instructions I couldn't get it to work.
I parented a sphere below Animedoll's head but to her head (or her chest)
I parented the deformer itself (made from the hair) to the sphere.
I kept the deformer base and field on the hair.
I ran the lag script but I ran it on the sphere and AD's head (not the deformer), checking both orientaton and position
And for the FIRST TIME the hair moved dynamically
Which is great because mye xperiments to create dynamic stuff in the past 3 days were failures. LOL
UPDATE UPDATE UPDATE UPDATE UPDATE UPDATE
Someone reported an issue with mcjLagEffect vs the newer version of Daz Studio
i didnt discover any problem but but but i slightly improved the script
Version 4 (current) April 21st 2017 - Added loopability, added saved program state, added webHelp button, Only the version for DS3 and DS4 was upgraded
Tried the following:
Exported an auto-fitted skirt to Aiko 8 as OBJ
Reimported it as OBJ
Parented to Hip Node
Applied D-form and place same way mcasual does here: https://1b65a1fe-a-62cb3a1a-s-sites.googlegroups.com/site/mcasualsdazscripts/mcjlageffect/dform.png?attachauth=ANoY7cr0j68s3FgaxXtw9iB-8RTQGAYkJABvB72VKdl2T_7wN8kGfQf7x1u1OJSHpxfmLraMYEOBdMGj68sVzjViS7a4UzCgBvaQOCccFjvbqprHIdOg9z_xNNtZ7nAXFR8P8oi464uZNXkfILQJdXS5XdUWpeY9-_agvEcnVPeq9Z5TvoHkOSyVcCvN-o2kE-U1rXGzlCyG7adx1fe_BMn3CZWcS1QMzoY5CZq6zsUk48zbleUpY8c=&attredirects=0
Parented each D-former component to the Hip
Selected the D-former as a follower node
Launched mcjLagEffect
Did the thing
Got stretched spaghetti without skirt sway.
Am I doing something wrong?
mcasuals explanation is too confusing so if someone can clarify that would be great.
Thanks in advance.
Merged question thread with the main thread.