Colors bleeding on one another with Iray.

denisnormandindenisnormandin Posts: 164

Hi,
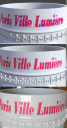
I have a color bleeding problem under Iray.
See the joined (montage) picture :
First, on top, Iray preview (the problem)
Second, in the middle, Filament preview (much better, but not quite OK)
Third, on the bottom, Blender Cycles preview (same source images for the texture, that's how it should look)

Can someone explain to me why this happens and how to tweek the settings to get a better result ?

Thanks 
DN
Forum tmp 1.png
840 x 1599 - 2M
Post edited by denisnormandin on

Comments

  • barbultbarbult Posts: 27,311

    You need to adjust (increase) the Texture Compression Per Texture Threshold values in the Render Settings/Optimization section. Double the numbers you have there now for Medium Threshold and High Threshold to make Iray use less compression on the texture maps. If that doesn't fix it. increase them again. Increasing these will use more GPU memory to render, so don't increase beyond what is necessary. It's all trial and error.

  • What does it look like when you actually render?

    Iray preview uses different(simpler) math to generate an image, so in some cases, the preview is wildly different from what will be produced at render.


  • barbult said:

    You need to adjust (increase) the Texture Compression Per Texture Threshold values in the Render Settings/Optimization section. Double the numbers you have there now for Medium Threshold and High Threshold to make Iray use less compression on the texture maps. If that doesn't fix it. increase them again. Increasing these will use more GPU memory to render, so don't increase beyond what is necessary. It's all trial and error.

    Thanks barbult,
    But this is part of a Mug Collection that I want to put out for sail.
    Solving my rendering problem locally won't solve any potential client's display problem. So I need to solve this at the source I guess. I was hoping there could be some settings to tweek in the shader so it would then be built in.
    Maybe I'll have to go back to the drawing board and redo the decal's deseign from scratch.
    Thanks again.


  • DrunkMonkeyProductions said:

    What does it look like when you actually render?

    Iray preview uses different(simpler) math to generate an image, so in some cases, the preview is wildly different from what will be produced at render.


     Hey DrunkMonkeyProductions,
     

    The render is just as awfull as the preview.

    Mug - Paris Ville Lumière (test).png
    2048 x 2048 - 4M
  • denisnormandindenisnormandin Posts: 164
    edited August 6

    I've decides to go around the problem and change the deseign so that the bleeding or smudging (call it what you may) doesn't have as much of a 'destructive' effect.
    Still, I think that the Iray compression settings should be adjustable in the shaders properties.
    It make no sense that for one part of one object in a scene  that has a light bleeding broblem, the whole scene's rendering settings should be adjusted at the risk of  blowing up (Iknow, I'm exagerating) the graphic card.

    Mug - Paris Ville Lumière (final).png
    2048 x 2048 - 5M
    Post edited by denisnormandin on
  • jmucchiellojmucchiello Posts: 1,901

    denisnormandin said:

    I've decides to go around the problem and change the deseign so that the bleeding or smudging (call it what you may) doesn't have as much of a 'destructive' effect.
    Still, I think that the Iray compression settings should be adjustable in the shaders properties.
    It make no sense that for one part of one object in a scene  that has a light bleeding broblem, the whole scene's rendering settings should be adjusted at the risk of  blowing up (Iknow, I'm exagerating) the graphic card.

    You can always set the render settings "high" and manually rescale all the textures in a pinch. If it's something you want to sell, for example, putting the time in might be worth it. Also, Scene Optimization can make the texture rescaling less painful than do it in a graphics editor manually.

  • felisfelis Posts: 6,460

    What texture size are you using?

  • denisnormandindenisnormandin Posts: 164
    edited August 6

    jmucchiello said:

    denisnormandin said:

    I've decides to go around the problem and change the deseign so that the bleeding or smudging (call it what you may) doesn't have as much of a 'destructive' effect.
    Still, I think that the Iray compression settings should be adjustable in the shaders properties.
    It make no sense that for one part of one object in a scene  that has a light bleeding broblem, the whole scene's rendering settings should be adjusted at the risk of  blowing up (Iknow, I'm exagerating) the graphic card.

    You can always set the render settings "high" and manually rescale all the textures in a pinch. If it's something you want to sell, for example, putting the time in might be worth it. Also, Scene Optimization can make the texture rescaling less painful than do it in a graphics editor manually.

    The original texture for "Paris Ville Lumière" were made in a graphic editor. But the new one was drawn with Acrylic paint markers on regular paper, than scanned at 600 dpi and reworked digitally to get the final 3k image (+/-), 3150 x 178. (Also answering felis' question.)

    Now, about "You can always set the render settings "high" and manually rescale all the textures in a pinch", I don,t understand what You mean. I've been doing some 3d modeling for quite some time now, but have only recently taken a more serious approach to it.

    Post edited by denisnormandin on
  • jmucchiellojmucchiello Posts: 1,901

    denisnormandin said:

    jmucchiello said:

    denisnormandin said:

    I've decides to go around the problem and change the deseign so that the bleeding or smudging (call it what you may) doesn't have as much of a 'destructive' effect.
    Still, I think that the Iray compression settings should be adjustable in the shaders properties.
    It make no sense that for one part of one object in a scene  that has a light bleeding broblem, the whole scene's rendering settings should be adjusted at the risk of  blowing up (Iknow, I'm exagerating) the graphic card.

    You can always set the render settings "high" and manually rescale all the textures in a pinch. If it's something you want to sell, for example, putting the time in might be worth it. Also, Scene Optimization can make the texture rescaling less painful than do it in a graphics editor manually.

    The original texture for "Paris Ville Lumière" were made in a graphic editor. But the new one was drawn with Acrylic paint markers on regular paper, than scanned at 600 dpi and reworked digitally to get the final 3k image (+/-), 3150 x 178. (Also answering felis' question.)

    Now, about "You can always set the render settings "high" and manually rescale all the textures in a pinch", I don,t understand what You mean. I've been doing some 3d modeling for quite some time now, but have only recently taken a more serious approach to it.

    The other objects in the scene, if you are running into VRAM issues, you can downscale some of the other textures, possibly so that the primary texture can be high rez.

  • jmucchiello said:

    denisnormandin said:

    jmucchiello said:

    denisnormandin said:

    I've decides to go around the problem and change the deseign so that the bleeding or smudging (call it what you may) doesn't have as much of a 'destructive' effect.
    Still, I think that the Iray compression settings should be adjustable in the shaders properties.
    It make no sense that for one part of one object in a scene  that has a light bleeding broblem, the whole scene's rendering settings should be adjusted at the risk of  blowing up (Iknow, I'm exagerating) the graphic card.

    You can always set the render settings "high" and manually rescale all the textures in a pinch. If it's something you want to sell, for example, putting the time in might be worth it. Also, Scene Optimization can make the texture rescaling less painful than do it in a graphics editor manually.

    The original texture for "Paris Ville Lumière" were made in a graphic editor. But the new one was drawn with Acrylic paint markers on regular paper, than scanned at 600 dpi and reworked digitally to get the final 3k image (+/-), 3150 x 178. (Also answering felis' question.)

    Now, about "You can always set the render settings "high" and manually rescale all the textures in a pinch", I don,t understand what You mean. I've been doing some 3d modeling for quite some time now, but have only recently taken a more serious approach to it.

    The other objects in the scene, if you are running into VRAM issues, you can downscale some of the other textures, possibly so that the primary texture can be high rez.

    I have no VRAM issues, my graphic card is quite solid. I just have to think that the people who will eventually buy my models might not have as much power under the hood. Plus, the models should be ready to use on any system without having to tweak the render settings.
    So, I think that I've reach the right compromise. The new lettering that I have created is still affected by the Iray light management and compression approach, but in a much less 'armful' way.

Sign In or Register to comment.
