Is there a way to fix a texture showing a strange line on a G8.1F character?
 Elor
Posts: 4,227
Elor
Posts: 4,227
Hello,
I'm speaking about MSO Rory, by @Mousso:
https://www.daz3d.com/mso-rory-hd-for-genesis-81-female
There is a line going from one clavicle to another, just at the limit of the Body surface (I looked at other seams, and I don't think there is problem here) and I tried to underline the problem with the green line on both pictures:
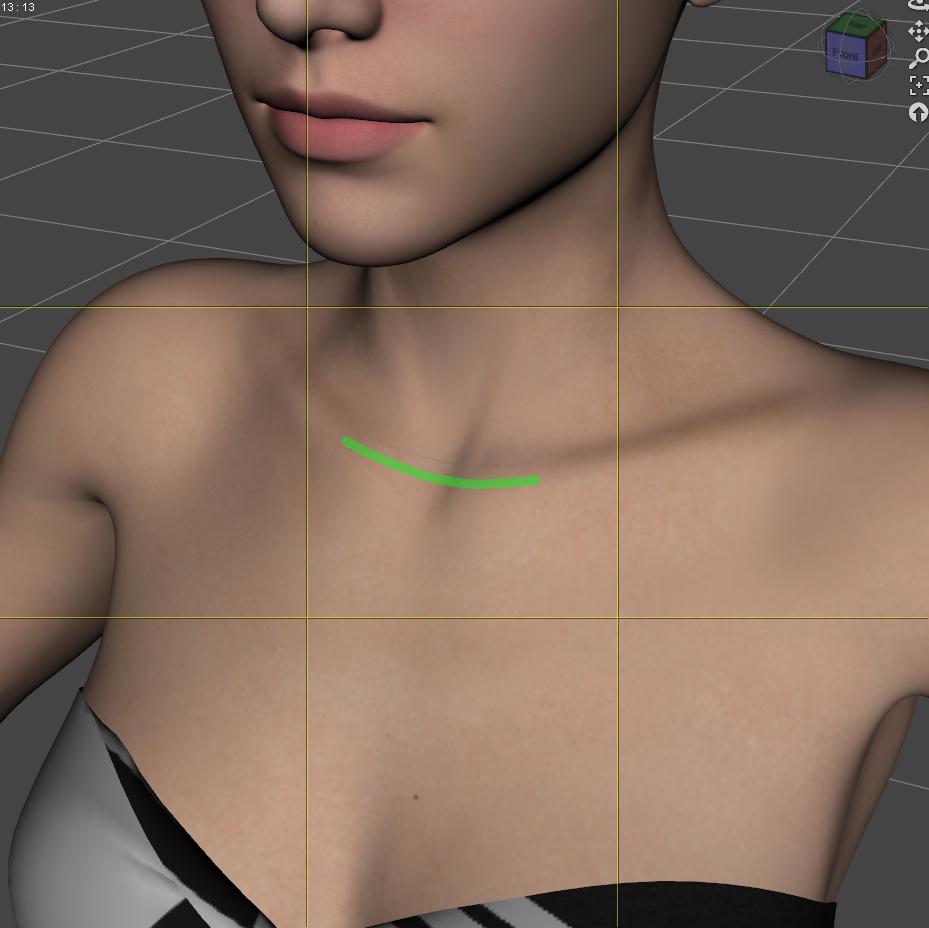
It's not just a viewport glitch, it's visible on an Iray Render:
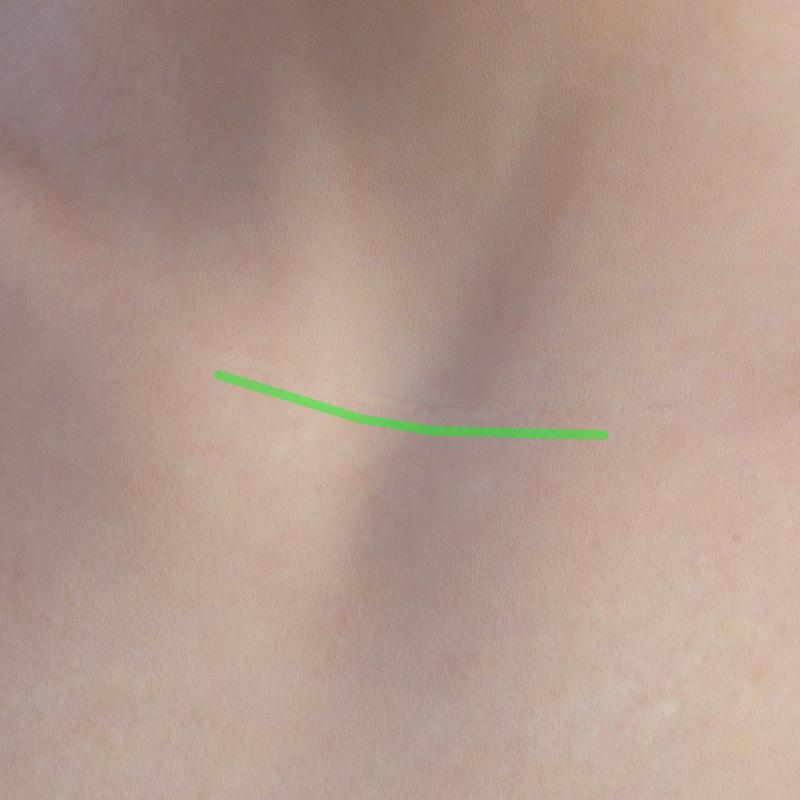
I checked with various Mousso's characters for Genesis 8.1, and none of them exhibit the same problem.
I don't know if it's the cause, and I won't show it for obvious reasons, but when I put MSO Gina body texture over MSO Rory body texture in Affinity Photo, asking Affinity to show the difference between the two, Gina's textures was a couple of pixels wider than Rory's.
Does someone knows how to fix it (outside of writing a ticket which will happen later today)?

Daz 3D is part of 
Connect
DAZ Productions, Inc.
7533 S Center View Ct #4664
West Jordan, UT 84084
Licensing Agreement | Terms of Service | Privacy Policy | EULA
© 2026 Daz Productions Inc. All Rights Reserved.
Comments
Have you tried looking at the textures.
My guess is it could be a normal map issue.
I realised it is on the seam of the head diffuse.
Will be have to be corrected in 3D painting, as it borders the body.
Thank you :)
I don't know how to do that, so I hope the ticket will be successful.
And there is likely a problem with the HD Head morph when Rory Head morph is not applied:
With Rory Head morph:
Without:
The seam issue can be seen with Texture Shaded drawstyle, so the issue must come from diffuse maps of Head and Body. It can be easily fixed in Blender by using Smear or Clone brushes, then bake the diffuse maps out.
As for the eye issue, I've seen the similar issue before. It's because the solely-used HD head morph makes the Sclera surface sink into the eyeball. You also can fix it in Blender or if you have Mesh Grabber, switch to Geometry Editor firstly, Select by > Surfaces > Sclera, active Mesh Grabber, zero radius, then drag out the sclera a little bit ~~
I replaced the body diffuse map by the body diffuse map of another character, and the problem was not here anymore:
G8.1F with MSO Rory textures on all surfaces:
Same G8.1F, but I loaded MSO Lacey textures on the body surface:
I opened a ticket, hopefully both will be fixed soon.
I'll keep your advices in mind, but I don't know enough about Blender to fix the diffuse map and I would not be surprised if the problem was also visible on other maps: I just don't know how to check for it.
Firstly, you can check the issue in this way:
1) With Wireframe Texture Shaded drawstyle, zoom in to the defect line on the seam of Body and Head. Usually such an issue is on the seam, so it's easy to judge:
2) If the defect line covers the seam wire (ss 1), it means both Body / Head texture maps were not well painted and/or baked ~
It's very easy to fix the maps in Blender (the vendors usually fix such an issue in the similar way... only may be with different software / different brushes ~~). You may give it a try while waiting for the official update:
1) Export the figure to OBJ with the settings shown in (ss2). Import OBJ in Blender with the settings shown in (ss3).
2) Go to Texture Paint workspace, zoom in to the seam area. Select Smear brush, tweak the brush size / strength, etc. Smear the defect line from the right side to the left (ss4). Using Clone Brush can be even better ~~
3) After fixing the defect, select Rory Body Diffuse.jpg from Image dropdown list, click Image button, Save As... to a target folder. Do the same with Rory Head Diffuse.jpg (ss5)
Now assign the fixed diffuse maps to Base Color and Translucency slots of Body / Head surfaces, Iray Preview, the issue will be gone. (ss6~ss7)
Edit: In principle, you should further fix other maps, i.e. roughness, bump, etc. as they were baked together...however it's not a must in this case... as that'll nearly make no change in renders ~~
Thank you :)
Does the brush work across seams? I think I did what I needed to do, but I still see a small line on the head surface while the part that was on the body surface is not here anymore.
Yes, it does. You can increase the brush size a bit, even repeat smearing aross the line ~
Or, are you familiar with Clone brush ? It's almost as same as the clone tool in Affinity, only the shortcut is different... You hold Ctrl in Blender to set a source near the defect line, then paint on the line ~~ Repeat this action until you fix the whole line.
Thank you, I'll try it another time, hopefully, the problem between the chair and the keyboard will be fixed
Do you know if there is a way to make the problem more visible in Blender? It's barely visible in Blender compared to Daz Studio.
Right, Texture in paint mode in Blender is not as good as Adobe Substance Painter... but if you zoom in much closer to the problematic area, you still can clearly see it.
Also check in Preferences > Viewport > Texutures, set Limit Size to Off, Anisotropic Filtering to 16x ~~
Solid Mode in Viewport on my side is pretty clear with zoom in.
I don't get it, in Blender, everything seems fine after using the Clone brush:
But once back in Daz, the line is still visible after replacing the problematic map:
I tried various ways of saving them and when I asked Blender to save the modified maps, it did save both the Head and Body diffuse maps (butchering them because it used the default value of 75 for JPG quality) so I also saved manually, setting JPG quality to 99 (would be nice if it was possible to change the default JPG quality value once and for all but if it is, I don't know how), but the outcome is the same: the Body diffuse map seems fixed, but the head diffuse map is not.
Edit : I painted a black line over the seams and it is saved. So this step is working as intended, now, why does this *censored* line doesn't want to disappear
I don't get it either ~~ It always works on my side. Make sure you save the image from Image Editor panel, then you can try saving a PNG format and see if the fixed images works.
The image quality you set (set it to 100% if using JPEG format...) cannot be globally saved in Blender other than in a blend file only ~~
the PA should be fixing this
Yes, if you cannot make it work while waiting for the fix, pls just wait for the update ~~
I opened a ticket a couple of days ago, and while waiting, I'm trying to see if I can fix it on my end :)
I tried PNG and it didn't work either
I also tried on another computer, still a failure.
Ah ~~~~~ I have no idea why.... but I could only suggest you try with the latest version Blender 5.2 even if I don't think it really make sense lol ~ ~
So far, I tried with Blender 4.5 LTS and Blender 5.0.1 on my Mac, and Blender 4.something on my other computer.
I tried to do the export from DS6, then editing in Blender 5.2, but the problem is still there :/
Have you also changed the translucency texture?
@felis: I replaced all instances of 'Rory Body/Head Diffuse.jpg' by 'Rory Body/Head Diffuse.png' and the problem is still visible in Daz Studio, invisible in Blender
@FenixPhoenix: there is no displacement map.
Just in case you may want to take a look, here's a video I just recorded for fixing the issue, hope that'll help ~
https://mega.nz/file/3LoknCSY#a-ZWRWSCtz76Vol-IqUJmhQkh2TsTMZF9dJ8NVz3LRE
Thank you for the video,
After watching it and checking each step, I missed a parameter in the export window: I was so focused on having the right boxes ticked and I missed the value of one of the drop down menu (Write group menu was not set to Use Surface Name)
I think I'm doing what you're doing, but the end result is still the same: in Textured Mode, there is still a line between the head and body surfaces, despite both maps being visually fixed in Blender.
Do you know if Blender save the maps inside a blend file or if they are only saving the changed areas, applying them back onto the original maps when the file is opened again? Asked otherwise, do you know if we can exchange .blend files without infringing on Mousso's ownership on Rory's textures?
I must do something wrong somewhere because otherwise, we do have the same product packages and the same softwares.
1st, Write Groups doesn't affect the painted / saved results other than Vertex Groups (if you check Vertex Groups option when importing OBJ...)
Blender doesn't save texture maps into the blend file unless you do Pack Resources, all modification will be saved as well. Then you can Unpack Resources to save the texture maps from the blend file.
As for exchanging the file, we cannot do that because sharing / distributing modifed maps, i.e. derivatives of the assets... is also against the License Agreement.
BTW, you mentioned you painted a black line on the seam and could save the maps as expected. But have you assigned the maps to the character in DS ? No change ?
I always forgot the derivative part of the licence. It solve the question then.
I didn't save the maps where I painted a black area over the seam, but you can see that the change is taken into account on this comparison (its the most visible where the arrows are pointing):
I only changed the head map on this picture so the problems are all located on the body map. But once it is changed too, the line is here.
Ouch, I suddenly noticed one issue ! Why the defect line in your screenshot is much wider than what I see from this character on my side ?! Check my screenshot down below, I've already zoomed much closer than yours I believe...but the line is still not that wide like yours. Why ?
You enlarged the image after capturing the screen ? Are Body / Head diffuse maps coming from the very same Rory character ?
Or would the issue come from DS on your side ? from a Mac OS ? or something ? Anyway it's so weird ~~
It's Rory materials on another character morph, one that was loaded while I read your previous message, so I simply changed the Head map on that character instead of loading Rory.
But all my tries to fix the problem where done loading Rory herself, exporting her shape as OBJ and loading that OBJ in Blender, but maybe I should try with this character: it seems to make the problem more visible, so maybe I'll see something different in Blender (I doubt it, after all, I'm applying the clone brush following the visible line on the seam between the two surfaces and it should be large enough to catch everything).
Ah, Okay, pls take your time.
Or maybe you can record a video if possible... the only idea I could think of by now lol ~~
Turn out I saved the maps with the black 'line', using a unique name so I didn't replace them:
It's with the same character morph as the previous picture (using MSO Rory textures). The line around the seam is visible in Textured Mode, but not in Iray preview.
I also did the test in Daz Studio 6: first picture is texture shaded, then Iray Preview, then Filament:
Like with Daz Studio 4, the line around the seam is visible in Texture Shaded not in Iray but is back in Filament.
I also did a render in Iray with Daz Studio 6 (not all the way to the end though):
I have no idea what could cause that problem, but the test with the black line shows that it's apparently a visual bug on any mode except when using Iray.
Hmm, it seems a bug~ I couldn't reproduce the issue. You're using a Mac OS, correct ?
I do use MacOS for the tasks that doesn't require an RTX GPU, but the problem was here too when I tried to fix the problem in Windows, using Blender 4.something.
And I just tested my black line maps on Windows: the line is visible too outside of Iray preview, on Daz 4 and 6.
I'll see if adding a black line on a non bugged chararcter leads to the same problem.