Help With Carrara Water
 revenger681
Posts: 156
revenger681
Posts: 156
Ok, So i've been working on this render for quite some time, every time I try to fill the pool with water in this scene: http://http://www.daz3d.com/shop/dream-home-yard-and-pool the water is always a solid block.... I've got light through transparency on, and GL, all that good stuff. I replaced the original texture with one of C8's water and it still comes out this way. Any idea what I am doing wrong? It took 6 hours to render this scene as is.... I'm getting quite frustrated! At first I thought I wasn't using transparency and etc, but I double checked and it is checkmarked. Water works in every other scene, just not this one... Can't figure out why...
Daz 3D is part of 
Connect
DAZ Productions, Inc.
7533 S Center View Ct #4664
West Jordan, UT 84084
Licensing Agreement | Terms of Service | Privacy Policy | EULA
© 2026 Daz Productions Inc. All Rights Reserved.
Comments
The water looks like this when I'm in the assembly room, it looks fine.. But never renders correctly... caustics is also enabled.
There is a SECOND light-through-transparency setting under the GI panel. Make sure it is ticked on when you use Global Illumination.
I swore I had that checked, I looked and it was checked while it was rendering. I must have hit it after I hit render. Bleh, that checkmark always gets me. I deleted everything but the pool area and re-rendered. Working now. Thanks!
Ouch. Six hours.
As a side note, if you're interested in cutting that 6 hours down to a few minutes, and have a better looking result, just ask.
Sure! I'd like some tips!
Here are my light settings as is.
here's an assembly room look too, I've since raised the interior/exterior to be above the ground grid. Other settings:
I've textured everything I could in C8 shaders (oak wood for the patio furnature, Bright Eyes for Carrara for V4's eyes, Carrara 'steel' for the patio cover, C8 blue tiled marble for the pool's linining, with white marble for the steps. I've used the default water texture for the water itself. I've put spot lights in all the ceiling lights that are in the bedroom's textures, and bulbs in the lamps after editing out the mesh's light bulb, and scaling the light bulb to their exact sizes. Two pots in the background (won't even be visible for this render) are using a C8 stone texture. V4 with (I think) Lana elite kin with sss.
I'm guessing to speed things up I would probably hide all off camera items, and use 1 or two lights for starters, right?
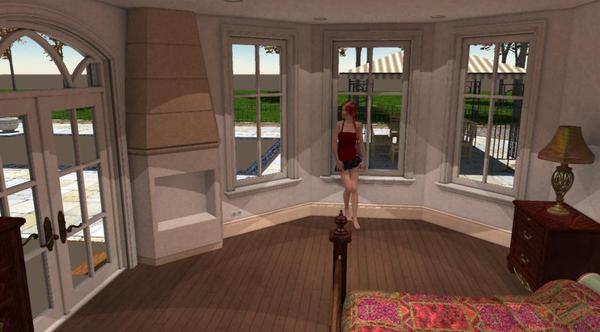
Okay, well, I just happen to have that scene already set up, and I don't think I did any of that stuff shader-wise with it. Though it's been a very long time since I used this scene.
Anyway, this render took about 8 minutes. It needs a lot of work, but should suffice for the points I want to make.
First, don't use global illumination or any of that fancy stuff. You don't need it. This scene has a total of 4 lights, plus a sunlight, though I didn't turn on the ceiling lights like you did. They all are set to cast 100% shadows, and there is no ambient light in the scene. But all the lights have soft shadows applied, which is very important.
The sunlight is set to stream in thru the windows, and there is a tree outside with translucent leaves that the light streams thru to give the interesting light pattern on the floor, which helps sell the feeling of realistic lighting. Since the sunlight is coming thru windows with transparency, you need to crank their intensity way up or you won't get any light coming thru.
Also notice that the windows are not 100% transparent, they are partially reflective. Totally transparent windows don't look right, they look like there's no glass there at all. So I made them overly reflective to, again, sell the feeling. Also, it keeps your eyes from wandering outside and being distracted, and keeps the focus inside the room.
Two of the lights are very light blue distant lights with soft shadows, set to simulate the blue skylight coming in the windows from all directions. Since the windows curve in this scene I had to use two distant lights. Again, you have to crank up their intensities.
The third light is a wide angle spotlight on the floor near the window, pointing up at about a 45 degree angle to simulate the light bouncing off the floor from the sunlight coming in. Very soft shadows and a 90 degree half angle to light up the room, and a light brown color.
And the last light is a spot parented to the camera to simulate the light bouncing off the wall behind the camera and lighting up the room. You can see the glare from that light on the window right in front of the camera, which serves as a bright focal point for the image. Though you might want to tweak that off.
Wow, fantastic lights! I will re-do my lighting and set them up like yours, the camera backlight is one I always forget about using. I'll do my new version based on your tips in the morning since i'm headed off to bed ATM. Also like the light color and translucent leaf tip! I always forget how much impact light color can make!
Thanks for your tips JoeMamma....... and the render looks great.... great use of light and reflections.
Thanks, Joe for all those tips! My render time was reduced a LOT! I'll post am update when I get off work today :)
Holly: during my latest render with JoeMamma's advice I once again got the muddy water result. The issue wasn't the transparency, but rather something else I did earlier: selected the water mesh by domain, and raised it up just slightly and that's what made my water clear. I think it has to do with how low Carrara initially imports this scene.
You're using the realistic sky. Click on Scene in the instances and then up above where it says Atmosphere, uncheck the Show Ground. If you want the ground, then lower the horizon by 20 ft. Even in the Medium scale scene the horizon defaults ti inches (if you're US measures) so you need to enter your value followed by "ft". It would look like this: 20ft. After you hit enter it converts that to inches so don't be alarmed when the the number looks like it increases dramatically.