Exposure Value - For Noobs and Dweebs
 Skelch
Posts: 276
Skelch
Posts: 276
I am simple and there are so many fiddly things within daz studio is easy for me to get lost. No matter how long I have used Daz Studio I still don't know half as much as many others do. And often forget some of the things I learn so this may help someone else, as it helped me.
Since downloading Daz 4.24.03 My renders have been VERY WHITE much brighter than I could account for. Finally found how just changing The Exposure Value a small bit makes Big differences. So for the simple or the new here is what I found.
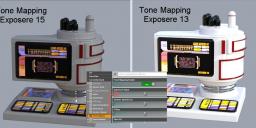
This grey model kept rendering white. I change reflections and everything under the surface tab, but could not get it right. Until I went under Iray settings and Found under Tone Mapping the Exposure Value and messed with it just a very small amount. It was set to 13 changing it to 15 (higher number = darker images) it fixed everything for me.
So you smart people feel free to tell me how dumb I am and how everyone knows this or you can just googled it. I made the post for noobs and simple folk like me.
Daz 3D is part of 
Connect
DAZ Productions, Inc.
7533 S Center View Ct #4664
West Jordan, UT 84084
Licensing Agreement | Terms of Service | Privacy Policy | EULA
© 2026 Daz Productions Inc. All Rights Reserved.
Comments
Which version did you use before ?
At one point (I think it was around the release of Daz 4.22 but I'm not sure), Daz decided to tweak the default values for Burn Highlights and Crush Blacks, changing them from '0.25' and '0.20' to '1.00' and '0.00' and maybe it's the impact of that change that you're seeing.
The change won't impact scenes saved with a version of Daz Studio from before that change, but if you're starting a new scene, it'll use the new version and will produce a different result compared to what was previously the default looks.
To add to your screenshot, a useful video to see what each setting in the tonemapping is doing: