Smooth Out Imperfections in Clothing When Posed?
 n.aspros123
Posts: 340
n.aspros123
Posts: 340
I'm wondering if it's possible to smooth out bumps and imperfections in clothing after dForce has been simulated?
Would sending it to Blender and back work and how is it done when the genesis female character is posed? Does the daz to blender bridge work for 4.22 and 4.24?
I've tried to smooth them out in Hexagon using the brushes. However it didn't work properly after sending back to DAZ. It did create a morph but it does not seem to have worked and something different happens when the slider is adjuisted in DAZ.
Thank you in advance for your replies.
Daz 3D is part of 
Connect
DAZ Productions, Inc.
7533 S Center View Ct #4664
West Jordan, UT 84084
Licensing Agreement | Terms of Service | Privacy Policy | EULA
© 2026 Daz Productions Inc. All Rights Reserved.
Comments
If a character is posed and/or not in base shape, you need to tick 'Reverse Deformations' when creating the morph.
If you fix the deformation with Hexagon, check this thread: https://www.daz3d.com/forums/discussion/comment/9021201/#Comment_9021201
If you fix it with Blender, suggest you not do it with Daz to Blender bridge though it works for DS 4.22 / 4.24... because it'll make the process a bit cumbersome.
Just directly export to OBJ and fix it with Blender. Then import OBJ with Morph Loader Pro, with the settings in below screenshot.
Thanks for your input @crosswind
Just need to ask: Do I save just the G8F in posed form, dForced and the tank top, as an .obj? Nothing else?
Or do I save G8F and Top as separate .objs in Base Resolution? Reason I'm asking is Jay Versulis has a youtube video and he sends the genesis and clothes separtely.
Yup, Ctrl + Select the posed G8F and the wearable, with the settings in Export. (screenshot 1). Nothing else. G8F will be used as the reference when fixing deformation on the wearable. In Blender or other applications, just make fix on the wearable and then export wearable to OBJ.
Not necessary at all. Export them together as above-mentioned. And yes, setting Resolution Level to Base Resolution on the wearable or setting View SubD Level as 0 is a must .. before exporting.
Before simulation, have you tried, under the surfce tab of the clothing, changing the Contraction-Expansion Ratio set it to -95% or maybe down to -80%. This has the effect of contracting the cloth tighter to the body.
Yes, if going for tweaking settings on dynamic surfaces, lower down contraction ratio may help to some extent but not set it too low. The side effect is that it'll shrink / shorten the top, you may have to add dforce modifier weight node to influence the force.
Besides, add some Velocity Smoothing and crank up Smoothing Iterations may also help.
I had a go at adjusting the contraction ratio, Velocity Smoothing and Smoothing Iterations. Settings shown in attachment. I adjusted the breasts as well.
It's sort of better. What do you think?
Is there anything else I can try and adjust before trying to add a dForce modifier weight node and/or sending it to blender?
Originally the cardigan (dforce Overload Cardigan G8 by Nirvy) had a nitted texture pattern and I added a japanese silk texture. Does this influence the material when dForced?
Materials don't affect the simulation, only the simulation settings.
It looks like she has a slight reminence of enlarging breats in her shirt. You can avoid that by using timeline animation and dialing the shape during timeline. That way the shirt start in a smaller version.
I think it already looks good to me... Have you tried increase Smoothing Iterations a bit ?
It seems that you applied a japanese silk shader preset to the cardigan... that wouldn't influence dforce settings on dynamic surfaces.
I've attached a pic of the settings used to my previous reply. Smoothing Iterations was set at 0.
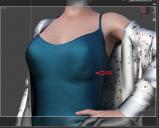
Is there anything I can do about the faint outline under the breasts?
I see no other pic of settings... Smoothing Iterations should be at least set as 2, you even can crank it up to 20 or more, see if the "outline" is gone ~~
You do mean Velocity Smoothing Iterations? Max it goes up to is 5.
No, I mean Smoothing Iterations in Parameters pane . It works with Smoothing Modifier. Velocity Smoothing Iterations works with dForce and Simulation. What you set in Velocity... is just fine.
For Contraction-Expansion Ratio, you can further try with 90% ~ 95%.
My goal for the blue tank top is make it look like this shape after dForced. See attachment.
Product?
It's an image I found on the net. I don't know which tank top it is but the uploader said it's dForce.
It might be this: dForce Tank Top for Genesis 8 Female by Notilize
I mean the product you are using...
https://www.daz3d.com/dforce-shrug-style-outfit-for-genesis-8-females
Okay, but they're different in terms of design ~ It's tight under figure's breasts on the one you're using while that Rendo's one is obviously with a looser design. If the figure has larger breasts, you won't get the expected result with that Shrug Style Top... no matter you simulate in whatever way.
I suggest another way around since I ever mentioned that the initial shape of the cloting is important before simulation. You can make a morph with Blender to give the top a "looser style". (screenshot 1)
Then you'll get the expected result afer simulation and you won't have to tweak it each time after simulation. (screenshot 2)
Which tools did you use in Blender to make the morph?
As usual, Draw brush and Smooth brush in Sculpt mode.
I don't know what's going on with Blender. When scuplting the top using the draw and smooth brushes, it looks okay. See Top Blender 1 and Top Blender 2. When I change back to Object mode the top doesn't look as smooth while in sculpt mode. Top Blender 3. I've tried more smoothing and drawing sculpting. Best I can without someone having a look for me.
Did I have the Draw and Smooth brushes Radius and Strength set correctly?
When I dForce the top with the Blender Morph, it doesn't look smooth under the breasts. See Top After Blender 1 and Top Blender 4 p. I also have the use Mesh Grabber to pull the bottom of the top out as it clips with the skirt.
I can share any files if needed to be troubleshooted.
Can I try your top morph.obj ? @crosswind . I think the mesh in yours might be better than mine possibly. When the silk shader is applied, the imperfections standout more possibly?
Oh, you just didn't draw / smooth the top enough... Suggest you turn on symmetry on X axis as well as Wireframe to checking the mesh change while sculpting.
You can try with the morph of initial shape I made but since you shaped your figure with different body morph, my morph may not really work well on it ~~
(extract the data folder in the attached ZIP to the root directory of your Daz Library. Reload the top and dial the morph: Initial Shape)
I'll try again with sculpting the top. @crosswind
When sculpting with Draw and Smoothing brushes:
- What do you set your Radius and Strength at?
- Do you Draw first then Smooth the areas?
- What areas of the top do you concentrate on?
- How much do you Draw out and Smooth in, this top by?
If I cannot succeed with it, maybe Hot Coffee time if you know what I mean?
There's no absolute rule... Setting Radius depends on the size of target mesh, if using symmetry, about 1/2 of this Top's width. Strength can be both set as 0.3 ~ 0.4 in this case if without a tablet.
Smooth the crease first (esp. on the area of cleavage and under breasts...) so that you can Draw, then Draw and Smooth.
Upper line, cleavage, under breasts and ribs... just with an aim to make it looser.
Make 0.5 ~ 1 cm in between figure's body and Top so as to assure a better simulation result in DS.
And there's no other special tricks.... Don't expect you can make perfect result at the beginning, you just need more practice. The more you practice, the more you'll be proficient in it.
Is your figure the base figure or a character morph?
There is one big annoying issue in DS, that is a downer.
When you make changes in body proportions of your character, as part of a full body morph, you will get those ugly creases all the time.
It happens on clothes and also on hair.
I have not yet found a solution to avoid this. I have fixed it in zbrush and saved it as a character morph on the cloth set, but when loading the clothing the next time the same ugly creases are back.
It might go away with a dforce simulation, but not permanently.
Morph projection issue is long lasting there... The more tighter the cloting is, the more distortion you'll get. Some fixing job has to be always necessary loh ~
Maybe send a ticket with these issues to the DAZ Devs so that they're aware of them. I've applied a Smoothing Iterations and it helps a little but not fully. Maybe it's a limitation of DAZ's programming.
Be good if DAZ had some sculpting brushes like Zbrush or Blenders brushes, so everything can be done in DAZ and just make a morph when done. DAZ's animation needs a revamp as well.