Possible to add a "Haze" effect to renders?
 n.aspros123
Posts: 340
n.aspros123
Posts: 340
in New Users
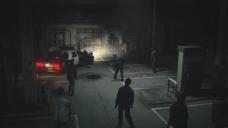
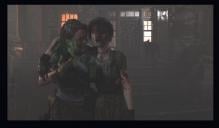
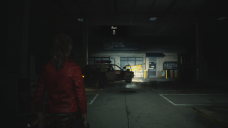
As the title suggests. Can DAZ add a "Haze" effect to renders? Like a thin grey or white layering effect shown in the attached images.
Or is it done in post processing?
Thank you in advance for any replies.
RE2make_Mizol_Gas_(2).jpg
1920 x 1080 - 139K
Screenshot_20250606_191416_Brave.jpg
1634 x 956 - 170K
Mizoil_Gas_Station_front.png
1920 x 1080 - 2M
Daz 3D is part of 
Connect
DAZ Productions, Inc.
7533 S Center View Ct #4664
West Jordan, UT 84084
Licensing Agreement | Terms of Service | Privacy Policy | EULA
© 2026 Daz Productions Inc. All Rights Reserved.
Comments
under environment settings you could use 'Matte Fog' or "Ground Fog", the latter is more accurate to a real world look but renders slower than Matte Fog,
or you could render a Depth pass in canvasses, use that as a mask in post to apply fog effects.
or create a cube that encompasses the whole scene and apply refraction and SSS material.
While the images you posted appear to use something like matte fog I'd recommend Ground fog as the better looking option.
I made a Depth Pass in Canvasses. It turned out black. See attachment. Is this correct? Using DAZ 4.24
I'll tried the Ground fog. What are the adjustments that can be done?
I'll do a search for some Fog for Daz on the web.
The depth data is there, it's just difficult to see without manipulating the image. I used levels in Gimp to make the details visible.
For fog (other than the Iray Fog and ground fog mentioned by Stonemason above, which can be used with great effects) I often use Fast Fog Iray (https://www.daz3d.com/fast-fog-iray) and SY Swift Steam Iray (https://www.daz3d.com/sy-swift-steam-iray) from Sickleyield (both are on sale right now). She has several other fog products that look great as well. I also use Atmospheric Smoke Planes for Iray (https://www.daz3d.com/atmospheric-smoke-planes-for-iray) quite a bit for fog/haze/smoke (can also work great for adding a bit of steam from a hot cup of coffee).
Note that I seldom use them as-is out of the box. I often change the color and the opacity of the fog/steam/smoke. But they really help with setting up a bit of atmosphere in your images (you can also turn them upside down to simulate smoke hase in a building).
I made some Depth Maps of some renders I've been working. One turned out okay: Jilleon Gas Station Depth Map
The other two have a white outlines which I don't want. I have rain in the scene. Is this what is causing the white outline? Jilleon Gas Station Hands Up Test Depth Map, Jilleon Gas Station Hands Up wBadgeTest Depth Map.
I'm not sure if I'm setting up the Depth Map render correctly. I'm using DAZ 4.24. I go to Canvases - Check Render To Canvases - Click the + - Change Type to Depth - Click on + in Node Lists - Name File. Click Render. Then have to use a photo editor, in this case GIMP, to lower the opacitiy.
The depth maps attachments are .png. @Stonemason
Because that is what you got from the Canvasses folder or because you converted the .exrs?
I'm just sort of old school. Gimp has exposure as well (and Photoshop has levels). Exposure and levels both affect image brightness/contrast, but in different ways. Exposure adjustments primarily affect the overall lightness or darkness of the image, while Levels will allow more precise control over the tonal range, including shadows, midtones, and highlights. Exposure works by multiplying pixel values, while Levels uses a histogram to adjust the tonal range.
The end result is virtually the same. I just prefer to see/use the image histogram (see example below) to see how much I might be crushing/clipping blacks/whites.
just to clarify i'm talking about using exposure settings to get the exr depth map to a point where it's visible and able to be used in editing the image, as I understand it adjusting the exposure doesn't remove any image information, there's no clipping or crushing involved, moreover adjusting photoshop levels on the .exr doesn't do anything, the image stays solid white no matter how much you adjust the levels.
nice image btw!
when you save the image you'll get a .png but also a folder with another image, the other image is the depth map in .exr format, that's the one you want to use.
the white noise/lines you get around objects I guess is an artefact, no idea what causes that but I fix it by scaling a box primitive so that it includes the whole scene before rendering the depth map.
attached some presets for ground fog from one of my recent releases if you want to see how it works, again it does take longer to render but gives a more accurate fog effect/interaction with lighting etc, the main adjustments I make are Decay start, Scale and Height
Thanks for the clarification. That's great that Photoshop does the exposure setting in an automated non-destructive way. So many things that used to be all manual (and not reversable) are so much simpler now, especially with Photoshop. Gimp has only recently implemented some non-destructive filters/editing, so adjusting levels or exposure is no longer destructive, it can be edited or turned off. But it still requires manual adjustment. I'd love to use Photoshop, but Gimp is more in my price range.
Oh ... thanks for the compliment. The image is just an AI enhanced render I've been playing with (the original render isn't really there anymore, except for the general pose). I've had some eye issues over the past few months, as a result reading the text on the DS interface has been pretty difficult. So I've been playing around with Krita AI, and learning Krita a bit. Gimp is still my go to for many things, so bringing the image into Gimp to edit is less ... um .... frustrating..
https://ibb.co/LXPPQDDK
This is a link to my render. Have a good go at editing it and type what you specifically done. @DustRider
Did you want me to do something with AI? if so I will be virtually unavailable until next weekend, then I'll see what can be done (I'm not real good with multiple figure images though). For adding fog effects though, I almost always do that in the render using Daz Studio.
Go in either direction.
I wonder if there's some bloom effect being used as well with lighting. I might try one of the fog sets.
It's so easy, just follow this tutorial
Thank you for sharing that. I will have a go using it and see what comes of it.
I made a render with your fog presets you kindly shared. Used the Heavy fog. I'll send you a DM with the link as it might get taken down if I post it here. @Stonemason