How can I make the car's headlights look more like they do in the reference image?
 Jumbotron
Posts: 279
Jumbotron
Posts: 279
Hello,
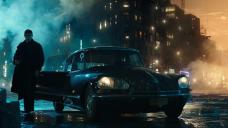
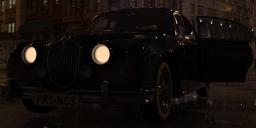
I'm working on a rendering inspired by one frame from a film (that I'm attaching below). I'd like (if that's possible) for the headlights in the car that I'm using in my work (Limousine Prince with the Iray add-on by Dumor3D) to look less like a typical emissive surface, where each part of said surface emits the same amount of light, and more like the headlights in the car from the reference picture look, with some areas more illuminated than others (non uniform lighting). Is that doable? Is it very difficult? I tried appying the attached map to different slots of the car's headlights surface. But that always makes all the light vanish.

Daz 3D is part of 
Connect
DAZ Productions, Inc.
7533 S Center View Ct #4664
West Jordan, UT 84084
Licensing Agreement | Terms of Service | Privacy Policy | EULA
© 2026 Daz Productions Inc. All Rights Reserved.
Comments
It might be easier to use a plane or sphere rather than a surface on the car. You will need to make a custom emissive/opacity map. White is visible, black is invisible. The map will need to fade to black on the bottom of the light for the emissive and fade to white for opacity. Just create one map, then duplicate and invert color on the second image. Depending on your lighting you will need to adjust levels on both channels.
Could also be done with post-work.
You could use an IES profile on a plane.
An IES controls how the light shines from the surface.
You can find IES here https://ieslibrary.com/
Just be aware that the plane must be created with Z negative as primary axis.
Example
The best I could come up with was this. I have attached the scene file too.
Click on image for full size.
Hello,
Thank you all very much for your input.
dtrscbrutal
I've played with a 1m plane and two complementary opacity maps, as you suggested, and I can't quite understand the result I'm getting. I suppose that I may be doing something wrong in the process. For example, is the Invert option (Ctrl + I on Windows systems) what you were referring to to get the map with the inverted color scheme? Because that's what I did in Photoshop. (Even though I've been paying for Adobe plans for some two years now, my proficiency with Photoshop is very, very poor at this stage). Please, have a look at the attached images. Thank you.
felis
I've tested with a plane for which I chose Z negative as its primary axis, as you indicated. And I applied the most downloaded IES profile from that website you linked. In this test, the main difference I see between having the IES profile loaded or not is how the light spreads from the origin. And this can be physically noticed by using an atmosphere volume. Without the IES profile, the light spreads a lot more. With it loaded, it is more focused, like a beam. I understand that the effect depends on the profile used, right? However, I'm more interested here in changing the look of the light source itself, rather than the way that the light rays behave. Again, please see the attached images. Thank you.
Fishtales
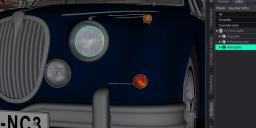
I've tested your scene. Thanks for taking the time of looking into my question and for sharing your scene. At the beginning, I didn't quite understand how you achieved that shape of the headlights. I couldn't find anything that explained it by looking at the Surfaces pane. Then I observed the edges of the geometry with the help of the Surface Selection Tool and then I understood that you actually changed the geometry of the headlights, right? I imagine that you used the Geometry Editor in Daz Studio for that? :)
@Jumbotron
You are on the right track, your invert is correct. You just need to do some refinement. See example images.
Your plane should be visible but transparent, blocking the light on the car but allowing some of the geometry to be seen. Lighting is going to have a dramatic effect on settings. Placement and scale is also key, there will likely be a lot of adjustment.
I should have explained that sorry. I used the Parameters to change the shape by lowering the 'Y' setting to shrink the Headlamp prop then raised it up in the 'Y' setting to get it in place. If it shows above the light outside the car then shrink it somemore until only the bottom of the light is visible inside the light. Another way to do it is use the geometry tool to select the bulb inside the light and make it a separate surface, at the moment it is part of the glass which seems stupid to me :) Why go to the bother of designing the bulb in the first place if it isn't separate from the glass.
dtrscbrutal, Fishtales
Thanks for the new replies. Much appreciated. I definitely want to get better at making custom maps. Nonetheless, in this particular case, I've found that directly modifying the parameters of the prop in Daz, like Fishtales explains, is a decent solution and of easy application.