[Released] STUDify [Commercial]
 Silas3D
Posts: 824
Silas3D
Posts: 824
Hi everyone, my next product to hit the store soon is a 4 in 1!
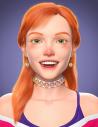
- A set of 5, Genesis 9 dForce smart prop accessories (3 choker widths and a cuff for each wrist)
- A 4K leather shader with 16 color presets
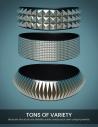
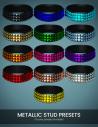
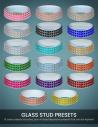
- The STUDify shader (24 tileable stud 4K displacement presets - 4 shapes with 6 sub styles within each)
- 2 geometry shell creation scripts.
Now Released!
https://www.daz3d.com/studify
STUDify Presets
Because the studs are generated via tileable displacement maps, you can apply them to anything (run one of the geoshell creation scripts first), but you can also create some very unique styles by changing the Horizontal and Vertical tiling values.
Preview images are included, so you can easily adjust the size/density of the studs without Iray being active. These preview images have very low gamma so won't be visible in render.
The STUDify presets should be applied to a figure/prop geoshell as there will be gaps between the studs and the original surface will be visible.
Geometry Shell Creation Scripts
The geoshell creation scripts can be used for any project and speeds up the shell preparation process, because all you need to do is select the surfaces you want the shell to cover on the host prop/figure and the scripts will:
- Create a geometry shell
- Make all shell surfaces opaque
- Turn of visibility of unselected surfaces
- Select visible shell surfaces, ready for a shader to be applied.
One of the scripts also makes the shell selectable in the viewport, so that the Surface Selection Tool can be used for easier texturing.
dForce Accessories
The accessories have been created as smart props (rather than conforming) to avoid deformation from morphs or poses (which could have a knock-on effect to how the displacement maps perform). These automatically get parented to the neck and forearms of Genesis 9 so that only minimal manual adjustment should be necessary, and can be dForce simulated for a snug fit.
Each accessory also comes with an 'Expand' morph that allows the prop to be expanded or contracted for further adjustment. Because they're non-conforming and use dForce, they can be used with other figures if manually parented and positioned.
The accessories have special edge-to-edge UV's optimised for the STUDify shaders, so that tiling is easier.
Bonus content!
I've attached an alternate UV for my dForce Stretch Belts belt, that's also optimised for the STUDify shaders. To load the alternative UV, load one of the belt presets into your scene, select the buckle and delete it (plus the parent rigid follow node).
Select the belt in the scene, then right-click the Surfaces tab and select Edit > Load UV Set... from the menu.
Navigate to where you have unzipped the attached obj (forum wouldn't let me attach obj directly), select it and then in the subsequent UV Loader dialog, click Accept. Don't replace the default UV as this will break the materials included with the belt product.
In your Surfaces tab, navigate to UV Set, click the dropdown and now you should have a new option for the UV, as per the name you specified.
The original belt only has one surface, so you will need to create a new Front surface for the belt using the Geometry Editor Tool which is only the front facing polygons, otherwise the STUDify shaders would apply to the edges and backface too.
Once you have done both of these steps, you can then save this updated belt as a scene subset to a location of your choice. This is recommended over saving modified assets, because doing so would break the original materials because of the extra surface, and the extra UV set doesn't get saved alongside this.
With a scene subset, both the new surface and UV are embedded in the preset, ready to be used in any scene.
Apologies for all the manual steps, but I can't create the scene subset for you as this would be distributing a version of the original product!


Daz 3D is part of 
Connect
DAZ Productions, Inc.
7533 S Center View Ct #4664
West Jordan, UT 84084
Licensing Agreement | Terms of Service | Privacy Policy | EULA
© 2026 Daz Productions Inc. All Rights Reserved.
Comments
Here's some more examples. Bear in mind that the STUDify shaders will work best with flatter surfaces, very curved/folded surfaces willl result in distortions. You can lower the maximum displacement amount to minimise this.
Uv's are also very important to get best results - if a prop/figure has bad UV's, this will have a negative impact on the result.
Now it is in the shop:
https://www.daz3d.com/studify
Just wonder what other use can one have with STUDify?
I already have shaders with the studs, but would be great if your script can be used for something other
and make excuse for me to buy STUDify.
I guess it could be applied to close fitting clothing too for fetish or fantasy wear
it would be dependent on the UV layout of the surface
@Artini I wasn't aware there was another stud shader available, my one has four types of studs with 6 substyles for lots of variants.
I mentioned in my main post and on the product description that the scripts can be used to create geoshells for anything, not just using the stud shaders. They can really speed up the shell creation process as a lot of the manual steps are automated, like surface opacity and visibility.
I'd like to think that my product offers a lot of value as it's 4 in 1 - The stud shaders, a leather shader, 5 dForce smart prop accessories and the geoshell scripts.
@WendyLuvsCatz you are correct that because the studs are shader-based, they are UV dependent. It's a shame that Iray decals dont's support displacement.
If a prop/figure has bad UV maps that will obviously have a negative impact on the result, as with any shader.
Thanks for the answers.
You're welcome!
Hi,
I added the prop included cuffs, removed the geo shell since I wanted a different style spike, then applied the script to add back a geoshell, then chose the red leather, but somehow some black leather is still showing through?
I tried again from scratch and now it the cuffs only pop up as the color of the leather(red).
Please advise.
Thanks.
@thatbumzzz_788e56ddf1 you don't need to remove the geoshell to change the spike style, as the styles are material presets - just make sure you have the shell selected before applying.
That is quite a peculiar issue - are you sure the original shell was removed from the scene?
If you could provide a step by step of what you're doing from scratch, I'll try to replicate my end.
Something else to be aware of is that DS can often have a funny 5 minutes and saving and reopening the scene ( ideally a restart of DS as well) can often resolve uncommon issues. Happy holidays!