When should I
 Nofew
Posts: 0
Nofew
Posts: 0
Sorry if this is posted in the wrong place!
So, some backstory -- I've got relivately unique characters. They've got wings and I've been searching for the past few months trying to find anything similar. Nothing was working. Either the wings weren't the right style, or they weren't made well. It was always one problem or the other -- EpicWings were great in terms of quality, but I need wings that attach to the arm. When I found those kinds of wings, they'd be made poorly; they usually don't have actual /bones/ in them, and they always have that "stabbed in" look. "Strigoi" is the best I've found so far, but the bones look weird when you view them from the side (Since there's no actual bones, just a transmap) and you can see it clipping the arms. Plus, the wings aren't a perfect match anyway and that bothers me.
After a few months I got sick of looking, so I decided to make my own from scratch. However, this is my first biological modeling project. I've posed numerous times before, but I don't know the workflow of how to actually make something /new/ for Genesis.
In solving the second problem, I need to avoid that "stabbed in" look. I know some figures use part of Genesis's own mesh to help avoid this, so I began by modeling off of Genesis's arm. This isn't a morph -- I just grabbed his arm and started working with it.
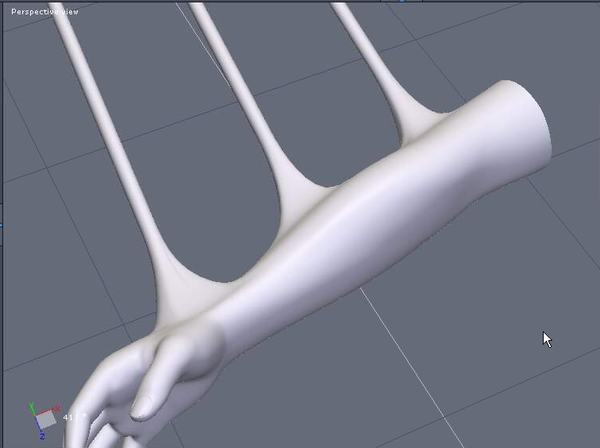
Obviously in Daz 4.5 I could just use GeoGrafting to attach this, but there's some shaders I can't work without that aren't updated to 4.5, and I don't know how to do that anyway! So, how would I go about attaching this properly to Genesis so its weighted properly? (See screenshot for what "this" is.).
I'd also like to know if I did it right to begin with. I stopped working for now since the last step before doing UV mapping and textures would be applying the webbing between the bones in the wings -- I expect that to take around 100 hours of manual welding considering how it took me a few hours to weld the bones to the arm, so, if I started this wrong already, I'd like to know /before/ I do that.
Just for reference, this is what my character looks like.
Oh, and, this being my first "from scratch(ish)" biological modeling project, I have to ask -- Am I doing it good?
Daz 3D is part of 
Connect
DAZ Productions, Inc.
7533 S Center View Ct #4664
West Jordan, UT 84084
Licensing Agreement | Terms of Service | Privacy Policy | EULA
© 2026 Daz Productions Inc. All Rights Reserved.
Comments
Normally wings on an "arm" structure attach to the bottom (Bats) or outside (archaeopteryx) of the bone, not the top. On the drawn character it looks like they're to the sides. Did you change them to the top for a specific reason? I think the drawn idea looks original and interesting.
Also, why do you have the whole arm there? Are you wanting to have a glove with the wings on it? If you're interested in a geograft, ideally you want to imitate only the faces you want to overlap (at the base of each wing bit). That is, you would need to copy those faces from Genesis and make sure you could hook up the wings to them without changing the number or arrangement of polygons of the overlapping faces.
We used to have a tutorial for that, but it seems lost to forum limbo. I think I have a pdf copy saved somewhere if you're interested?
They're like that because that's their design; the artist who drew the picture wasn't understanding how I wanted them to connect, so I told him to just draw them coming from behind the arms so he didn't have to care.
To clarify -- These are /not/ meant to be bat wings. They can't even use these to fly if that wasn't already obvious based on how little surface area they actually attach to. This is my own design and while it was inspired by bats, it's nothing really like them anymore.
I have the entire arm there since I wasn't sure what I actually needed -- I plan to remove anything I don't actually need later. (I'm hoping you could tell me when "later" is!)
This is not supposed to be geografted (but send the pdf anyway!). I need this to work in 4.0 so I can use some older shaders. I know certain parts of Genesis (*ahem*, /those/ parts) are "connected" in a similar way -- By taking part of Genesis's base geometry and welding to that as a separate object, then having the verts you copied overlap with the ones on Genesis and I'm trying to figure out exactly how to do that. Like, what do I do when it comes to weight mapping? Do I just copy/paste the ForeArm maps to it and then paint from there?
Geografting did/does work in 4. I sent you a PM with the pdf.
If you just want to do an add-on conformer, you would just use transfer utility from Genesis. You would have to then add your own custom bones for the wing parts themselves, or morph them open and closed. A transmap around the base of each wing when you texture can make a decent blend even without geografting once it's rigged.
I'm almost certain it doesn't support geografting. I recently purchased this and it's not showing up anywhere. Or I'm blind. Sometimes I have issues finding stuff. <.<</p>
Transmap nothing -- These things ain't human, so I'm just gunna make my own texture for their entire body once the wings are done. That'll solve blending issues. Besides, Genesis's textures (Even the "Michael 4 Elite" ones) are too small for me. I have this weird affinity for rendering at 10000x10000. I'd go higher if I could. Knowing me I'll probably have at least an 8192x8192 texture for each material zone.
Did you look under both characters and clothing? It says it's still dsf/dsa so it should work in 4.
Yes, I did. I looked in every menu and sub-menu under Daz Studio's content. It's not there.
There's no readme for it in the readme folders either, though I might be missing some. Do you know all the places readme's can end up?
In the machine with the default install setup, they're under Studio/My Library/Readme's.
Ain't there. This happens fairly often though. It's like some content doesn't even include a readme anymore! That don't help much when you can't find it x.x..
Uups. Nope. Nevermind. Those work fine. I'm just an idiot -- Totally forgot to actually download and install it! My bad. <.<..</p>
So, I've got a character with unique(ish) wings. To make a long story short, I spent six months trying to find something similar and nothing worked. So, I'm doing them from scratch. Ish.
I've gotten every bit of it down how I like it, except, the webbing between the bones. For the life of me, I just cannot get this to look realistic. I've tried just sticking a flat face between them and that don't work, I've tried draping cloth over them and doing an average weld and that don't work, I've tried manually welding verts and that don't work either.
Attached are various images of my attempts. The first is the wings without any webbing, the second is my "flat face" attempt. Third is what they look like with cloth draped over them, third and fourth are before/after shots of manual welding. Auto welding just results in a giant mess and tends to weld the bones to themselves or the arm to its self, so I figure I don't need to show an image of that.
(Note: I'm new to the forums and it looks like the images are reversed while I type this. Not sure if they are or not, but just have that in mind.)
It's really important I get that "gripping" look like I have where the bones attach to the arm. The creatures don't got wings when they're first born. As they age the bones poke out of the arms and the skin tries to heal around it, so it gets pulled up along with the bones. As such, the webbing is very tight (It doesn't have any wrinkles and it barely billows in the wind) and it looks like it's straining to hold on to the bones.
I almost want to lean towards an alien/grotesque look in how it's attached to the bones. That seems to give the most realism.
EDIT: Oh cool, they're in the correct order! Kay. Shiny.
Merged the two threads on this topic.
Could you post a sketch of what you awnt to achieve, or (if you can find any) photos or links to photos that show the kind of look you want? My instinct would be to say bridge between the spines to create a surface, but that would be close to your first approach with a plane which you don't like. It may be that you need to rethink the shape of the spines themselves, making them look as if they are wrapped in skin, and then bridge from that to the next spine - in general a model should show the final shape, not the internal structure, as adding a new layer to flesh it out (literally or figuratively) can be extremely hard.
I can't draw well so excuse the scribble I've attached.
The first drawing has the bones outlined in black and what I'd like to add in Purple. The general curves are accurate, though I'd like them to be closer together so the webbing is thinner.
The second drawing is a view from the top. Black are bones again, the yellow is mostly flat webbing (but it still needs to follow the curves in the first drawing), while the Purple lines represent "extra" flesh. Notice how they're generally laid in a somewhat random fashion and vary in spacing, length and height (though obviously I couldn't draw that) -- This is what I was trying to do by draping a cloth over them. I was hoping that it'd fall in a somewhat random fashion and make those lines for me and I could just weld from there. It did, what I wanted, but the welding wouldn't work. I explain why later in this post.
The third drawing uses black for the bones and Purple for the height of flesh. It's mostly flat (Not perfectly flat, though a bump or displacement map will probably be used) with some extra mounds of flesh coming up now and then.
I am making the outline, with just the skin, as you suggested. The welding process took care of giving them the look I wanted when I was attaching them to the arm -- This was due to the fact that Genesis's arm's geometry is very chaotic compared to the cylinders I'm using for bones. The act of welding alone gave them that look with no extra trickery. If there was some way to randomize the vert's positions on the bones without altering the shape too much I'm pretty sure I'd be able to do exactly what I want. Any suggestions on how to get that done are very welcome.
Just to be clear, I've already tried making the cloth's geometry more chaotic. Just rotating it funny did the trick, but I still only have straight parallel lines of equal distance to weld to on the bones, so that didn't help. The bones need to become more chaotic, not the cloth.
Later I'll add physical bones inside these spines. The reason I want to have actual bones and not just mesh that sticks up more is due to the fact the wings will be translucent. If you grab Strigoi's wings you can see exactly why I want physical bones inside the wings. Look at them at just the wrong angle and it's like they turn invisible. I plan to make a lot of renders with the wings sticking out towards the viewer, so if I were to model them like Strigoi's you'd keep seeing through the non-existent bones.
Likewise, I also need the wings to have depth. A single flat plane between the bones won't do the trick -- I need two planes with open space between them, and each one needs to be welded differently to avoid that "duplicated" look. Considering the camera angle compared to the wings, the webbing might not appear in the render if it doesn't have actual thickness.
I think you may need to select a line of edges where the top skin surface will go on two adjacent bones, bride, then extrude the created polygons to get the dip away from the bones. The have fun attaching the result to the arms.
So, last night I got an idea at like four in the morning. I tried it, and it actually worked! Almost! I woulda maybe got it if I didn't fall asleep.
I decided to move one of the cloths I draped over the bones down and sub-divide the bones once (And apply it, not just leave it as dynamic geometry), then auto-weld with somewhere between .01 and .1 range. At .05 the result was almost perfect! Attached are the images I came up with.
I should be able to get the result I want by messing around a little more with the height, range and compressing it a bit. Of course there might be a better way to do this, but so far it's pretty much exactly what I'm looking for. Just gotta make the webbing grip the bones a bit "stronger", then a smoothing brush carefully applied to the parts where it looks like it's clipping rather than gripping should take care of everything.
@Richard Haseltine: You wanted a concept, you got it! This is the closest I can get without posting a finished piece. I attached an image with a few different shots in it so you can get a better idea of what I was going for. The two on the top have smoothing set to 2 but the bottom one's got it disabled. It should explain the "gripping" concept and what I meant by "chaotic geometry that doesn't alter the object's shape too much".
Just figured I'd keep y'all informed on my progress. It drives me nuts when I search a forum, find a post almost just like what I'm looking for and then the guy solves his problem but doesn't explain how, so yeah. <.<</p>
Interesting effect - I wouldn't have thought of trying that, but you can often exploit the quirks of an application to good effect.
Kay, so, good news and bad news!
The good news is that I've got the webbing coming along pretty nice. I got it to look more realistic than the screenshots I posted before. Welding's annoying as crap (I went a bit crazy. There's about 50,000 verts in the webbing alone. <.<) but it's coming along.</p>
I decided to take a break and try something else. I made a simple object and tried to geograft it to Genesis. Alas, that's where the bad news came up..
I've grafted the item "just fine". When Genesis is standing in his default pose everything works pretty much as expected. I then tried to do it while Genesis wasn't in the T pose since I didn't model my wings from the default pose. I figured I'd run into problems, but not something this bad.
For the sake of experimentation I've moved Genesis's arms down to his sides and his shoulders froward. I then exported that shape to Hexagon and created a cylinder primitive that sticks out of Genesis's arm like a T. After welding it to his arm I created a second cylinder primitive and attached that to the first on the other side in the same way.
The reasoning here was to make sure that the tutorial over yonder worked and that when the weight mapping was projected onto the new graft that it'd go on "cleanly". If the weight mapping was "weird" then I'd see some distortion on the new figure, such as the distortion in the image I've attached... x.x
Clearly the weight mapping is wrong. Furthermore, it won't follow the arm as expected. If I move the arm away, the geometry at the base of my graft just sits there and detaches from the arm.
This worries me for obvious reasons. I've spent over ten days working on my wings and I don't want the same thing to happen to them. How do I go about fixing this distortion? Would this have happened if Genesis was in his default pose, too?
NOTE: I've saved the object and pose as .dsf and .dsa in case someone needs these to examine what I've done, but I don't know if these are actually legal to distribute so I'd rather have someone like Richard check them out first and make sure I created them correctly. So, Richard, if you're still around, could you point me at an article about how to go about making new content properly or should I just upload them somewhere private and PM you the link?
EDIT: Crap. Murphy's law hit me real hard. Not even two hours after I finish this post I get an idea on how to make my wings almost perfect. Of course it worked. Please, please, PLEASE, tell me there's a "reverse deformations" option for geografting like there is for morphs! x.x! (Attached is my wing. <.<)</p>
I'm not sure I understand from those images. The geometry does have to line up with the zeroed figure to be a conformer of any kind, not just for geografting. In order for it to attach the vertices around the edge of the graft must match vertices on the figure to be grafted to. And if something projects a long way from the figure you can expect to edit the weights at least, and possibly to add extra bones too.
The geometry does still match -- I posed Genesis, then modeled off of the pose, and tried to bring the new object onto Genesis while still holding the same pose. The verts line up and all, but the weight mapping is all weird now.
If there were anything similar to "reverse deformations" for morphs except for new objects, that's what I'd need to use.