How to get lighting like this?
 SoapTasteGood
Posts: 10
SoapTasteGood
Posts: 10
in New Users
Is there a way to get lighting similar to these pictures? Do you need a specific product maybe?
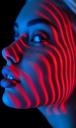
a close up of a woman's face with red and blue light.jpg
736 x 1236 - 74K
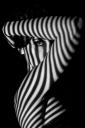
55e67d70-ecad-48df-9648-5698e5f6b987.jpg
640 x 960 - 44K

doawsnload.jpg
427 x 640 - 41K
Daz 3D is part of 
Connect
DAZ Productions, Inc.
7533 S Center View Ct #4664
West Jordan, UT 84084
Licensing Agreement | Terms of Service | Privacy Policy | EULA
© 2026 Daz Productions Inc. All Rights Reserved.
Comments
You could try this freebie: https://sharecg.com/v/72383/browse/21/DAZ-Studio/Window-Blinds-Prop (I haven't tried it).
Or this Daz Originals product: https://www.daz3d.com/shadow-play-daz-studio-lights?srsltid=AfmBOopznD6DmFPhRRpoPWaw1JsbqXYBVVgN2nPFYCCVbctO6f6wdFK4
You can also create a row of bars and light your character through them.
I do like those sorts of images but unfortunately haven't had time to try some out myself yet.
Two other products which may help out are:
Also
https://www.daz3d.com/film-noir-iray-portrait-studio-vol-ii
and
https://www.daz3d.com/film-noir-portrait-studio
Its pretty easy to do this just with just a couple spotlights, and a plane with an opacity map. (Below is an opacity map I quickly made for this test, but you may want to make one with the lines slightly tapered, bent, wiggly, etc to make a more interesting effect.)
Under render settings > environment > change environment mode to "scene only".
Create a red spotlight and place it as shown in the pic below. Point it at your figure and adjust the beam width how you want it. Create a plane. Use the opacity map below for the plane's cutout opacity in the surface tab. Place the plane directly in front of the spotlight so it covers the whole light beam as shown below. Its good to parent the plane to the spotlight once you have it setup how you want, so if you move the spotlight around the plane will follow with it. The plane will act as your window blinds obviously, you can change horizontal tiling to adjust the size of the blinds or rotate the plane to change the angle of the blinds. In this way it is actually better than actual physical blinds in the scene because its easier to make quick adjustments (I had to set horizontal tiling to 9 to get the effect below.)
Now turn off photometrics on the red spotlight or else you won't get nice sharp shadows. See settings below. Also turn off the limits to Intensity on the spotlight and you can make the light as strong as you need (otherwise with photometrics off you can't adjust illumination). Now Add a blue spotlight coming in from the other side. Just set that up as you normally would set up a spotlight. Then its just a matter of fiddling with settings to get the look you want. But this should get you in the right direction without having to buy anything.
That freebie is pretty damn good. Definitely going to play around with it more. Here's a test render i did with it.
Couldn't quite get the other product to work, but the other suggestions here got me covered. Thank you!
Used the "IDG" one to create this render. Took me a while to figure it out how it works, but its pretty interesting, it has a bunch of options. Thank you!
Also pretty good. Thank you!
Very detailed answer. Thank you for taking the time. I will definitely try this method later.