Chair Prop "Breaks" after Applying Smoothing Modifier
in New Users
Have a wooden chair that has a cushion. Would like to make the cushion indent/compress when a character "sits" on it (collision)?
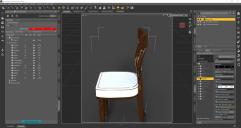
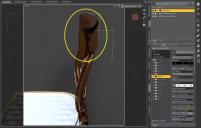
Just simply adding a Smoothing Modifier, the chair "breaks". See snip Chair 2.


Chair 1.JPG
1920 x 1018 - 181K


Chair 2.JPG
1436 x 916 - 195K


Comments
What is currently set as the collision object?
Nothing
I don't know why it's happening, but an alternative solution if the chair is properly surfaced: create another chair and parent one with the other.
Chair 1, What and How do I select only the cushion to be visible?
Same goes for everything else for Chair 2?
@Elor
I don't have the chair you're using, but ideally, it has a at least a cushion surface. If it's the case, you simply use the geometry editor, go to the Tool Settings panel (I don't remember if it's active by default) and click on the eye for the surface you want to hide
Here's an example with another chair with the cushion hidden:
And then, you do the same on the other chair, hiding the surface you kept visible on the other chair.
Edit : I don't remember if the hidden geometry stay hidden once you're reloading the scene
I think it does not, so an easy alternative is to go to the surface panel with the chair selected, click on the surface you want to hide and set the Cutout oppacity to 0%:
Which chair is it? Please post a wireframe view - it may be an issue with the geometry.
The chair is from Sexy Chair Poses for G8F by vyktohria, Darkworld. @RichardHaseltine
Wireframe Before Smoothing Modifier is applied, refer to Chair Wire 1 & 2.
----------------------
Wireframe After Smoothing Modifier is applied, refer to Chair Wire 3a & 4a.
The cushion is made up of three parts. All parts that make up the cushion, must be hidden on one chair?
Can the chair be saved as a whole after the two chairs have had their surfaces hidden and it works properly with the Smoothing Modifier? @Elor
I can't get those to 100% on the image host, attaching (unresized) versions to the post mght help. Still, it does look as if parts of the emsh are not welded together and so the smoothing algorithm (which is essentially SubD without adding new geometry, I believe) is smoothing them in different directirons; the emsh also looks a bit irregular, which won't be helping. It's possible that the model was made with some sort of CAD or Nurbs system and the converted to polygons, which can produce untidy results.
Yes, you need to have one chair with only the cushion and the other with only the rest.
I checked: hidding geometry is not saved when you're saving then loading a scene unlike Cutout oppacity.
I don't think if it's possible to have a smoothing modifier only on some surfaces but other people are more likely to confirm either way.
In a similar case, what I did was saving the cushion as a new prop, the chair without the cushion as another new prop then loaded both, parented the cushion to the chair and saved the result as a scene preset.
I'm using a 27" monitor. Images look big and clear when the image is clicked and zoomed in. There's attachments of the images.
I'm not sure if Smoothing Modifier does this, maybe for 4.22.1 Beta or future builds of DAZ. Smoothing Modifier can be applied to selected parts of a prop that has multiple parts that make up one prop instead of having to do these shenanigans.
Who are the developers of DAZ and how are they contacted?
I had a fiddle. When using Tool Settings, when parts are hidden, it hides the parts for both chairs.
I've tried hidding the parts needed using Opacity Cutout and Collision Item is set to the character. Still same result. When Smoothing Iterations is set to 100, it goes all over the place. See Sexy Chair NC 100.
The chair's cushion is not deforming correctly when applying the Smoothing Modifier.
There is only one geoemtry isntance, which each chair accesses, so any chnage you make with the Geometry Editor will apply to both unless you export one as OBH and reload (creating a new geometry instance). My usual approach would be to convert the chair to a figure, if it isn't, using Edit>Object>Rigging, then use the Joint Editor to create a new bone for each bit you want to hide (right-click menu), use the Geometry Editor to select the parts yopu want to hide but instead of using the (as you've found, non-persistent) hide option I would isntead assign them to a new group, then in Tool Settings with the Joint Editor active assign that group as the Selection Set for the new bone - that way you can hide parts by the bone visibility, and that will save with the scene.
Have you tried using dForce on the chair? You can put a smaller dynamics strength (25 - 50) on the cushion and have it set to 0 for the rest of the chair using either the surface settings on the surface pane or if you are more familiar with weight mapping you can make a custom weight map in the tool settings pane via the weight mapping brush and the create new dForce Modifier Weight Node.
@Elliandra Thank you for your reply.
I have not used dForce before. I'm watching tutorials on YT. From my understanding, most tutorials have a character and object. Character starts in A pose and finishes in the pose that is desired but I'm not sure how the indentations are set and formed? Is the chair the "character" in this instance?
In this case your would start with the sitting pose in frame 0 slightly above the chair, and then in frame 20(?) have them lowered down into the chair. You should set start from memorized pose to Off.
For the chair, add dForce modifer, and a dForce modifier weightnode.
With the geometry editor select all of the chair, and switch to weightpaint mode, with the weightmap selected in the scene tab, open tool settings pane and select the weightmap (you might have to click 'add map' first. Then right-click in viewport and edit > fill selected. Set it to 0 and enter. Then the chair should go from red to grey meaning no weigth.
Then paint with the weightbrush the part where she will be sitting so it get red, bluish on the edges. Red mean 100% weight.
Then set gravity to maybe 0 or a little negative (negative means that the seat will bulge upwards.
Then do simulation by play animated range.
@RichardHaseltine Thank you for your reply.
If I understand some parts. I create bones for the parts that make up the cushion by selecting them in Surfaces tab or by selecting the parts and right clicking in the viewport? I think it's four parts. The trim part (yellow/gold stripes) extends to and is joined to the chair.
There's two chairs with only one that has the Smooth Modifier applied. Is one chair deleted or both are retained with bones applied to the chair 1 frame parts required and chair 2 has the bones applied the the cushion parts. Then the selected parts are hidden in Tool Settings?
Apologies I have not done this but how are new groups made in Tool Settings?
@felis thanks for answering the dForce question I was offline!
No, you select the parts you want to able to switch on/off as a single piece with the Geometry Editor (though using the right-click>Select By menu, or the list in the Tool Settings pane, will enable you to select quickly), you ad the bone9s) with the Joint editor after converting to figure, and you use the Joint editor to make the Geometry group the selection group for the bone - after which the geometry visibility is controlled by the bonde visibility.
You still want two hairs, one with the seat bone hidden that is not smoothed and one with all but the seat bone hidden which is smoothed.
I have this product. If you select cushion related geometry, you'll find them unwelded.(ss1) That's why it was broken into pieces....
I had to firstly cut the cushion part in DS and send it to Blender. Remeshed and welded it to assure good simulation result can be achieved in DS later on. Then imported the cushion, reshaded it, added dForce modifier + weight node....then simulated it with Timeline. (ss2)
I have to say the workflow will be challenging for newbies... Maybe you can find another good chair...