Hood following head while down

In regard to https://www.daz3d.com/dforce-x-fashion-urban-outfit-for-genesis-8-and-81-females is there a way to get the hood to conform to the shoulders instead of the head while it's down? I can understand why you'd want the hood to follow the head while it's up but if it follows while down it ends up clipping through the shoulder (see attached image).
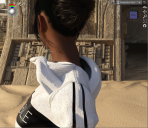
Screenshot 2024-04-19 024806.png
1939 x 1678 - 4M
Post edited by arrjee on
Daz 3D is part of 
Connect
DAZ Productions, Inc.
7533 S Center View Ct #4664
West Jordan, UT 84084
Licensing Agreement | Terms of Service | Privacy Policy | EULA
© 2026 Daz Productions Inc. All Rights Reserved.
Comments
You coudl redo the weightmaps, to remove the ehad influence entirely in favour of the chest bones to to replace the head bones with custom bones that used the same weight maps (so you would have the saem ability to adjust, but it wouldn't be automatic) - however, those are fiddly options. You could try just rposing the head bones on the hood.
Assigning new weight maps to the clothing is the way to do it as Richard suggests but you don't have to do it manually yourself. Let Studio do it for you. There are a couple of steps and the use of utilities you might not yet have seen and, as you're posting in the New Users section, I'll try to list the actions as comprehensively as possible but if I miss something or you're not sure about anything please just ask.
What we're going to do is create a completely new version of that hoodie with the hood down and save it as a separate clothing item. During the import phase of creating your new clothing Studio will assign weight maps to it based on how close the geometry is to the various bones of the skeleton. In this case the shoulder bones are closer than the head bones to the hood so the result is that the hood now follows the body parts you want it to.
1. Load a base G8 and leave it in the default A-pose.
2. Load your hoodie.
3. Apply the hood down morph and run the default dForce simulation.
4. Select just the hoodie and then export it as an .obj to a folder on your hard-drive: File -> Export. Make sure that 'Filter Objects' is ticked in the options box that pops up otherwise you may end up exporting the figure geometry as well but leave all the other options at their default settings.
5. Delete the original hoodie. We don't need anything more from it at this stage.
6. Import the .obj hoodie from your chosen folder. If all has gone well it should appear to be properly fitted to your character although it actually isn't. If this doesn't happen, start again from Stage One!
---
7. Now we're going to make it fit your character using the Transfer Utility. This process copies the skeleton from G8 onto your clothing and assigns the weightmaps. There are a few ways of starting the Transfer Utility and here's one of them. Select your hoodie and then Edit -> Object -> Transfer Utility.
8. In the window that appears select Genesis 8 (or Genesis 8.1) in the drop down box labelled Scene Item in the Source section. Select your new hoodie object in the corresponding Target scene item drop down. Leave everything else at default and click Accept. The hoodie is now properly fitted as clothing to G8.
Try moving your figure around now - you'll see that Studio has correctly weight mapped the hoodie for it's hood-down state. You also might notice that you've lost all the other morphs from the original and you can't now apply the materials that came with the outfit (because the import process changed the name of the surface slightly) but both of these are easily fixable. Rather than another wall of text (and sorry about this, screen shots tend not to upload on weekends due to server overload!) if you want to know how to finish the process off please just ask.
9. Finally.... File -> Save As -> Support Asset -> Figure/Prop Asset. Set the content type to Follower -> Wardrobe -> Shirt or whatever else you want to, same for all the other options. You don't have to set them but it helps if you use Smart Content.
Give your clothing a new file name and don't save it over the original!
Thank you very much. I played with the surfaces settings to try to make them match the settings from the original product. Looks good and poses well.