Texture Booster (Commercial)
 V3Digitimes
Posts: 3,427
V3Digitimes
Posts: 3,427
Available now : https://www.daz3d.com/texture-booster
Introducing my latest creation : “Texture Booster”, including and easy and intuitive lightness/color/richness controls useable on almost everything you want (with UNlimited lightness and color control), also including Iray Uber and PBRSkin converters so that your old generations of figures, outfits and props are also compatible with the booster and gloss tool, of course a gloss control script, geograft transfer tools, etc... . The description text is pretty long because you can do a lot of things with it. Yet near the end of this description text, you will find a kind of “bulleted list” of what can be done, as well as a link to a video overview, and, if possible, a few images. As usually this thread is here for any issue, question, or feedback you could have on this project.
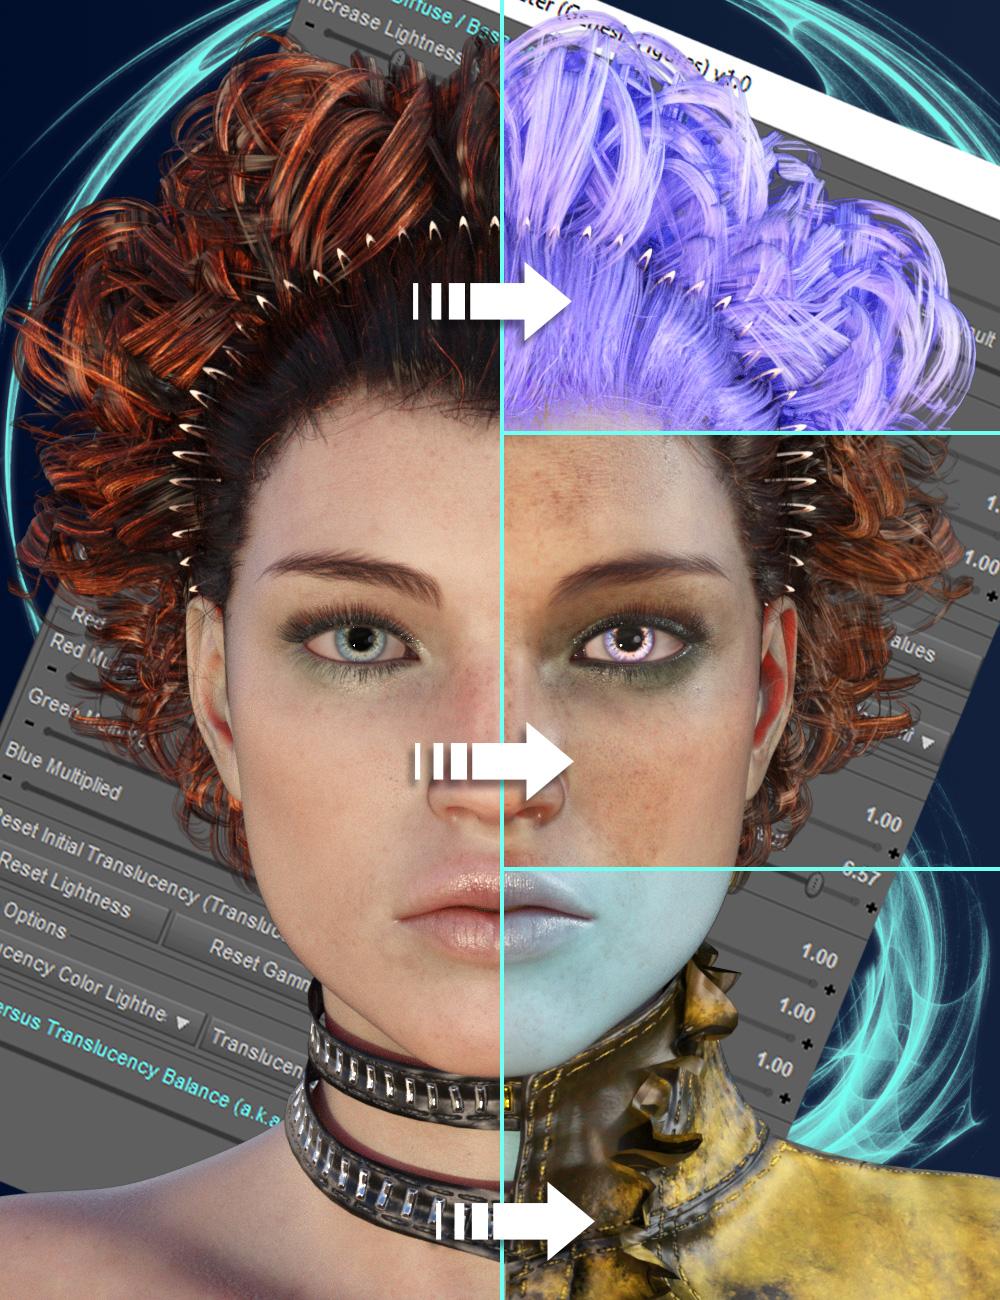
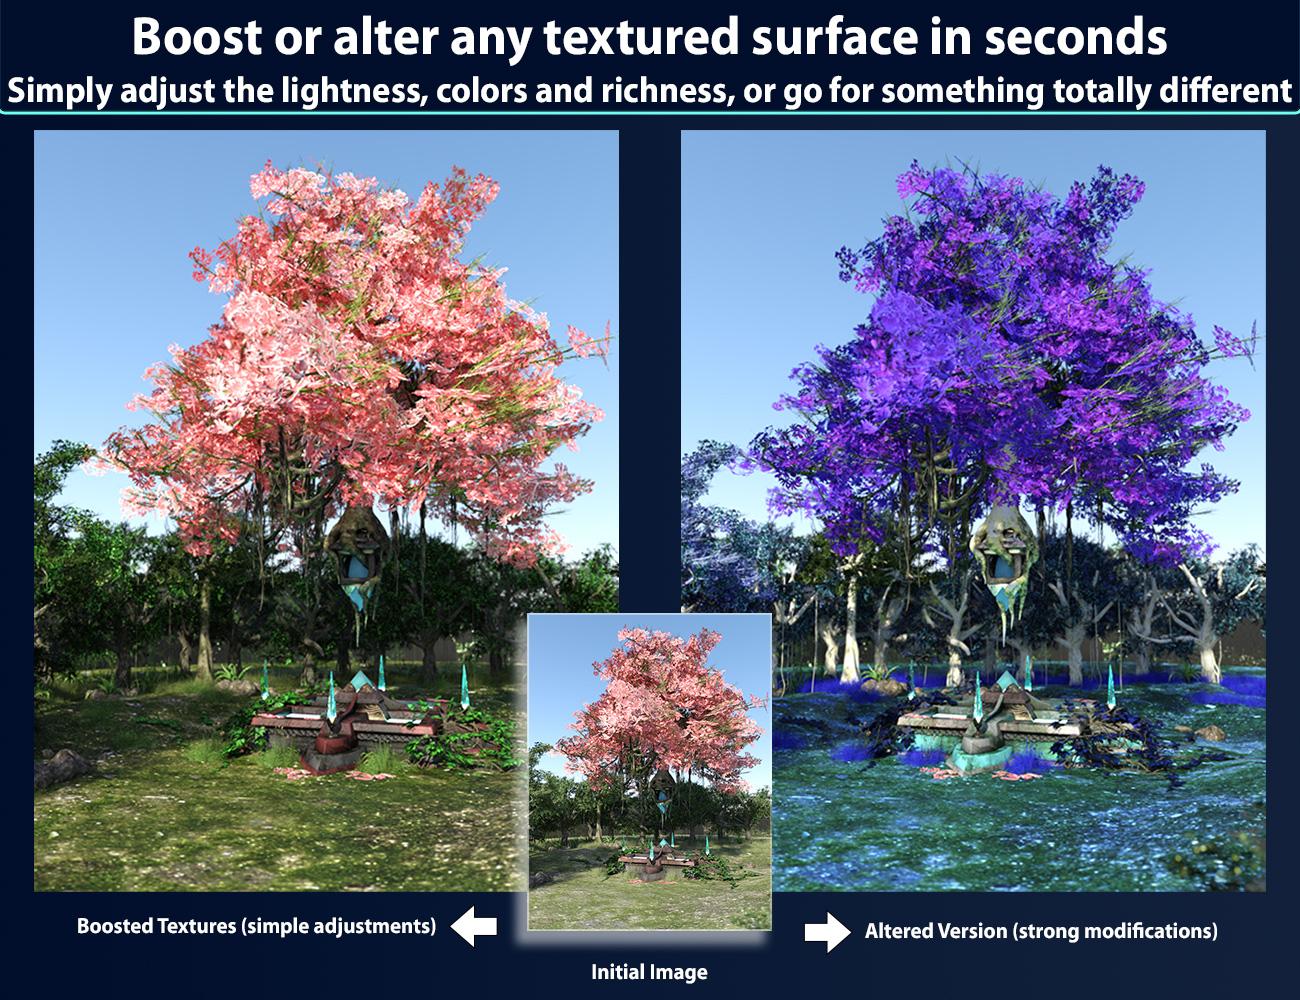
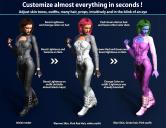
Texture Booster is a suite of tools allowing you to control and enhance the look of your Genesis figures of any Generation, as well as the look of any selected surfaces of your scene. The booster scripts use clear dials allowing you not only to go fast and to understand clearly what you’re doing, but also to reach easily the result you want with virtually unlimited possibilities. The full product associates tools developed for any generation of Genesis figures and tools acting on selected surfaces. This way you will be able to adjust to your liking all your figures, outfits, props, many hair, irises, teeth, etc…
Have you ever thought that your figure, hair, outfits or environments would look better if their colors were lighter, or darker, or even more detailed, or were using another tone, tint or hue ? Have you ever struggled to adjust the look of your figures or of your other scene surfaces, and eventually gave up because it would be too long, too complex or too fastidious to enhance everything?
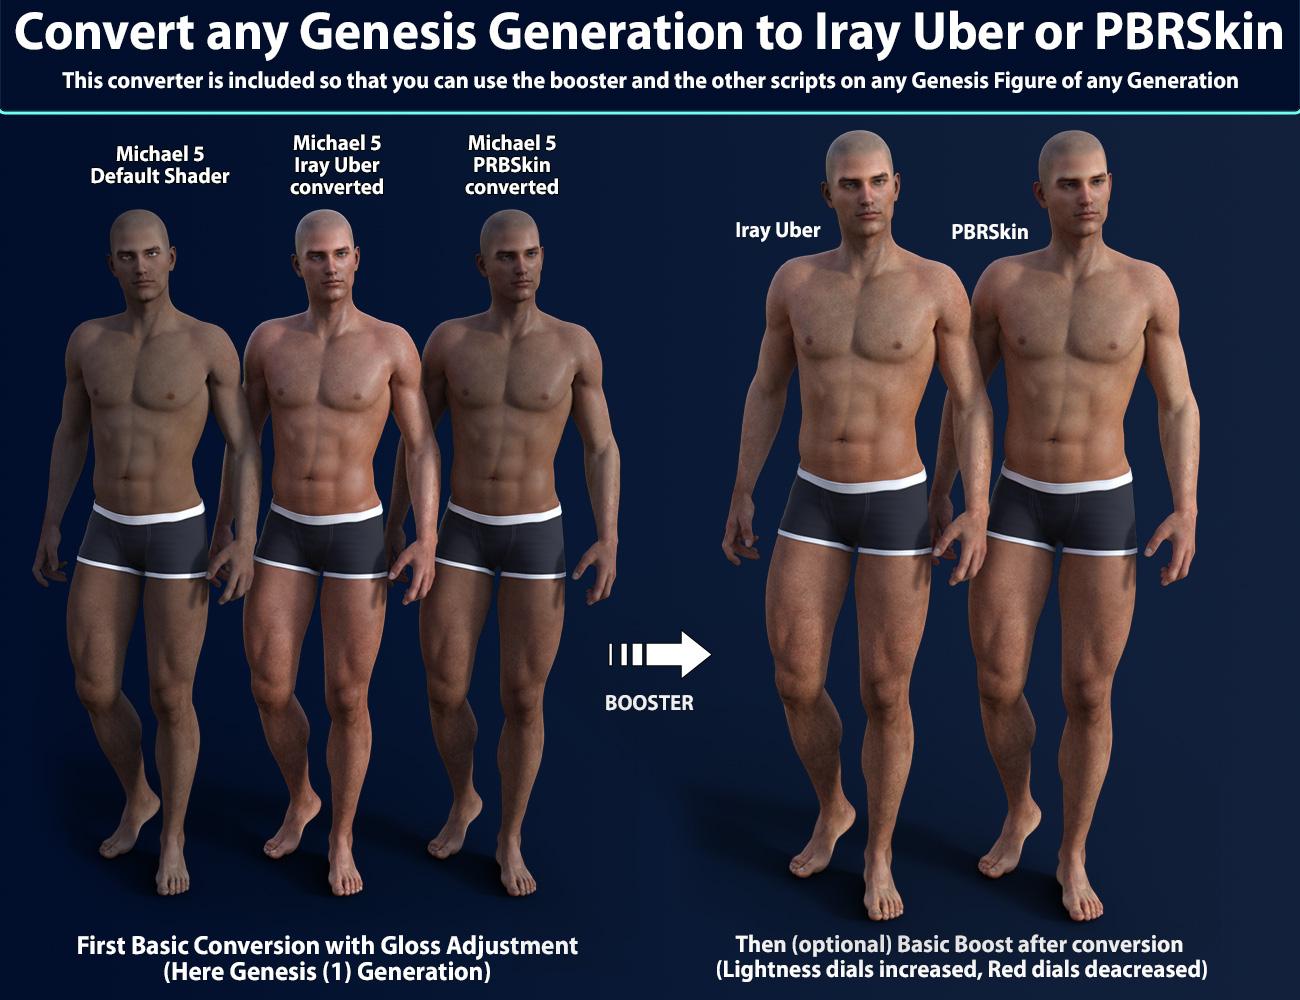
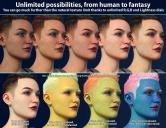
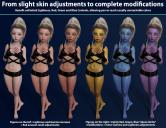
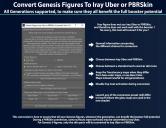
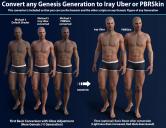
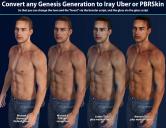
These times are over! Now with Texture Booster, you will find the fastest, easiest and most intuitive way to control and enhance the look of your figures, wearables and props, browsing the widest range of accessible skin - and other surfaces - so far, from realistic skin tones to fantasy ones, from classical surfaces tones to super colored ones. The two Texture Booster main scripts, one for Genesis figures, the other one for any selected surfaces, work both on Iray Uber and PBRskin figures, wearables and props. If the surfaces you want to optimize don’t natively use those shaders – which can occur for too old content - you will find scripts to convert, with many options, any Genesis figure of any generation, as well as the wide majority of their wearables and of the scene props, either to Iray Uber or to PBRSkin, in order to unleash for all your scenes the full power of the Texture Booster.
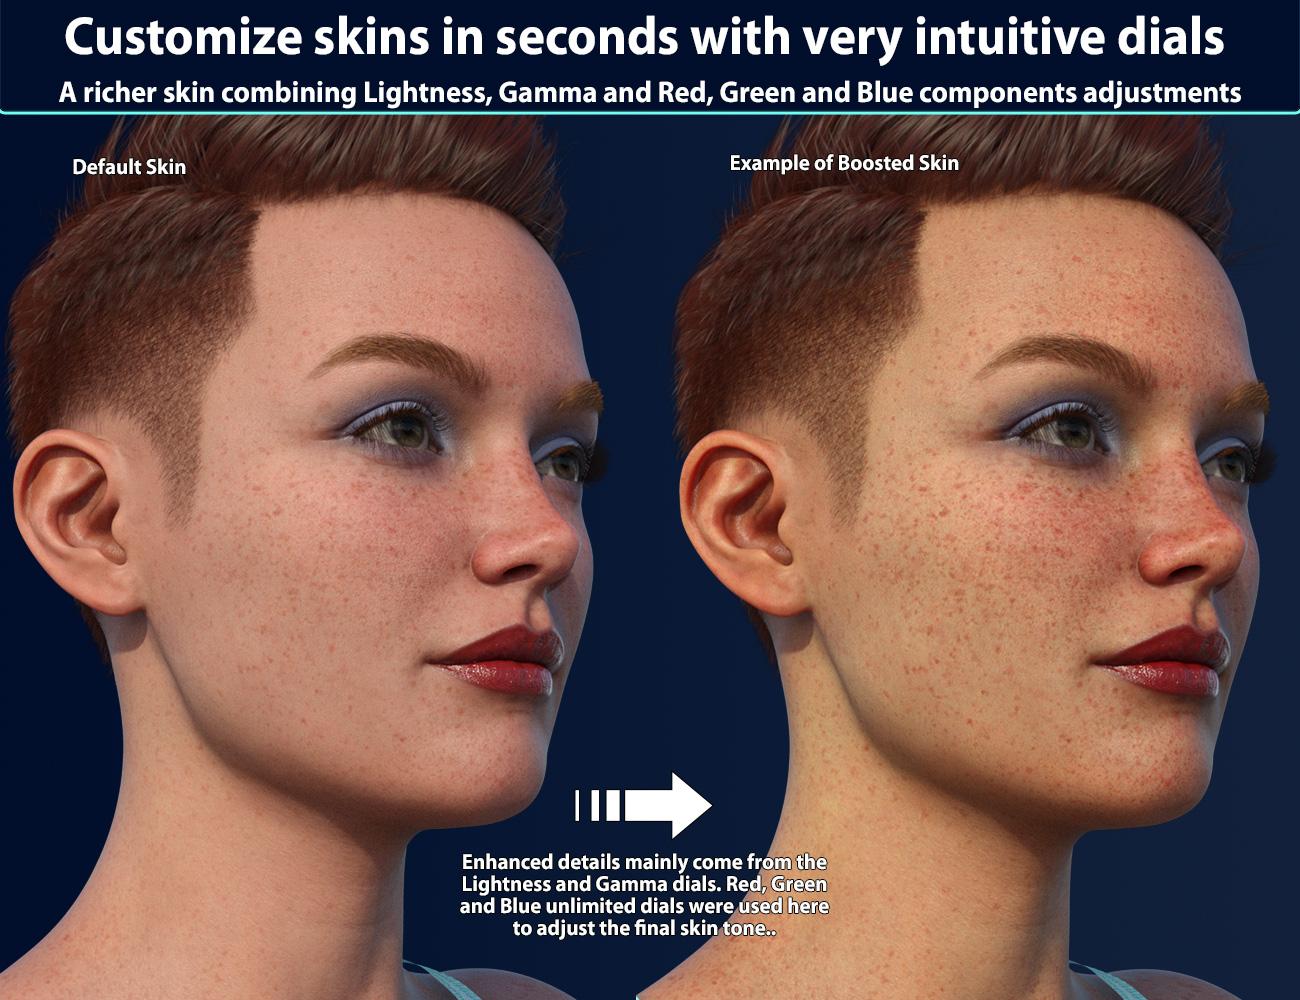
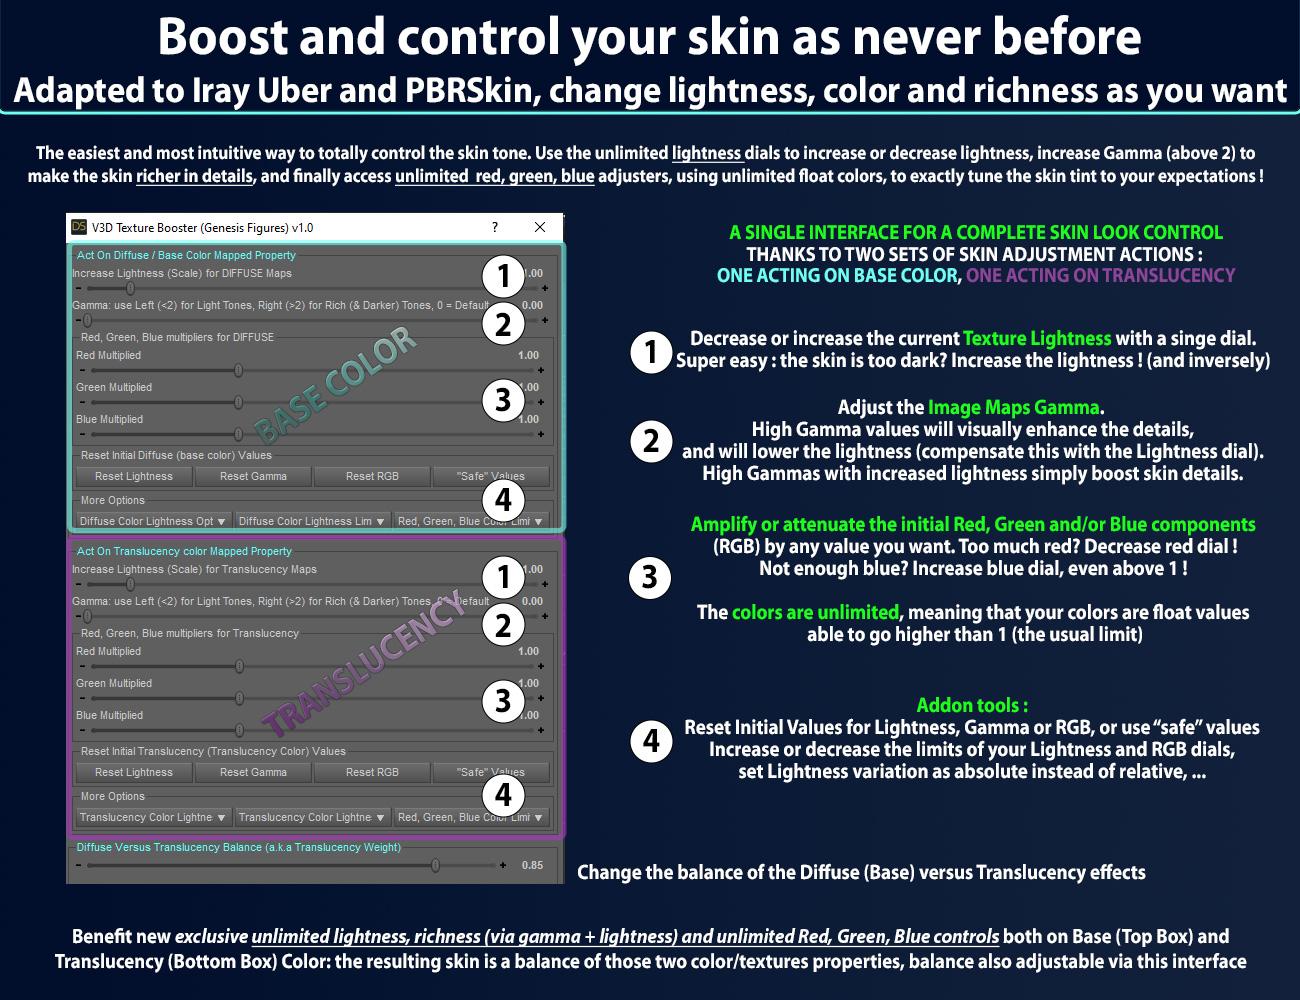
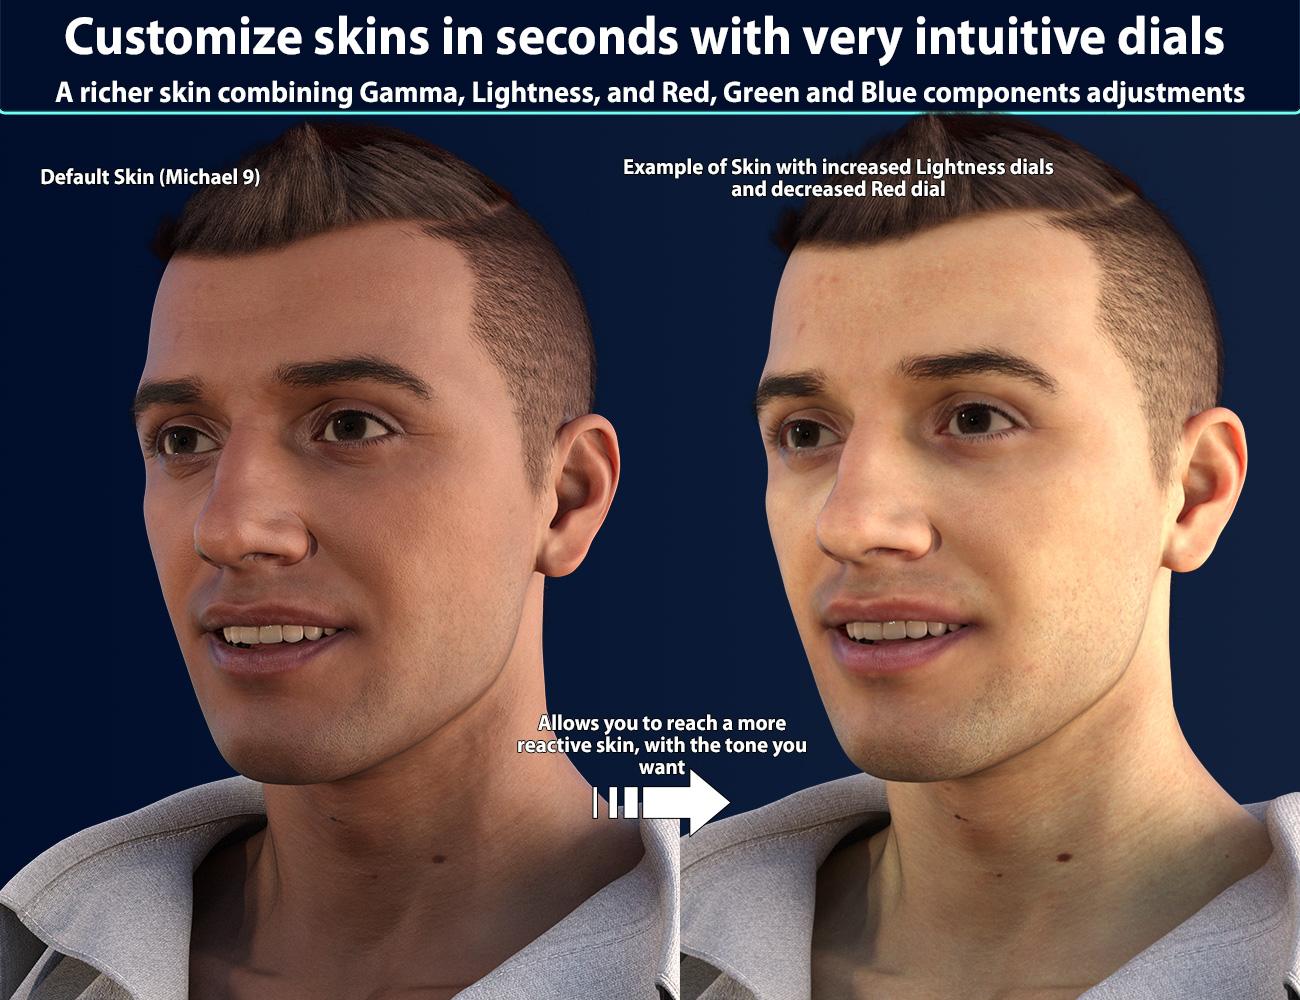
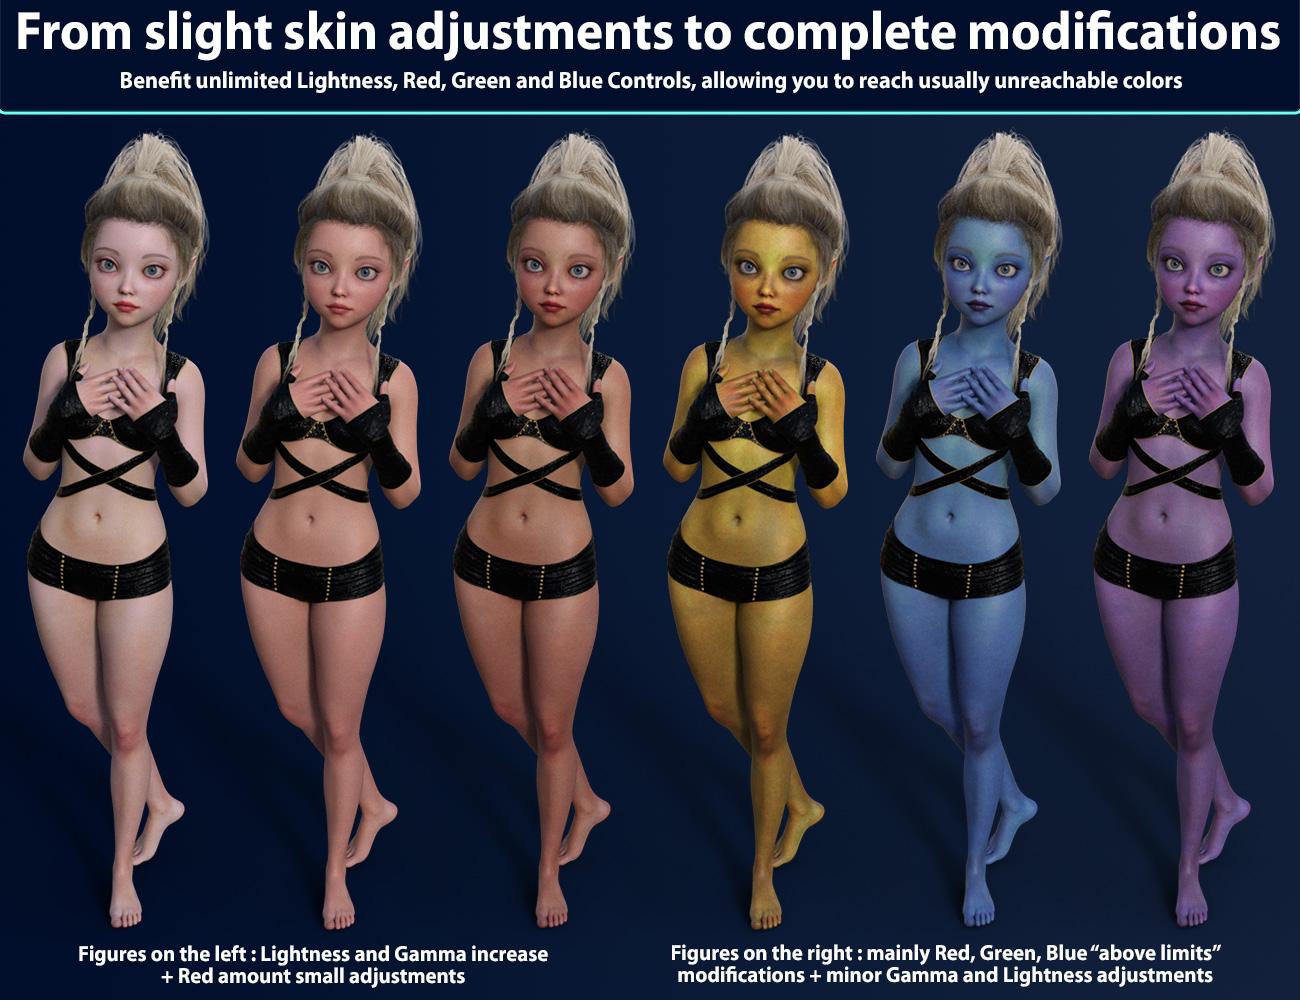
Concerning the booster script in itself, the two most intuitive properties you will most often act on are the lightness and tone, as well as tint and hue thanks to the corresponding dials available both for Base Color and for Translucency Color. The lightness dial will act directly as a texture modifier, allowing you to have lighter or darker skins without any loss of detail. The tint or hue control is made by unlimited Red, Green and Blue dials allowing you to work more efficiently in term of color control. The Gamma dial is here mainly to be used in conjunction with the lightness dial in order to boost the texture maps details (so the surface details) or to make the colors stronger.
The way the booster works is super intuitive, for instance for figures : The figure is too dark? Increase the Lightness dials. The texture details are not visible enough? Increase Gamma and Lightness dials! You feel that the skin is too reddish? Lower the Red dials! You want a blue fantasy figure ? Push the Blue dials and lower the other color dials! Using lightness and unlimited color dials will allow you to reach the skin lightness and tints or hues you want in seconds without altering skin details, and in addition, using the gamma in conjunction with the lightness will allow you to visually tan and untan the figure, or to enhance the skin and texture details and richness.
Lightness and Red, Green and Blue dials are unlimited float properties, meaning that they have no upper limits, allowing you to have “more blue” even if the blue component was initially at its maximum : the booster will adjust the blue component limit to a value higher than its natural limit, allowing you to increase or decrease the colors and lightness of your Base Color and Translucency Color maps without any limitations.
Gloss is also an important part of the final look of your figure. This is why you will also find a smart gloss script, adjusting both to Iray Uber and PBRSkin, allowing you to control this gloss very efficiently, in an unlimited way too, and to choose between Dual Lobe Specular and Glossy Layered properties, and between Bump and Detail Normal.
More specific tools are also included such as the transfer tool allows you to transfer the skin of a Genesis figure to any of its geograft child figure (such as Genitalia), a splitter and a booster options, all of this being perfectly explained in a well-organized documentation.
Well, since obviously a lot of things can be done, here is a summary of what you will find. For any Genesis figures, and other figures, props, many hair, all outfits, you can:
- Get a fast, easy and efficient control of the hue, gloss, lightness and richness of your scene textures
- Convert with options, if necessary, your Genesis figures (any generation) or your selected scene surfaces to Iray Uber or PBRSkin to make sure the booster will work on all the content you want.
- Reach unprecedented tone (hue) control thanks to unlimited Red Green and Blue color controls (the colors used are unlimited float colors).
- Change the lightness of your surfaces with a single dial while preserving all the details of the texture map.
- Save your lightness and color as any property of any surface (shaders, material presets, figures, props, scenes…), whereas Gamma changes can only be reloaded via figures, props, scenes, and scene subsets…
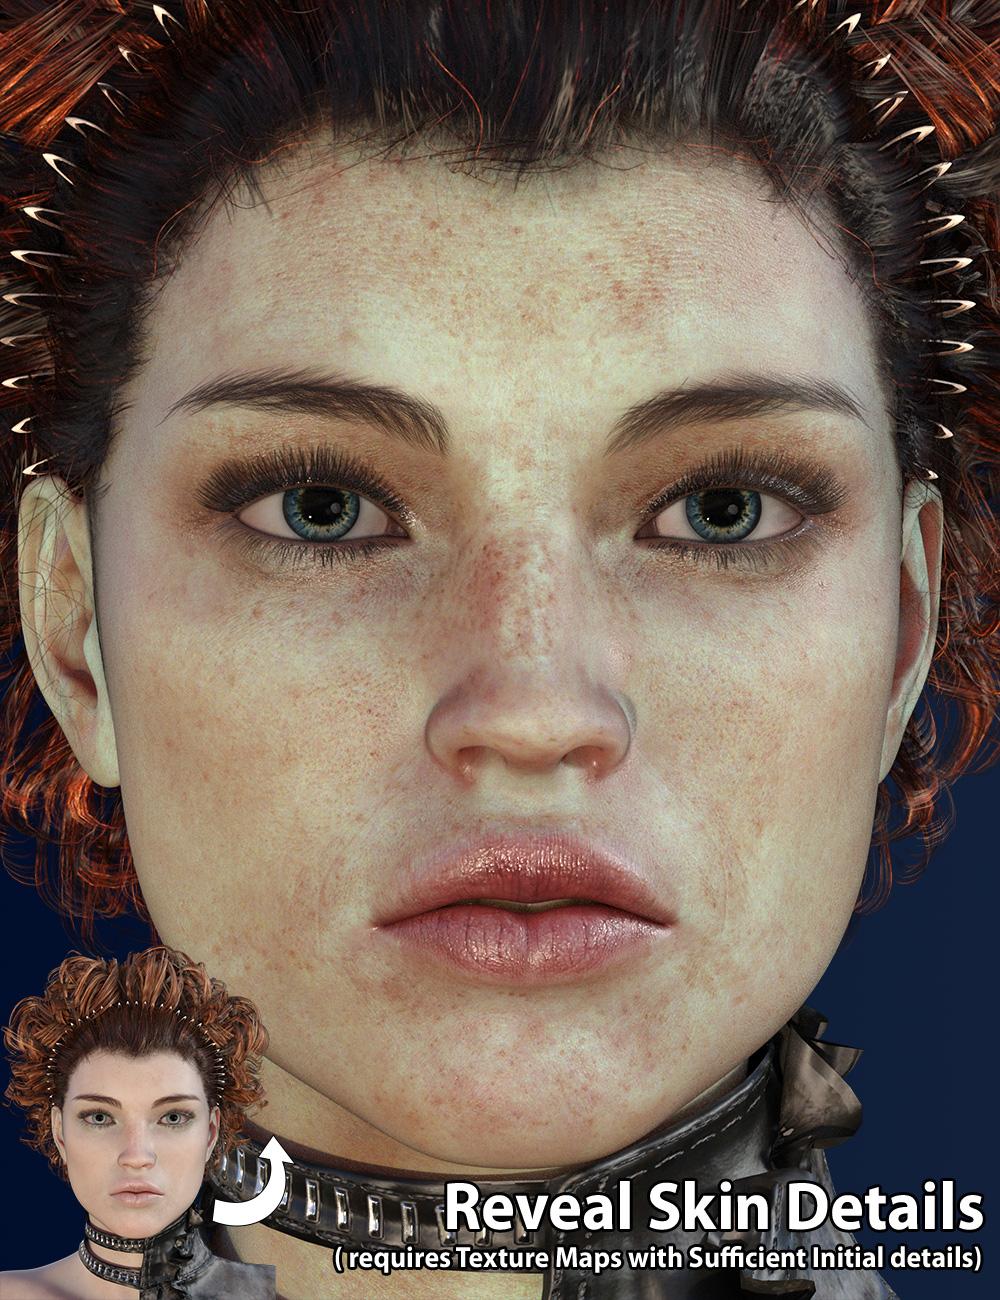
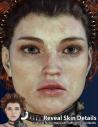
- Boost details : Use Gamma increase in conjunction with lightness increase to reveal the details of the skin or of your selected surfaces.
- Use additional tools dedicated to additional operations (such as for instance transfer to geograft) detailed in documentation
- Benefit a Smart Gloss interface supporting several shaders and bump, normal details, and roughness properties configurations
Now, stop being frustrated because something is too dark is your scene and you cannot make it brighter. Stop being annoyed by skins being too red, or not enough detailed, or too tanned, or on to contrary too pale. Stop wondering why this outfit does not exist in blue, whereas it would be the perfect color for your render. Simply solve your problems by launching the Booster, and by easily dialing the textures and surfaces to the lightness, tone, hue and richness you want.
Here is a video to see how it works and what it is made of : https://youtu.be/hWr9Xc2kg18
The video overview lasts more than 20 minutes, but the lasts ten minutes are just another example on the booster on another Genesis generation, outfit, hair, irises... So no need to see everything, except if you are curious.
You can also see a few images, I don't post them all because I think I made almost 30 images, it would be too much...


Daz 3D is part of 
Connect
DAZ Productions, Inc.
7533 S Center View Ct #4664
West Jordan, UT 84084
Licensing Agreement | Terms of Service | Privacy Policy | EULA
© 2026 Daz Productions Inc. All Rights Reserved.
Comments
Released this morning, you can find it here : https://www.daz3d.com/texture-booster
Have fun!
Wow, congrats on the release.
Hope to edit my Face Transfer 2 creations with it.
Thanks ! Nice idea Artini, feel free to share your results, and to ask me if you have any question :)
Will it work with DAZ 4.21?
The product was already in the cart, so thank you for the swift response!
No problem :) Feel free to let me know if you face any issue in DS 4.21 :)
Apart from my sheer incompetence?
ROFL! Yes, apart from that XD
I didn't think I needed this, but after seeing the Michael 5 & 6 results, I'm excited to finally get Genesis 1 & 2 Core Figures back into usage.
Hello,
I hope I didn't miss the information while reading the description but I have a question regarding the converter to Iray Uber / PBR Skin: does it also allow a conversion from Iray Uber to PBR Skin ?
I could not agree more, there are many good (edit : excelllent) shapes and texture sets in these generations, it would be a pity to forget them forever!
No problem, the description is pretty long :) Yes, it does allow conversion from Iray Uber (or any classical shader) to PBRSkin, whatever the Genesis Generation (except for the specific case of figure of the mouth and the eyes of Genesis 9 which are not converted to PBRSkin or Iray Uber, but for other generations this is not the case). So, for Genesis figures the converter supports any generation of Genesis, and can convert to PBRSkin or Iray Uber. You have a second converter for "selected surfaces" allowing you to convert your old creatures/outfits/props the same way (with different options).
Thank you for your answer
I tried it on Michael 9 and tippied toed into the first steps without blowing myself up, nor the computer. I also loved the results. Now if I could get the lighting right the 'first' time. I am looking forward to more fun. Thank you for this.
does this supersede https://www.daz3d.com/xtreme-reshade-for-iray-uber ?
The answer is BOTH yes and no. Let's proceed to a comparison of the main differences :
1. Main things that can be done with xtreme reshade and not with booster :
- Rotate shaders with the angle you want
- Benefit a dedicated shader mixer shader (whereas the texture booster keeps the initial well known shaders: Iray Uber, PBRSkin)
- Direct and easy saturation adjustment with a saturation dial
- Convert almost anything to the xtreme reshade shader (but not easy for PBRSkin, especially for beginners)
- "Mappable" Saturation, lightness, red, green and blue modifications (modifications can be weighted, you can decide where you will modify the different color properties, and you cannot do this in the booster)
2. Main things that can be done with booster and not xtreme reshade :
- Preserve the original Iray Uber or PBRSkin shaders and easily work with those two shaders (whereas xtreme reshade requires a shader conversion to xtreme reshade shader, and was not really compatible with PRBSkin)
- Convert almost anything to Iray Uber or PBRSkin
- Have a direct access to the gamma texture modifier
- Have a direct access to the lightness, but this time via Iray texture modifiers, which produces visually slightly better results than the lightness dial of the xtreme reshade.
- Work easily both on Base Color and Translucency Color (whereas xtreme reshader was limited to Base Color)
- Control the Red, Green, Blue Channels as really unlimited floats (whereas the xtreme reshade still has the 255 integer levels limits and you could only push the lightness to compensate this)
- Additional scripts (smart gloss, transfer, options)
- Enhance the visual richness of the details of texture maps via color contrast using a simultaneous gamma and lightness boost.
There might be other differences, but these are the main ones that come to my mind right now... So... This is why my answer is yes and no..
thnks for this comparison! (proceeds to add both products to my cart)
V3Digitimes I recieved your message (but the link to it didn't work, so I'm replying here). Using the Texture Booster after applying L.I.E. makeup works. Looks like I can also reset back to normal following your documentation. One thing I am unsure of however, is how to "bake" L.I.E. into the texture and save that out. (I never liked the TEMP folder, as things tend to go missing)
What I've done that seems to work is to setup my skin, apply the booster and save as a material preset, then reset the booster, apply makeup, apply the booster again and save as another material preset. So thank you for your help and for this product, it saves me from spending extra time in Photoshop.
Keiku, nice to hear from you. I'm glad you had your LIE makeup working with the booster. Concerning your specific bake question, even if baking is not necessary, you can do it manually (browse to the tmp location, copy the necessary image(s) to a "constant" folder, then reload this copied image(s) in the right slot(s)), or if you own my Scene Optimizer, this can be done via the Store script which creates a permanent copy of the LIE files (use restore script to apply them and replace the LIE). But this is not necessary for the booster, this is just for your own comfort.
I guess what you describe as what you've done is a way to have as a material preset a natural and a make up version of a same figure. Please remember (because it may be surprising) that when you reload the material presets, the gamma is not saved with material presets, so you might have to reapply it (or gamma can be saved in subsets/figures/scenes).
I'm happy I could help you, and that I simplified your workflow! Have fun with your renders :)
Liking the scripts so far. It would be really helpful if we could click on the number and enter a value, in addition to using the sliders.
Hello,
I played with it a bit, and I have some questions
Nails color doesn't seem to survive the script, at least with Tara 2 (technically, a G8.1F figure with Tara 2 morphs applied) and preset 3. Here a couple of renders to show the problem (the no color renders are just here as a reference):
Uber (no color):
PBR (no color):
Uber (color):
PBR (color):
Is it normal ?
I also have questions regarding the detail settings. For Genesis 2, 3 and 8 figures (I didn't test with a Genesis figure or a Genesis 9 one), the tiling settings of all surfaces are set to 1, which produced poor results when I borrowed the micro-details maps from Victoria 8.1 , but it's fixable with a bit of patience.
But if I'm using a Genesis 8.1 figure, apply an Uberskin skin, then use the script (preset 3 like in the previous test), the tiling settings of each surface seems to be the same as what Daz set for Victoria 8.1 which means not spending a couple of minutes to check each surface
A couple questions here:
Hi, thanks for those good questions :
1. For the nails, what you see is totally normal. The shader conversion will make the Base Color associated color uniform on all the skin/lips/nails surfaces, and will apply "standard" values of gloss on Skin/lips, and Fingernails/toenails.
This behavior is used because it is a very good way to have robust results (safe, reproducible). When I did this, I supposed that most users would be able to "re-tweak" the nails colors or gloss, and remove maps if necessary (using, if they wanted to the booster/gloss for selected surfaces, the selected surfaces being the nails).
So, no, this is not a bug but an expected behavior. What you showed as your second image (the almost white nails) is because you started from red nails where some image maps were probably removed when the nail shader/material was applied. After conversion, you have the same 'lack of map' which explains what you see. If you want a similar look, set up the base color to red, kill translucency weight (both can be done with the booster), and adjust the gloss.
2. I did not expect people to use other generations normal details maps on previous (old) generations, because old generations already come with bump and normal maps "roughly doing the job". This is why the tiles of the normal details were not set up during the conversion step for old generations. This is not fixed by Daz Studio but it loaded with the material preset initially used by the conversion script (one material for each generation, and each shader).
This can be possible to re-save the materials with this information (detail tile) included, but I must admit that for now I would not know which tile to use(the size relationship between the tile of the different surfaces is easy to determine, but the absolute value for thesetiles is not easy to set up, since it depends on the maps "detail size", the question being, does it vary a lot from one content creator to another? I don't know what to do with that... I am going to think about it... In the meantime, what you can do is save a material preset after you make the detail tile operation, but you save only (using the save filters), the details information. This way, after conversion, you can reload your details whenever you want in a single double click.
Do you have an idea if, between different details maps the tile changes a lot. I think I remember I had issues with that (not being the same for any figure) when I developed some of my old products...
I'm curious if Texture Booster can work with surfaces that have been prossessed by OsoBlendy, such that I could change the part of the surface's blocks that got added by OsoBlendy without changing the part that wasn't. or change the part that was there originally without changing the parts that OsoBlendy added.
Thank you for your answers
1. I'll use your advice to look a bit more on the subject, and in the meantime, I have a couple of 8.1 characters with nails color settings which should work (applying them after the conversion is done).
2. Oh, well, you know how it is: someone learn something new and now, they want to use it everywhere. I didn't know older characters had elements that has the same function of the details settings
I don't own this shader, so I cannot answer on this specific point. I have not made shader restrictions in the script to keep the maximum of compatibility with other shaders. The clues I can give is that the booster acts on two properties, each of them being identified by their name (take care, not their label, their name, and you can see the name using the surfaces editor, using the little wheel on the right of a property slot, clicking on paramters settings), the first one being Diffuse Color (generic name for the properties labelled Base Color or Diffuse Color in a lot of case), the second one being Translucency Color. Then the properties must be mappable and mapped (you can set a white map if you want to use the dials to access unlimited RGB), with "the full" image editor options (Gamma, Type, Scale.., which is not the case for old non iray shaders). So it will depend how the shader you mention was built.
1. Yes, exactly! individual surfaces (nails, irises, teeth, etc) must be modified after conversion, because it will mainly act on properties of your new shader. You can do this manually, or using the scripts, or by loading shaders or materials...
2. Older characters only have details settings if you convert them to PBRSkin. Once done you can pick the "seamless details maps" of any figure of any generations (since they are seamless, the generation does not matter), and plug them in the corresponding details slots (the longest part of the job being to change the tile of each surface). Once the tiling is changed, simply save as/material preset/ choose "uncheck all", and then check only the detail tiling that you want to save (or other details properties), so that you can reload them on any figure of the same generation. But as I told you before, if the bump maps (and eventually normal maps) of the inital figure are well done, and that you don't do "super close up", there is no great benefit to setting up additional "normal details" (IMHO).