How do I create hdr lighting.
 druc
Posts: 496
druc
Posts: 496
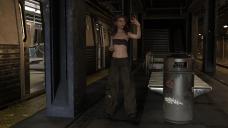
I have kit bashed several products bough here to create a double sided subway platform. I'm very happy with the kit bash. The issue I have is lighting the stairs down to the platform and the platform. See image. The platform and stairs are from https://www.daz3d.com/cyberpunk-subway-station the tunnels from https://www.daz3d.com/subway-tunnel-environment. The tunnels use HDR lights. How can I create these lights. Maybe if I put some in the top of the stairs they will shine down like in the tunnels. There was an advertised webinar for Daz plus member (like me) but the time was not acceptable and it was never, to my knowledge, in the how too vids.
Daz 3D is part of 
Connect
DAZ Productions, Inc.
7533 S Center View Ct #4664
West Jordan, UT 84084
Licensing Agreement | Terms of Service | Privacy Policy | EULA
© 2026 Daz Productions Inc. All Rights Reserved.
Comments
I am uncertain what you mean by HDR lights - HDRI?
But for adding light on your staircase, why don't you just add a plane and make it emissive?
Thanks felis for the reply. The attached image is a screen shot of the textures for the tunnel lighting. I couldn't upload the email from, time flies 19 November 2022 tittled "Creating Your Own HDRIs - In the Studio Livestream". The tunnel has lights that I would like to duplicate.
I don't think I have that product.
Looking at your picture it look to be HDR (high dynamic range) IES files. IES files is light profiles.
Exactly why they have been made HDR I don't know - the profile should be better (higher range), but I am in doubt it will be seen.
You can find IES files online. Don't know if you can find HDR IES files - maybe.
They can applies to an emissive surface. Just be aware that the surface in defualt orientation has to face Z negative.
Attach is an image with an IES profile attached to a plane.
Edit to add: you can use one of the profiles you have in your directory. Which to use will be trial and error. I would suggest doing some test in a new scene (unless your existing is fast to render). Just create a new primitive, a plane, facing Z negative, make it emissive and apply one of the profiles, and see how it looks. When you have found one that seems good, add it to your scene and test.
Using canvasses to render high-bit-depth .exr files of the environment, either from a range of angles taken from a fixed point or from a spherical lens (there is a product in the store set up for this) can be used, through an external application for mutliple images, to create an HDR image that can then mimic the lighting of the scene without having to load the props. That will save time if you plan to use the scene mutliple times, and should reduce the memory load even for one-shots.
Thank you both for your replies. This will require some trial and error, but it's all good learning.
I ended up stripping the platform, stairs and underground lights from the https://www.daz3d.com/cyberpunk-subway-station double platform and stairs as they are the parts I am using.. I changed the Emissive light colour and now I have a well lit scene. Only issue now is with multiple people (3) on the platform with hair, clothes, props etc the first render is taking 7 plus hours to get to 89 %, but looking very good and sharp. So much so I can see I have a person too close to one of the support columns and the train leaving the station too close to the stair wall.
Lighting has always been an issue I have struggled with, now with emissive lighting it adds a whole new dimension. I can edit an existing light a little, but don't, as yet, know how to create an emissive surface. We live and learn and that's a good thing.
Creating an emissive surface is not difficult. Any surface can be turned into an emissive lighting surface that casts light into a scene. Some products come with emissive surfaces already created and turned on to cast light. You can create an emissive surface from an existing product’s surface(s) or from a primitive.
I loaded The Central District Subway (https://www.daz3d.com/the-central-district-subway) into any empty scene. It's an old item that was created before Iray came to Daz Studio. I did not load its lights. The first image is a render below street level with no additional lighting and it is rather dim. I then added a small primitive plane to the scene and positioned it on the stairway leading from the street to the level shown in the first render. As such, it will not be in the rendered view but light that it casts will be. Primitives load with emissive surfaces but turned off by default due to the fact that the emissive color is set to black; see the second image below. I changed the emissive settings of the plane by choosing a reddish color to mimic street-level neon lighting. One also needs to experiment with the other emissive parameters to get the desired lighting effect.
The Luminance and Luminance Units together help you to set the brightness of a scene depending on your needs.
You can see the effect of emissive surface's lighting in the third image.
Some objects may not come with the capability to create emissive surfaces because they do not have the Iray Uber Base shader applied to them. If not, when the object is selected in the Scene tab, you will not have the Emission property for any of its surfaces in the Surfaces tab. If you want it, with the object selected in the Scene tab,
You will now have Emission available to you when you switch back to the Editor tab in Surfaces.
There are several short and well done videos in YouTube on this topic. Two that may be helpful are
Wow jjoyner that explaination was so informative, THANK YOU.
You're most welcome. I'm just sharing the love here. I've been a hobbyist/dabbler at this stuff for quite a few years now and have managed to learn (and remeber) a few things. I'm retired now so I have more time to play and explore.