Clothes Warped when Legs are Close(Genesis Female)
 RenatoDias
Posts: 34
RenatoDias
Posts: 34
Hey, all.
Been having this issue where the clothes become all warped/rolled up on themselves when the legs are close. Happens with Gen 2/Gen 3 clothing and some from G8.
Can anyone help? Most of the clothes don't have adjust morphs. Pics included.
First pic is a dress set from an independent author, second one from an official set sold in the Daz Store.
I had a few pics with this issue, if there is a solution, I may re-render them.
Thanks in advance.
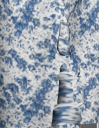
dazissue_clothesrollup.png
531 x 685 - 511K
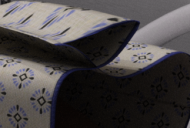
dazissue_clothesrollup2.png
323 x 218 - 124K
Post edited by RenatoDias on
Daz 3D is part of 
Connect
DAZ Productions, Inc.
7533 S Center View Ct #4664
West Jordan, UT 84084
Licensing Agreement | Terms of Service | Privacy Policy | EULA
© 2026 Daz Productions Inc. All Rights Reserved.
Comments
I couldn't reproduce the issue with Hospital Wear on G3F... Is that the case you auto fitted the clothing on G8F or sth. ?
Edit: Yes, I could see the issue with auto-fitted Gown on G8F. If so, you may check the original G3F wear first... There's no joint under Pelvis node, which means the vendor deleted them, so there's no rigging / weight on thighs / shins...
However, auto fitting transfers all weight from G8F to the Gown, so you may tweak or delete the weight maps on thighs / shins... or directly delete those joints in the same way as the vendor did.
Download this free script first - http://www.mikededes.com/delete-selected-bones/ Select Pelvis node on the auto-fitted Gown, right click menu: Expand - Expand from Selected, Shift + Select all sub-nodes, then run the above script... (as the attached screenshots)
Yes, I auto-fitted it to G8F. I guess that's the problem then?
EDIT: Yes, it worked. Thank you so much.
Yes ~ removing weight or joints is needed.
Actually, it only solves if the model is static. If it bends the knee, the knee goes through the clothing.
You'll get the same result when you bend the joints under Pelvis with G3 version's Gown.. I have to say this product was "only desigend for standing poses". A quick way to "remake" it is to add dForce modifier + weight node... if you'd like. Better know a sculpting softwre (or at least Mesh Grabber )... some shapes need to be tweaked.
Can it be solved with a DForce modifier+Weight Node?
Yep,definitely.
How would I go about solving it?
Interesting topic, so here is what I have found.
Step-by-step guide on how to apply the dForce modifier and weight node to cloth in Daz Studio:
1. **Add the Cloth to Your Scene**:
Load your figure and the cloth item you want to apply dForce to¹.
2. **Add dForce Modifier**:
Select the cloth item, then go to `Edit > Object > Geometry > Add dForce Modifier: Dynamic Surface`.
This will make the cloth compatible with dForce physics¹ ².
3. **Add dForce Modifier Weight Node**:
While the cloth item is still selected, go to `Create > New dForce Modifier Weight Node`.
This creates a weight map that defines which areas of the cloth are dynamic
(affected by physics) and which ones are non-dynamic¹.
4. **Paint the Weight Map**:
Go to `Tool Settings` and where it says `Active Tool`, choose `Node Weight Map Brush`.
In the `Weight Maps` tab, add `Influence Weights` and `Add Map`.
The idea is to create a map where you will set values for non-dynamic areas¹.
5. **Simulation Settings**:
In the `Simulation Settings` pane, there is a small tab named `Advanced`.
Make sure to choose your graphic card to make your renders run faster¹.
Remember, the weight maps define the dynamic areas and non-dynamic areas within the same object¹.
So, you can control which parts of the cloth will be affected by the physics simulation
and which parts will remain static.
(1) https://renderguide.com/daz-dforce/
(2) https://thinkdrawart.com/daz-studio-dynamic-cloth-dforce-tutorial-for-beginners
Notes about weight map creation.
Creating a weight map in Daz Studio involves several steps¹:
1. **Preparation**:
Weight Mapping involves assigning values to a weight map for a bone
with a brush tool or gradient tool¹.
The goal is to come up with smooth bending joints that behave realistically¹.
2. **Activate Weight Map Brush Tool**:
DAZ Studio's Weight Map Brush Tool can be found by selecting the Weight Map Brush Icon,
and looking under the Tool Settings Option Menu¹.
3. **Choose Weight Mapping Type**:
You should decide between General Weight Mapping and TriAx Weight Mapping¹.
4. **Start Painting Weight Maps**:
Make sure to have the Weight Map Brush Tool selected and open the Tool Settings Pane¹.
Choose a starting joint to begin your work¹.
Next, select the rotation to weight.
Have one selected to get a weight map to display¹.
Choose X Rotation, Y Rotation, or Z Rotation to start¹.
Now notice that the model in the display has turned blue.
This is the unweighted weight map. Blue equals no weight, Red equals weight¹.
5. **Painting**:
Choose the paintbrush to start adding weight by painting directly on the model where the joint is¹.
Painting with the brush takes longer, but it provides more control¹.
Choose a gradient to apply a quick starter map to refine with the brush¹.
In many cases the Sphere gradient is useful for laying down a quick weight map
to refine with the Paint and Smooth Brush¹.
6. **Fill Weight by Selection Sets**:
One new tool introduced in DAZ Studio 4.5 is the “Fill Weight by Selection Sets”¹.
Make sure you are in the Weight Tool Pane, then Right-click in the Viewport.
Select the tool from the menu.
This tool allows you to create a starter weight map for each selection set for the model,
which you can then refine with the weight brush tools¹.
(1) http://docs.daz3d.com/doku.php/public/software/dazstudio/4/userguide/creating_content/rigging/tutorials/weight_mapping_a_figure/start
(2) http://docs.daz3d.com/doku.php/public/software/dazstudio/4/userguide/creating_content/rigging/tutorials/weight_map_brush/start
(3) http://docs.daz3d.com/doku.php/public/software/dazstudio/4/referenceguide/interface/action/index/dzconvertfigureaction/start
(4) Daz Studio Pro Tips: Weight Maps
More about a weight map creation.
Creating a weight map using the gradient tool in Daz Studio involves several steps¹²:
1. **Select the Weight Map Brush Tool**: You can find this by selecting the Weight Map Brush Icon
and looking under the Tool Settings Option Menu¹.
2. **Choose the Rotation to Weight**: Select the rotation to weight.
Choose X Rotation, Y Rotation, or Z Rotation to start¹.
The model in the display will turn blue, indicating an unweighted weight map.
Blue equals no weight, Red equals weight¹.
3. **Choose the Gradient Tool**: Choose a gradient to apply a quick starter map
to refine with the brush¹.
The Sphere gradient is often useful for laying down
a quick weight map to refine with the Paint and Smooth Brush¹.
4. **Apply the Gradient**: Position the circular handles
so that they align to the mesh with the desired falloff².
Click Apply Gradient to commit the value to the weight map².
(1) http://docs.daz3d.com/doku.php/public/software/dazstudio/4/userguide/creating_content/rigging/tutorials/weight_mapping_a_figure/start
(2) http://docs.daz3d.com/doku.php/public/software/dazstudio/4/referenceguide/interface/viewport_tools/weight_map_brush/editing/weight_map_direct_editing/start
(3) https://www.daz3d.com/forums/discussion/316846/rigging-weight-maps-and-gradients
(4) http://docs.daz3d.com/doku.php/public/software/dazstudio/4/userguide/creating_content/rigging/tutorials/weight_map_brush/start
Creating a weight map using the brush tool in Daz Studio involves several steps¹²:
1. **Load Model to Rig**:
If you haven't already done so, convert the mesh to a TriAx figure¹.
2. **Activate Weight Map Brush Tool**:
You can find this by selecting the Weight Map Brush Icon
and looking under the Tool Settings Option Menu¹.
3. **Choose the Rotation to Weight**:
Select the rotation to weight. Choose X Rotation, Y Rotation, or Z Rotation to start¹.
The model in the display will turn blue, indicating an unweighted weight map.
Blue equals no weight, Red equals weight¹.
4. **Start Painting Weight Maps**:
Choose the paintbrush to start adding weight by painting directly on the model
where the joint is¹.
Painting with the brush takes longer, but it provides more control¹.
(1) http://docs.daz3d.com/doku.php/public/software/dazstudio/4/userguide/creating_content/rigging/tutorials/weight_map_brush/start
(2) http://docs.daz3d.com/doku.php/public/software/dazstudio/4/userguide/creating_content/rigging/tutorials/weight_mapping_a_figure/start
(3) https://www.daz3d.com/forums/discussion/39988/how-to-use-node-weight-map-brush-to-rig-with-bones
Will be interesting to see your results, so please post them, if possible.
The main steps are shown above as Artini posted. I give some simple tricks and settings just for this Hospital Gown. I have to correct myself first of all as there ARE quite a lot of morphs given by the vendor on this Gown to "make it fit to some poses"... You may try shaping the Gown as needed... though I personally prefer to adding dForce to it...
1) To keep it simple, when selecting polygons, just making sleeves and lower Gown to drape may be good enough, especially no need to make Left and Back lace to drape...
2) Better use Timeline to simulation
As below screenshots....