Why Is This Happening ??? Texture Problem

I make some cups for FA's Christmas giveaway. One of the cups was inspired by Sickleyeilds Ugly Sweater freebie from a few years ago, which has recently been added to sharecg.

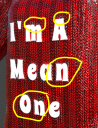
The texture on the cup is fine, however, when I tried to use the same files to create a matching sweater on Sickles freebie I run into a problem no one seems to be able to solve. I keep getting grey spots around the letters used on the sweater. I have the texture, a bump and tried using a normal, tried making adjustments on the various options under surfaces and can not get rid of the spots.

If anyone has any idea why this is happening and what I can do about it, that would be so appreciated.

Capture.PNG
501 x 656 - 796K

Comments

  • SofaCitizenSofaCitizen Posts: 1,624
    edited January 29

    Ahh, yes, I had a similar issue a while back. I believe it's caused by the texture compression in the render settings. Try bumping that up to see if it fixes it.

    I think the default is 512 (medium) and 1024 (high) and I have mine bumped to 2048 (medium) and 4096 (high). That may be overkill and going halfway would be enough tho.

    Post edited by SofaCitizen on
  • crosswindcrosswind Posts: 4,808
    edited January 29

    Are those letters on an LIE layer or embedded on the fabric texture map ?

    Pls use PNG format which is quality lossless. If you're using 4K+ texture maps but the issue still persists, pls try setting much bigger values in Texture Compression Threshold, like 4090 ~ 8192 or 8192 ~ 16384

    Post edited by crosswind on
  • Faeryl WomynFaeryl Womyn Posts: 3,336

    The textures are 2048 jpeg and the letters are on the fabric, not a seperate layer.

    I still have the layered files in my program so will save out as png and try that.

    These two images are the main ones so you can see what I did.

    SofaCitizen are you talking about making the images bigger or something I have to change in Daz?

    Ugly Sweater 01 Bump.jpg
    2048 x 2048 - 1M
    Ugly Sweater 01.jpg
    2048 x 2048 - 1M
  • PerttiAPerttiA Posts: 9,567
    edited January 29

    It's the color red. The compression algorithms do not like it. Try increasing the default compression values in render settings and change the textures to PNG.

    Post edited by PerttiA on
  • SofaCitizenSofaCitizen Posts: 1,624
    edited January 29

    Faeryl Womyn said:

    SofaCitizen are you talking about making the images bigger or something I have to change in Daz?

    Sorry - it's the "Texture Compression" values under the Advanced tab of the "Render Settings". For some reason they are missing on my Mac now but here is a screenshot from the PC.

    Screenshot 2024-01-29 193106.png
    522 x 489 - 33K
    Post edited by SofaCitizen on
  • felisfelis Posts: 3,751

    SofaCitizen said:

    Faeryl Womyn said:

    SofaCitizen are you talking about making the images bigger or something I have to change in Daz?

    Sorry - it's the "Texture Compression" values under the Advanced tab of the "Render Settings". For some reason they are missing on my Mac now but here is a screenshot from the PC.

    If your Mac are on 4.22, then try to look under Render Settings > Editor > Optimization.

    I couldn't find them, and learned that they are moved. 

  • SofaCitizenSofaCitizen Posts: 1,624

    felis said:

    SofaCitizen said:

    Sorry - it's the "Texture Compression" values under the Advanced tab of the "Render Settings". For some reason they are missing on my Mac now but here is a screenshot from the PC.

    If your Mac are on 4.22, then try to look under Render Settings > Editor > Optimization.

    I couldn't find them, and learned that they are moved. 

    Oh, awesome, thanks!

    Yeah, I am running 4.22.1.58 on my Mac and 4.22.1.41 on the PC so I guess the move happened sometime between those two versions. Time to run DIM to update the PC.

  • crosswindcrosswind Posts: 4,808
    edited January 29

    Faeryl Womyn said:

    The textures are 2048 jpeg and the letters are on the fabric, not a seperate layer.

    I still have the layered files in my program so will save out as png and try that.

    These two images are the main ones so you can see what I did.

    SofaCitizen are you talking about making the images bigger or something I have to change in Daz?

    OK, I see...

    I recommend an alternative.. Pls try using Diffuse Overlay rather than embedding them on Base Color map. Make a mask with those letters, black background and while letters, and place it in the slot of Diffuse Overlay Weight with value 1. See if that works or not on that Ugly Sweater...

    SNAG-2024-1-30-0040.png
    2026 x 1399 - 2M
    Post edited by crosswind on
  • Faeryl WomynFaeryl Womyn Posts: 3,336

    Thanks for all the advice and will try out everything till it works lol Have some others who tried to help me waiting to see if I find an answer.

    I will post the results good or bad in case anyone else has this problem.

  • Faeryl WomynFaeryl Womyn Posts: 3,336

    crosswind said:

    OK, I see...

    I recommend an alternative.. Pls try using Diffuse Overlay rather than embedding them on Base Color map. Make a mask with those letters, black background and while letters, and place it in the slot of Diffuse Overlay Weight with value 1. See if that works or not on that Ugly Sweater...

    I tried your method and saw improvement. I made the images png, did the words as a seperate image and placed in the diffuse overlay weight slider and set to 1. Put in the texture in the base color and bump in it's slider set to 0.50 and set glossy roughness to 1 so it wouldn't shine and look plastic.

    If you check the image I added, there are still tiny grey spots, only visible if zoomed in real close.

    grey spots.png
    1200 x 960 - 1M
  • crosswindcrosswind Posts: 4,808
    edited February 1

    Faeryl Womyn said:

    crosswind said:

    OK, I see...

    I recommend an alternative.. Pls try using Diffuse Overlay rather than embedding them on Base Color map. Make a mask with those letters, black background and while letters, and place it in the slot of Diffuse Overlay Weight with value 1. See if that works or not on that Ugly Sweater...

    I tried your method and saw improvement. I made the images png, did the words as a seperate image and placed in the diffuse overlay weight slider and set to 1. Put in the texture in the base color and bump in it's slider set to 0.50 and set glossy roughness to 1 so it wouldn't shine and look plastic.

    If you check the image I added, there are still tiny grey spots, only visible if zoomed in real close.

    Edit ~

    First, pls make sure you didn't add letters to Base Color map. Second, use a pure black/while letter map as a Mask in Diffuse Overlay. Then you don't have to tweak Glossy... just add some value to Diffuse Overlay Roughness, and set a light grey in Overlay color rather than a pure white.

    As the Base Color map is 2K jpg and as well as in red, it's normal that you'll see blurry "grey spots" with close-up... 4K png will be much better.

    With my example, M3D Holiday Sweater, it's much better with close-up.

    SNAG-2024-2-1-0055.png
    817 x 603 - 60K
    SNAG-2024-2-1-0056.png
    2020 x 1315 - 2M
    Post edited by crosswind on
  • SofaCitizen said:

    felis said:

    SofaCitizen said:

    Sorry - it's the "Texture Compression" values under the Advanced tab of the "Render Settings". For some reason they are missing on my Mac now but here is a screenshot from the PC.

    If your Mac are on 4.22, then try to look under Render Settings > Editor > Optimization.

    I couldn't find them, and learned that they are moved. 

    Oh, awesome, thanks!

    Yeah, I am running 4.22.1.58 on my Mac and 4.22.1.41 on the PC so I guess the move happened sometime between those two versions. Time to run DIM to update the PC.

    See http://docs.daz3d.com/doku.php/public/software/dazstudio/4/change_log#4_22_1_40 and http://docs.daz3d.com/doku.php/public/software/dazstudio/4/change_log#4_22_1_53

  • Faeryl WomynFaeryl Womyn Posts: 3,336

    crosswind said:

    First, pls make sure you didn't add letters to Base Color map. Second, use a pure black/while letter map as a Mask in Diffuse Overlay. Then you don't have to tweak Glossy... just add some value to Diffuse Overlay Roughness, and set a dark grey in Overlay color rather than a pure white.

    As the Base Color map is 2K jpg and as well as in red, it's normal that you'll see blurry "grey spots" with close-up... 4K png will be much better.

    With my example, M3D Holiday Sweater, it's much better with close-up.

    Ok will try the new information and I didn't use the letters in the base color map, only the red sweater image. I only put the letters under the diffuse overlay weight as you suggested. I'll take another look at the letters in my 2d program to see if there are any other colors besides black and white, that might be the problem. 

  • crosswindcrosswind Posts: 4,808
    edited February 1

    Faeryl Womyn said:

    crosswind said:

    First, pls make sure you didn't add letters to Base Color map. Second, use a pure black/while letter map as a Mask in Diffuse Overlay. Then you don't have to tweak Glossy... just add some value to Diffuse Overlay Roughness, and set a light grey in Overlay color rather than a pure white.

    As the Base Color map is 2K jpg and as well as in red, it's normal that you'll see blurry "grey spots" with close-up... 4K png will be much better.

    With my example, M3D Holiday Sweater, it's much better with close-up.

    Ok will try the new information and I didn't use the letters in the base color map, only the red sweater image. I only put the letters under the diffuse overlay weight as you suggested. I'll take another look at the letters in my 2d program to see if there are any other colors besides black and white, that might be the problem. 

    Okay ! Sorry for a mistyping above, should've been: ...set a light grey in Diffuse Overlay Color...

    BTW, another trick: since there's a bump map with that sweater, if you want "embossed letters" instead of "textured letters", just paste the white letter layer to the bump map in your image editor, then replace the original bump map with it...as attached.

    SNAG-2024-2-1-0057.png
    2515 x 1336 - 1M
    SNAG-2024-2-1-0059.png
    2028 x 1353 - 3M
    Post edited by crosswind on
  • Faeryl WomynFaeryl Womyn Posts: 3,336

    crosswind said:

    Faeryl Womyn said:

    crosswind said:

    First, pls make sure you didn't add letters to Base Color map. Second, use a pure black/while letter map as a Mask in Diffuse Overlay. Then you don't have to tweak Glossy... just add some value to Diffuse Overlay Roughness, and set a light grey in Overlay color rather than a pure white.

    As the Base Color map is 2K jpg and as well as in red, it's normal that you'll see blurry "grey spots" with close-up... 4K png will be much better.

    With my example, M3D Holiday Sweater, it's much better with close-up.

    Ok will try the new information and I didn't use the letters in the base color map, only the red sweater image. I only put the letters under the diffuse overlay weight as you suggested. I'll take another look at the letters in my 2d program to see if there are any other colors besides black and white, that might be the problem. 

    Okay ! Sorry for a mistyping above, should've been: ...set a light grey in Diffuse Overlay Color...

    BTW, another trick: since there's a bump map with that sweater, if you want "embossed letters" instead of "textured letters", just paste the white letter layer to the bump map in your image editor, then replace the original bump map with it...as attached.

    Oh good idea with the bump map, will do that as well and change that overlaly to light grey and see if that works.

    Will do tomorrow since most the day was spent grocery shopping and entertaining son lol 

  • WendyLuvsCatzWendyLuvsCatz Posts: 37,924
    edited February 2

    if you want it to look like a Fairisle jumper not one with appliqued letters I would take both images into an external editor like Gimp

    I would use the lettering to mask off the diffuse map

    ( by selecting the lettering by colour then selecting the other diffuse layer, hide the lettering layer)

    then use the options colours tab (brightness contrast, hue saturation) to desaturate and lighten that masked area so it just appears knitted in another colour yarn

    one can then layer it with the original adding transpareny and erase edges by stitch to get a more accurate knitted in look

    export under a new name

    but, I also realise this would not work for redistribution without permission, Sickleyield could always add your new texture to her gallery if she wishes too


    Post edited by WendyLuvsCatz on
  • Faeryl WomynFaeryl Womyn Posts: 3,336

    Faeryl Womyn said:ack and white, that might be the problem. 

    Okay ! Sorry for a mistyping above, should've been: ...set a light grey in Diffuse Overlay Color...

    BTW, another trick: since there's a bump map with that sweater, if you want "embossed letters" instead of "textured letters", just paste the white letter layer to the bump map in your image editor, then replace the original bump map with it...as attached.

    Oh good idea with the bump map, will do that as well and change that overlaly to light grey and see if that works.

    Will do tomorrow since most the day was spent grocery shopping and entertaining son lol 

    Using the letters on the bump instead of seperate and changing the color to grey like you suggested did the trick. There's still a tiny bit of grey but you have to have your face planted on the sweater to see it lol Now I can finally release this, was suppose to be for christmas to go with the cup I made. 

  • Faeryl WomynFaeryl Womyn Posts: 3,336

    WendyLuvsCatz said:

    if you want it to look like a Fairisle jumper not one with appliqued letters I would take both images into an external editor like Gimp

    I would use the lettering to mask off the diffuse map

    ( by selecting the lettering by colour then selecting the other diffuse layer, hide the lettering layer)

    then use the options colours tab (brightness contrast, hue saturation) to desaturate and lighten that masked area so it just appears knitted in another colour yarn

    one can then layer it with the original adding transpareny and erase edges by stitch to get a more accurate knitted in look

    export under a new name

    but, I also realise this would not work for redistribution without permission, Sickleyield could always add your new texture to her gallery if she wishes too


    Still sounds like a good idea though. 

  • crosswindcrosswind Posts: 4,808

    Awesome ! yes

Sign In or Register to comment.