Grooming dForce Hair After Simulation?
 mk1837
Posts: 25
mk1837
Posts: 25
Often when I run a simulation on dForce hair, I get a result that includes some stray strands that fall in unwanted places (see the attached image for an example where a stray strand has fallen over the figure’s right shoulder.) Is there any way to “groom” dForce hair after the simulation is run, to clean up these stray stands?
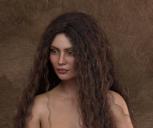
dforce_stray_hairs.jpg
504 x 423 - 111K
Daz 3D is part of 
Connect
DAZ Productions, Inc.
7533 S Center View Ct #4664
West Jordan, UT 84084
Licensing Agreement | Terms of Service | Privacy Policy | EULA
© 2026 Daz Productions Inc. All Rights Reserved.
Comments
you can try mesh grabber, but best results is to bring it into Blender for sculpting, there you masking and other fine detailing tools. However I've found SOME of the newer dforce hair doesn't play well in Blender and haven't had the time to figure that out yet.
With DAZ only, your best solution(s) would be to :
- Use the Geometry Editor Tool to select the hair strands that didn't fall quiet as you excpected. Define a new surface for them (Right-Click > Geometry Assignment > Create Surface from Selected). Copy/paste Surface Physics properties and textures from another hair strand and simulate only this again to place it the way you want.
- Another solution I often do : Load your hair. Select one half of it (with the Geometry Editor Tool). Duplicate the hair (Edit > Duplicate > Duplicate Node Hierarchies). Delete the half you selected on one copy of the hair (Geometry Editor Tool > Right Click > Geometry Editing > Delete Selected Polygon(s)). Then select the other copy of the hair, inverse the selection (Geometry Editor Tool > Right Click > Geometry Selection > Invert Selection) and delete that other half. This way you've got twice the hair, but each one has only one half of the head. This way you can simulate each half separately which helps a lot to achieve a desired simulated result.
- You can also, pre-dForce simulation, create some primitive objects (cylinders, spheres, whatever). Simulate once to see where hairs don't move the way you want. Then select your primitive(s) and add them to the simulation (Select the object > Scene Tab > Options > Edit > Geometry > Add dForce Modifier : Static Surface). Animate those primitives so that they prevent, during the simulation, hairs from moving where they shouldn't go. It's tricky to set up at first but once you get the hang of it, it's an efficient way to "guide" hairs a bit.
- You could also create a wind node that pulse air towards your character's face so that hair stay behind and slowly decrease the wind strength along the timeline so that at the end of the simulation the air is 0 and hairs continue to simulate while hopefuly still being pushed back enough to stay there.
In other words, with DAZ alone, there's not much you can do. Mesh Grabber wouldn't do a good job as it would act on the whole air object withtout taking into consideration the part of strands attached to the skull.
With Blender, ZBrush or any other 3D app :
Problem you'll face is that the huge majority of hair bundles don't have a simple way of selecting hair roots (the very first polygon of each hair strand attached to the skull). Most vendors define hair surfaces like that : front, bangs, sides, etc. But they sadly don't define surface(s) for hair roots, which would enable anyone to easily define d-Force properties for those roots and this way change in a few clicks any non d-Force hair in d-Force hair.
What I mean is that once a hair bundle is exported in a third party app, you'll have to select all hair roots (first polygon of hair strands) and define for those polygons a new material ID(s). In order to be able to select and block all hair roots easily. Then, if you know ZBrush, Maya, Blender, etc. you'll get some tools to move those hair that didn't fall quiet as you'd have liked them to. Change their position/rotation and bring them back in DAZ as a morph.
With Zbrush (that's how I'd do it), without even having to define a material ID for the roots you can simply mask / define polygroups for all hair that shouldn't move and using masking / moving brushes change the shape of some strands.
These are vey helpful suggestions. I will run some experiments and see what method works best for me. Thanks very much!
For Blender, the next version of Sagan will have support for several hair assets out of the box, as well as a system flexible enough to be made to work with, I hope, many others.
The reason why I'm responding is because once you've got one or more particle systems, you can simulate it and freeze it perfectly with the script here. Well, perfectly position-wise, but the particle velocities are not preserved, only their locations.