Transparency

whispers65whispers65 Posts: 952
edited October 2021 in Daz Studio Discussion

This is all for a personal project btw.

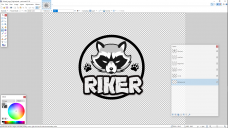
I was given challenge colors of black, white, and gray.  I created a logo (see attachments).  I placed it on the polo shirt.  No problem really.  The white doesn't show but I figured that was how daz works with transparency?  But as is, it is fine.  My intetions are to create shirts of gray/black, black/gray, white/black, white/gray. 

If I change the shirt color to black though, nothing shows up and it makes partial sense.  The black is black obviously and the white goes transparent. That still leaves the gray color, but that didn't show either.  So I thought I'd invert the colors and still nothing.  Then I changed some of the colors to gray.  Still nothing.  I'm not sure now.  I thought I had it figured out.

Suggestions?  Shouldn't an off color white (something that isn't purely white) work?

Thanks.  My end goal is to have a black shirt with the logo on it as well as the others.

Screenshot (7).png
1920 x 1080 - 291K
Post edited by whispers65 on

Comments

  • margravemargrave Posts: 1,822

    You "placed it" on the shirt? How? Iray decal? LIE? Manual texture edit? Cutout opacity?

    You need to explain what you did before we can tell you what you should do next.

  • GordigGordig Posts: 9,167

    Do you have an opacity map? Select every part of the logo that you want visible, fill it white, put it on a black background, then slap that image into the Cutout Opacity slot. 

  • WendyLuvsCatzWendyLuvsCatz Posts: 37,822
    edited October 2021

    indeed

    any grey should be in the diffuse channel only

    a cutout opacity map should have only two colours, Black and white

    grey semitransparency is not applicable to opaque surface colours, cutout opacity is a masking channel not a translucency channel

    with glass and other translucent materials it is not used at all rather refraction and translucency is

    that is why some hairs look awful, they include grey in their cutout opacity maps and it should not be, hair caps are notorious for this in iray and fight for dominance over the underlying skin

    Post edited by WendyLuvsCatz on
  • margrave said:

    You "placed it" on the shirt? How? Iray decal? LIE? Manual texture edit? Cutout opacity?

    You need to explain what you did before we can tell you what you should do next.

    I took a copy of the diffuse map and edited it.  of course I didn't touch the original.  I then use a paint program and put the image on that.  Then changed the diffuse map again.  Probably 99 ways to do this, but I don't know the other 98.


    Screenshot (10).png
    1920 x 1080 - 772K
  • WendyLuvsCatz said:

    indeed

    any grey should be in the diffuse channel only

    a cutout opacity map should have only two colours, Black and white

    grey semitransparency is not applicable to opaque surface colours, cutout opacity is a masking channel not a translucency channel

    with glass and other translucent materials it is not used at all rather refraction and translucency is

    that is why some hairs look awful, they include grey in their cutout opacity maps and it should not be, hair caps are notorious for this in iray and fight for dominance over the underlying skin

    I only changed what was in the diffuse, the map and color.  Nothing else.  I know enough to mess things up.  What I do is very basic.  LOL.


  • Gordig said:

    Do you have an opacity map? Select every part of the logo that you want visible, fill it white, put it on a black background, then slap that image into the Cutout Opacity slot. 

    I looked but there isn't anything used in that slot from what I see.

  • margravemargrave Posts: 1,822

    whispers65 said:

    I took a copy of the diffuse map and edited it.  of course I didn't touch the original.  I then use a paint program and put the image on that.  Then changed the diffuse map again.  Probably 99 ways to do this, but I don't know the other 98.

    If you edited the diffuse map, then the grayscale loss must've happened in the paint program. What blend mode did you use? Multiply blending would erase white color data like that.

    Also, Daz has a built-in feature to create decals. It's called the Layered Image Editor. So you don't need to bother with a paint program for this.

  • margrave said:

    whispers65 said:

    I took a copy of the diffuse map and edited it.  of course I didn't touch the original.  I then use a paint program and put the image on that.  Then changed the diffuse map again.  Probably 99 ways to do this, but I don't know the other 98.

    If you edited the diffuse map, then the grayscale loss must've happened in the paint program. What blend mode did you use? Multiply blending would erase white color data like that.

    Also, Daz has a built-in feature to create decals. It's called the Layered Image Editor. So you don't need to bother with a paint program for this.

    I  never used LIE before, but this whole project is intended to learn different things so I will give a go.  Thanks.

  • charles_2239525charles_2239525 Posts: 775
    edited October 2021

    You are right that there is probably 99 ways to do this. You can do it as geoshell, just click on shirt, and Create->Geoshell. The geoshell will be a child node of the shirt, select that and then Surface tab. Select the material entry(entries) and then the Edit tab for Surface. Type in !Uber in the search box, apply base Uber shader. Scroll down in surfaces and you'll find opacity/cutout option to do the same thing as you did with the diffuse. I started out doing what you did, and sometimes it's still the best option but like you said you want to know other (and quicker) ways to get the same job done. The geoshell will have the same UV mapping as the shirt, so you'll still need to use that as a reference for placement and you'll need to also create a cutout map (black and white) where white is what you want shown and black what you want to hide. Using a paint program you can usually get this by using the magic wand masking tool.

    Sometimes however just slapping a logo onto something isn't to work that well because you have a flat logo going on say something that has bends to it and when you do you wind up with the logo being stretched and distorted. Or you want to place a logo that crosses between a wrap around seam. One of the most common of this is say putting a tat on the back of a G8.x character, well the seam follows the spine. Here you either have to do some exact pixel matching (which can be done) between seams. Or you can pick up Substance Painter from Adobe now if you have an Adobe subscription and get it done perfectly in a matter of minutes.

    Post edited by charles_2239525 on
  • WendyLuvsCatzWendyLuvsCatz Posts: 37,822

    charles said:

    You are right that there is probably 99 ways to do this. You can do it as geoshell, just click on shirt, and Create->Geoshell. The geoshell will be a child node of the shirt, select that and then Surface tab. Select the material entry(entries) and then the Edit tab for Surface. Type in !Uber in the search box, apply base Uber shader. Scroll down in surfaces and you'll find opacity/cutout option to do the same thing as you did with the diffuse. I started out doing what you did, and sometimes it's still the best option but like you said you want to know other (and quicker) ways to get the same job done. The geoshell will have the same UV mapping as the shirt, so you'll still need to use that as a reference for placement and you'll need to also create a cutout map (black and white) where white is what you want shown and black what you want to hide. Using a paint program you can usually get this by using the magic wand masking tool.

    Sometimes however just slapping a logo onto something isn't to work that well because you have a flat logo going on say something that has bends to it and when you do you wind up with the logo being stretched and distorted. Or you want to place a logo that crosses between a wrap around seam. One of the most common of this is say putting a tat on the back of a G8.x character, well the seam follows the spine. Here you either have to do some exact pixel matching (which can be done) between seams. Or you can pick up Substance Painter from Adobe now if you have an Adobe subscription and get it done perfectly in a matter of minutes.

    that's a bit cheeky Charles cheeky 

  • charles_2239525charles_2239525 Posts: 775
    edited October 2021

    WendyLuvsCatz said:

    charles said:

    You are right that there is probably 99 ways to do this. You can do it as geoshell, just click on shirt, and Create->Geoshell. The geoshell will be a child node of the shirt, select that and then Surface tab. Select the material entry(entries) and then the Edit tab for Surface. Type in !Uber in the search box, apply base Uber shader. Scroll down in surfaces and you'll find opacity/cutout option to do the same thing as you did with the diffuse. I started out doing what you did, and sometimes it's still the best option but like you said you want to know other (and quicker) ways to get the same job done. The geoshell will have the same UV mapping as the shirt, so you'll still need to use that as a reference for placement and you'll need to also create a cutout map (black and white) where white is what you want shown and black what you want to hide. Using a paint program you can usually get this by using the magic wand masking tool.

    Sometimes however just slapping a logo onto something isn't to work that well because you have a flat logo going on say something that has bends to it and when you do you wind up with the logo being stretched and distorted. Or you want to place a logo that crosses between a wrap around seam. One of the most common of this is say putting a tat on the back of a G8.x character, well the seam follows the spine. Here you either have to do some exact pixel matching (which can be done) between seams. Or you can pick up Substance Painter from Adobe now if you have an Adobe subscription and get it done perfectly in a matter of minutes.


    that's a bit cheeky Charles cheeky 

    I was thinking the same thing was editing it until you reposted it lol.


    Post edited by charles_2239525 on
  • charles said:

    You are right that there is probably 99 ways to do this. You can do it as geoshell, just click on shirt, and Create->Geoshell. The geoshell will be a child node of the shirt, select that and then Surface tab. Select the material entry(entries) and then the Edit tab for Surface. Type in !Uber in the search box, apply base Uber shader. Scroll down in surfaces and you'll find opacity/cutout option to do the same thing as you did with the diffuse. I started out doing what you did, and sometimes it's still the best option but like you said you want to know other (and quicker) ways to get the same job done. The geoshell will have the same UV mapping as the shirt, so you'll still need to use that as a reference for placement and you'll need to also create a cutout map (black and white) where white is what you want shown and black what you want to hide. Using a paint program you can usually get this by using the magic wand masking tool.

    Sometimes however just slapping a logo onto something isn't to work that well because you have a flat logo going on say something that has bends to it and when you do you wind up with the logo being stretched and distorted. Or you want to place a logo that crosses between a wrap around seam. One of the most common of this is say putting a tat on the back of a G8.x character, well the seam follows the spine. Here you either have to do some exact pixel matching (which can be done) between seams. Or you can pick up Substance Painter from Adobe now if you have an Adobe subscription and get it done perfectly in a matter of minutes.


    Not sure what was in the box.  It didn't show for me.  :)  Geoshells would be cool too.  I'd like to try my hand at tattoos and tan lines, whatever I can do to learn this program inside out for a change.  I know there is a lot to it and I've barely scratched the surface.  I know I can get products for the most part (well not always like a baseball uniform seems to be hard to come by) but they aren't always what I am looking for or behave like I want.  NOT that there is any wrong with products.  I've bought tons.  I'd like to be creative on my own and see what I can do.  I get depressed and try and shove the creativity bug back into the nether reaches so I won't have to deal with it, but it still comes back.  So why not.  I don't have any subscriptions at this point.  Funds are well truthfully non-existent.  I worked 34 years but things have a way ot turning around.  I watch my 86 year old dad so I have some time to learn, but not any money.  It is what it is.

  • whispers65 said:

    margrave said:

    whispers65 said:

    I took a copy of the diffuse map and edited it.  of course I didn't touch the original.  I then use a paint program and put the image on that.  Then changed the diffuse map again.  Probably 99 ways to do this, but I don't know the other 98.

    If you edited the diffuse map, then the grayscale loss must've happened in the paint program. What blend mode did you use? Multiply blending would erase white color data like that.

    Also, Daz has a built-in feature to create decals. It's called the Layered Image Editor. So you don't need to bother with a paint program for this.

    I  never used LIE before, but this whole project is intended to learn different things so I will give a go.  Thanks.

    Update:  I used the LIE editor this time.  After a brief tutorial on youtube, it wasn't bad to use at all.  I did it in a couple of minutes.  I still haven't figured out the black tshirt business, but it is fine on everything else.

    Screenshot (11).png
    1920 x 1080 - 997K
Sign In or Register to comment.