How To Move This Edge And Keep it straight.
 Zach Wilson
Posts: 92
Zach Wilson
Posts: 92
I've extruded this polygon out twice. I now want to move the selected edge straight back to have it at an angle but no matter what I do it moves to the side as well (you can tell from the top view). I've tried holding shift while moving and control while moving but no luck. I also switched the manipulator form world coordinates, camera coordinates, and selection coordinates. Do I need to be in a particular ortho view when I try this? Because I tried it from a side view and got the same results.
Daz 3D is part of 
Connect
DAZ Productions, Inc.
7533 S Center View Ct #4664
West Jordan, UT 84084
Licensing Agreement | Terms of Service | Privacy Policy | EULA
© 2026 Daz Productions Inc. All Rights Reserved.
Comments
can you type co-ordinates in manually and validate to do it?
(sorry I don't use Hexagon)
In the properties tray in the upper right corner of the vertex modeling room interface, there are some choices for the manipulator. You can choose from hidden, world, camera, and selection. In this case of a single edge, you might try clicking to choose 'selection.' Just remember to change it back.
Oh, I see now that you say you tried that. Hmmm.
Well, I tried using 'selection' on an edge of a curved cylinder. I got a manipulator arrow to pull perpendicular from the selected edge. Not sure why that isn't working for you.
LOL I looked at this on my ipad and didn't realise it was Carrara
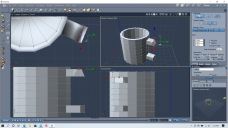
I was following this tutuorial in Cinema 4D on making a simple coffee mug you can see what he did at the 8:05 mark. I think the problem is how my cup is situated in 3d space compared to his not sure though I'll have to play with this some more.
Have seen a Carrara coffee mug tutorial somewhere but don't remember where. Since it appears you are a verteran modeler just not familar with Carrara's specifics, here is a very quick rough and ready coffee mug in Carrara using similar methods. I start with a cylinder. To get a handle, I use the extrude tool, pull upper and outer edges, then use the bridge tool. More details follow, and are attached.
- In the vertex modeler, I inserted a 3D object, cylinder and chose dimensions to taste.
- I selected and deleted the cap of the cylinder
- (skip, but this bothers me, the bottom of cylinder is still an N-Gon. I'm not showing steps, but I selected the bottom, used the extrude tool to get some polys, then used tesselate vertex to center, and used dissolve to get quads.)
- I added thickness to get an inside and outside of the mug, along with a full rim
- I selected two polys that were perpendicular to the X axis. I used the extrude tool while holding the control key (command on a Mac) to start the handle. I repeated to taste.
- I selected the upper and lower outer edges of the extruded handle. I used the X axis manipulator to pull them further out from the mug so they were angled toward each other.
- I selected the two polys facing each other. I used the bridge tool to connect them. I used the plus key to add some segments to the bridge.
- I selected the middle of the handle and pulled it out a little in the X direction to start a curve.
- I checked the smoothing box to get a rounder shape. You can increase the degree of smoothning if desired. Smoothing is sensitive to placement of edge loops.
- and returned to assembly room to see mug model with gray default shader.
The second post in the following thread has a bunch of useful "modeling in Carrara' links, as well as other modeling links in general. There is also Stezza's wacky modeling thread.
https://www.daz3d.com/forums/discussion/96301/modeling-objects-in-carrara-q-a-come-one-and-all/p1
Here is the rough coffee mug in a ZIP file.
Thanks alot Diomede. This helped alot. As for vetran modeller no... not even close. I used trueSpace 4-6 back in the day and used a lot of primitives with very bad bolean practices. The only decent poly model I made was a low polygon game model of an elf. I wanna say it was a tutorial from 3D Buzz or something like that.
This example uses the scale tool to move the desired edge into place relative to a stationary paralell edge. Use the CTRL + ALT + Left Mouse Click to select a vertice on the stationary line (it will turn yellow) and become the point of origin for the scale operation.
One quick note about setting the manipulator to "selection": When you do so, the Z axis (blue arrow) will align with the direction of the calculated normal. That is to say perpendicular to a face and averaged between faces on a single edge. The way the other two axis point seems a little less predictable.
To just move one edge you can use the "Move Along" tool.
Because you have selection coordinated selected while they are on world coordinates.
a couple of thoughts on this,.
You coud grab the little grey triangle in the corner of the Gizmo,. which will allow you to move,. free form.
you could rotate the object in the Vertex modeller,. so that the handle is facing straight,. that should allow you to move it on one axis
and Hi to all
Thanks for the help everyone. I rotated the object and that worked.