Problem with my dress model Joints
 Bagboy
Posts: 173
Bagboy
Posts: 173
Hello-
I've been trying to create my first conforming clothing for V4, in DS Pro 4, and have gotten as far as creating the rigged dress out of the Figure Setup Tool and adjusting some of the Grouping and some of the bones.
Now, after conforming it to V4 and transforming her shoulder up and down, some unexpected deformations appear.
I thought maybe it was a Joint Tool thing I could adjust, but apparently the problem is more than just that. In the first place, I'm seeming to get "static" red areas at both ends of the bone, which doesn't seem right to me.
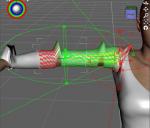
I've included a screen capture of the shoulder selected in the Joint Editor and transformed down a bit.
Can anyone spot the problem?
Thanks!
Daz 3D is part of 
Connect
DAZ Productions, Inc.
7533 S Center View Ct #4664
West Jordan, UT 84084
Licensing Agreement | Terms of Service | Privacy Policy | EULA
© 2026 Daz Productions Inc. All Rights Reserved.
Comments
One thing to check is that you have the mesh correctly grouped - if you hide the selected part of the sleeve and the parent of that part, are there any polygons left?
Hello Richard!
I don't think I've missed any polygons in their intended groups.
Here's a screenshot with the shoulder and the collar hidden.
Thanks for having a look!
I'm not sure why that's happening - I just tried making the fall-off spheres on a piece of clothing that does work look like that and the weights were still correct, though it's more common to have the static sphere enclose the active sphere (and you probably want to shrink the shoulder end of the active sphere to give a smooth bend, at the moment it looks as if a noticeable movement will end up with crunched polygons where the collar joins the chest).
Yeah, my process following the various Figure Setup tutorials didn't quite go as precisely as expected, so maybe I missed a step or two, or applied them incorrectly.
For instance, I was under the impression that using the V4 bone structure and pasting it to the dress would create bones pretty close, if not identical to, V4's. But, I still had to do quite a bit of copy and pasting of V4's coordinates to line the dress bones better.
But, I the closest I can get so far leaves me with these odd deformations.
I'll keep trying different things and see if something pops up to solve my problem here.
Heh, and I haven't even gotten to the skirt part yet!
Thanks again.
BTW, exactly what do I save if I want to keep backups of the work? Unfortunately, I've crashed a couple of times and had to start over.
Do I export the OBJ and CR2? Or would saving the whole scene file do it (which I would do anyway, but it takes so long)?
In DS4's Figure setup, you load V4, replace the geometry, delete unwanted bones, add any body handle bones, make sure Modify selected is ticked at lower left of the pane and then click the Create button - that should make the bones match exactly. Misaligned centres could certainly cause odd defects like that.
Oh Wow! That was indeed the missing step! The Modify Selected Figure checked box!
I was surprised that the geometry actually replaced the originally placed V4 model with the dress, but hey. No biggy to load up another V4!
Yup, now the dress conforms more predictably.
Thank you so much, Richard! :D