Xgen ... Density Map issue with Gen8
 goodwinds
Posts: 20
goodwinds
Posts: 20
This is the description of my experience when trying to create a Density Map in Xgen for a Daz character.
I tried to detail as much as possible all the steps keeping in mind those like me who are newcomers to Daz and Maya
If someone knows a straightforward way to overcome the problem mentioned below pls. I'll appreciate very much his/her advice
DAZ
Load Gen8 and select it in the Scene tab
Scripts --> Bridges --> Daz to Maya
Maya
1- File --> Set Project --> choose folder --> Set --> Create Default Workspace
2- File --> Project Window --> Accept
3- Outliner --> open Genesis8Female_Group --> select Genesis8Female
4- right click over the mesh --> select Face
5- double click over the selection tool to open Tool Settings and select Drag
6- select the area of the head that will be covered by the hair
7- File --> Save Scene as ... give a name and save
8- right click over the selected area --> Assign New Material --> Lambert
9- Alt + Shift + D to clean history
10- Channel Box/Layer Editor --> select all Translate/Rotate/Scale
11- Channel Box/Layer Editor --> Channels --> Lock Selected
12- Workspace --> XGen
13- select XGen tab --> Create New Description - rename Description and Collection if it's the case
Control the Primitives by --> select Placing and shaping Guides --> Create
14- Primitives --> Generator Attributes --> Mask --> click on the down arrow --> Create Map..
give a Mask a name ... choose a Map Resolution around 40... Start Color --> White and Create
the area previously selected turns white as it should be and the cursor turns into a brush
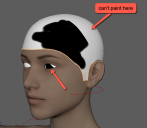
When start painting weird things happen ( see pic)
- however when painting with black, only the part of the head that belongs to the face UV becomes black, when brushing the back of the head the color doesn't change 'cause this surface is in other UV (torso)
- when painting the head eyes are painted with black too!
So, it's impossible to create a Density Mask this way as Maya Paint Tool doesn't support UDIM. The only way around I found was this:
- proceeded as above until selecting in the Outliner Genesis8Female then press Shift + D to duplicate the mesh now Genesis8Female_1
- select the original one and the hip and Character1_Ctrl_Reference and press H to hide
- select the copy - Genesis8Female_1 - and then select the area of the head to be covered by hair as per 4/5/6
- after that right click --> Invert Selection --> press the Delete key --> right click --> Invert Selection
- now you've created a mesh which represents only the area of the head that will be covered by hair
- on the top menu select UV --> UV Editor
- right click --> UV Shell --> select the shells on the right and drag them to the left, adjust size if necessary so all UVs will be in the 0-1 UV space
- close the UV Editor
- now proceed as mentioned in 7 and below and create the Density Mask
Some tutorials in Youtube recommend to create the Density Mask in Zbrush. As the mask will cover 2 UVs the problem is the same.
A solution will be to follow the method above and then export the scalp to Zbrush, paint it and re-export it as mentioned in the link below:
Creating Realistic Hair with Maya XGen by Hadi Karimi

Daz 3D is part of 
Connect
DAZ Productions, Inc.
7533 S Center View Ct #4664
West Jordan, UT 84084
Licensing Agreement | Terms of Service | Privacy Policy | EULA
© 2026 Daz Productions Inc. All Rights Reserved.
Comments
It's very standard workflow to create hair on a scalp mesh and wrap it to the skull, partially because of this reason (0-1 UV range ptex) and also for animation pipelines. Also you get the advantage of being able to reuse hairs on different characters this way.
BTW: You may find it easier to steal a scalp mesh from a dForce hair on the store as those are already unwrapped and a fairly nice shape. Either way works though.
For more info: https://forums.autodesk.com/t5/maya-forum/xgen-how-to-paint-maps-on-mesh-with-multiple-textures/td-p/6366547
Thanks for the info hfilb!! I'll give a try.
That's the beauty of this forum, readers always bring a clean and easy solution for a problem!