My first completed model in Hexagon - made a couple of years ago!
 Hermit Crab
Posts: 877
Hermit Crab
Posts: 877
Hi everyone,
Here is almost my first post in the Hexagon discussions although I follow with interest.
I put together a short video of screenshots of my first completed model in Hexagon which was wholly inspired by a tutorial in 3dArtist magazine a few years ago.
Before building this model, I had tried many times to use Hexagon just by extruding faces of a cube or trying out tools to see what would happen.
Somehow the tutorial gave me the kick-start I needed and I became engrossed enough to complete something.
The model leaves a lot to be desired, of course, but I hope you might enjoy the video I made.
EDITED to add the video link:
Daz 3D is part of 
Connect
DAZ Productions, Inc.
7533 S Center View Ct #4664
West Jordan, UT 84084
Licensing Agreement | Terms of Service | Privacy Policy | EULA
© 2026 Daz Productions Inc. All Rights Reserved.
Comments
I found a picture of the model after the final tweaks.
My next model was wholly my own work.
It went through many versions and still has a lot wrong with it.
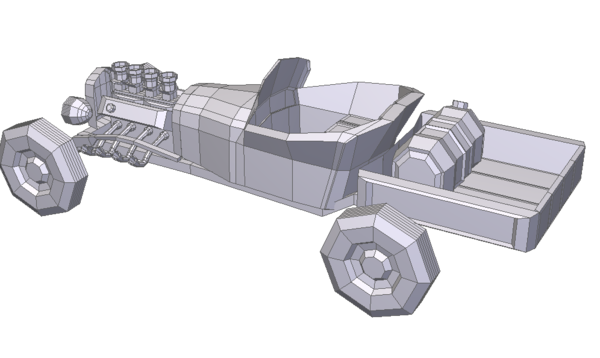
I took inspiration from a construction kit of a race car that was a lying around, broken, in a box. I didn't attempt to copy it exactly - I just used it for general guidance.
I've done a lot of repairs on real cars in my time but I'm not a car enthusiast in any way. They ARE a good subject to model, though!
Respect for the patience! They look good to my eye :)
Marcus, this is wonderful work! This will look great in an old time town scene, are you perhaps going to share you models?
I wish I can model. Have downloaded quite some tutorials but are just so clueless. Mine will be more buildings if I can only start learning the steps. I have done a wooden cabinet, but in Bryce 7 and now I can't export it out of there in another format such as .obj, etc. for others to use except for Bryce users.
Laura
Many thanks Estroyer and Launok for commenting on the models I showed. I do appreciate your remarks very much.
If there was any interest, I have a ton of WIP shots of the race car - they would show the stages I went through in trying to devise a way to create it.
Again, if there would be any interest, I would love to get advice from more experience Hexagon users about how I should have done it.
For example, I went to endless trouble building the whole shell of the race car in one piece - shell, front 'wings', cockpit & seat and air intakes.
I made the whole rear wing and an interior dummy engine in one piece also. It means that UV mapping is very problematic now.
What I need to learn is the underlying principles of making a good model.
Launok: It hadn't occurred to me to share them because they were only things I managed to achieve as opposed to objects that a more skilled user would create and others would be glad to have.
I honestly don't feel that I would have the right to distribute the rat-rod or hot-rod (whatever its called) because the tutorial I copied it from showed the artist's work being built from his concept sketches on to his own showpiece. I think it would be wrong for a poor copy of his design to be circulated. Or is that paranoid?
However, I plan to build another car with the old classic look to it. I've been looking at videos on the internet to try to understand the structural anatomy of these things (suspension, etc.)
I remember my first attempts to model were also in Bryce. I'm sure you'll love Hexagon.
Hey, Marcus Severus :)
Those are very neat models - If I'd done them, I certainly wouldn't feel bad about sharing. If built as single pieces, it would be difficult to UV map, but not impossible!
For some reason, when I first started, I also had the idea that it all had to built as one piece. What I do now is make it from as many pieces as I can get away with - makes building, UV mapping, texturing and animation all much easier.
Thanks, Roygee, for the comments - again much appreciated.
If I get a chance later I might show a few shots of the race-car as a work in progress. They might interest some newcomers to Hexagon
but I'm aware that others will be much more advanced and won't need anything I show.
Always good to see WIPs - see how others do things and pick up on different methods :)
OK - I'll post some images of how the race car evolved.
I might have pictures on my posts out of correct order - but I'll put them in related groups.
It might take a day or two - please let me know if it's too much!
Here is the finished car with an explosion of its parts and the model I used for reference.
I actually started this as an attempt to learn using Carrara's Spline Modeller.
So I built the rear engine cover and then the long nose. I was stuck with the rest so moved on to Hexagon to see if I could envisage the car by doing a quick mock-up.
The spline-modelled parts are triangulated.
Then I decided to switch to Hexagon entirely but I had to experiment.
I went through many trial attempts to shape the body shell so I will just post a few more shots which are probably of different versions.
Sometimes Hexagon crashed and I started over.
Sometimes I got into a mess so I started over:)
I just worked 'by eye' because this involved going to the manual and learning more tools as I progressed.
To make the wheels, I put one cylinder inside another.
Then I selected faces from each cylinder and extruded them. The INSIDE faces of the OUTER cylinder were extruded towards the OUTSIDE faces of the INNER cylinder and vice versa.
I used the BRIDGE tool to join them.
Then I put cylinder tyres around them.
I made the tail part as a one-piece item beginning from a cube.
Later I created a bulky shape where an engine should be just to have something behind the holes at the rear of the body-shell.
That's about it.
The rest was bits and pieces.
The seat and 'cockpit ' were just modelled from polygons sunken from the body shell.
The front geometry for suspension and steering is one-piece (it made getting it centred much easier!)
Now you will see why I look upon it as not so well made!
Thanks for sharing that - interesting to see the progress :)
I've tried Carrara's spline modeler, but just can't get used to modelling sideways!
Modeling a car is particularly challenging for me, being a mix of organic and hard-body. I've personally found that using Gordon's surface for the body gives me the best results, although I must have a set of good blueprints.
Recently being experimenting doing it without blueprints - I started using box-modeling to get the basic shape, then refining in sud-D with the smoothing control shape switched on. It's an interesting technique - almost like clay modeling :)
I found I need to be very careful using this technique and plan well ahead, otherwise I end up with a very high poly count. Still haven't produced anything I'd show in public.
If you don't mind a bit of constructive critique, I would say that many of the edges seem unnecessary and you should aim to get your polys as square as possible, but overall you have produced a good outcome - well done :)
Thanks, Roygee, I'm glad you liked seeing the images.
You're right about there being too many polygons. Because I started the body shell with a flat 'pile of bricks', when it came to tapering at the rear and forward of the cockpit, these polygons squeezed up tight together.
They actually prevented me from getting a better nose shape - the sort of square cross-section remained whereas with the spline-modeller nose I think I had a better shape.
That gives rise to the kind of question I could raise.
Could I have just deleted some of the lines running forward of the cockpit and kept a good shape? For example, say half-way down the nose I had eight lines reduced to four?
Another thing I did. I tended to start the body shell as shown as a pile of bricks. At some point I'd model changes to one half and delete the other half and even the whole base as well. Then when I was ready, I'd duplicate and weld the two halves. Then I'd put a base back on. The simplest base would be one multi-sided polygon. But I had many polygons since I drew them out from the side-walls.
Another issue! At one point I tried creating the driver's cockpit as a separate model - one of the images above shows that. Is that a better way to proceed? For me it caused issues with connecting/fitting it back to the body shell.
And the last issue I need to re-think. It would have been much easier to create the rear wings (aerofoils?) and front wings as a few individual parts. Do modellers generally just place (or even intersect) individual parts together?
Thanks for your info on your own modelling. I am the disciple here!
I need to check the technique of smoothing you mention - there are still many tools I haven't used in Hexagon.
It's not good to rely on smoothing tools because it's a very imprecise method that can make a model unnecessarily complex and resource exhaustive, along with making manipulations later down the line difficult. And since the final result of modeling is obviously to render what you've made, it can make getting a proper render (especially a photo realistic one) hard to impossible.
You can get away with intersecting models when rendering. It really just depends on the situation if you should make individual parts or one piece. Some models can benefit from things like recesses and grooves to make it appear realistically assembled. For example, if the body had slots for the wheels to connect into. Its little details like that, that can make a model stand out.
Thanks for the additional advice, user.operator.
I'll take on board what you say but when I get a chance will look at the smoothing operator in the interests of seeing more of Hexagon's capabilities.
I agree that the small details make all the difference. At the stage I'm at I'm just trying to see if I can complete the odd model.
I don't know if it happens to others, but my experience is that I get to a point where I need to start all over because the shape needs changing and the polygons already there would be more trouble to shift around than beginning from scratch again.
I guess that's a lot to do with not using reference images in the scene.
When I first started, it was in Anim8or, which can't handle heavy poly loads and I was on a crap computer. My mentor told me that any edge that does not define a change in shape has no business being there. I'm now using more robust software and on a far better computer, but that advice has stuck with me - I'm very poly-aware and work as economically as possible.
Looking particularly at the body of the racing car - the rear is very nice - good edge flow, great poly distribution and all nice and square. The forward part has too many edges, which prevent it from getting the cone shape. The top surface is not a continuation of the back, so most of those edges could be dissolved (hit the back-space key and select "all"). The side is a continuation of the shape, so you would have to use a poly-reduction method shown on my first pic below. Weld three verts, dissolve the centre edge, pull the centre vert to form a diamond and dissolve or weld the downline edges. You end up with less edges and all quads.
I would not have made the front and rear as separate meshes, although I do this wherever I can. The pic of a mech I'm currently working on already has 60 meshes and will end up with about 100. Everything in that model started off as either a cube or a poly-line. There are some parts I will re-do because they didn't work out as expected. That is another thing - don't be shy of scrapping and starting over - it's usually faster than trying to fix something and only costs time :)
Another thing - rather not start off with a pile of bricks, as you did - rather start with a simple cube, cut in edges and shape as needed. Very much like sketching - start rough and add detail as you go.
Intersecting meshes are OK, but I try to avoid them, because if you get two parallel faces too close together, you get horrible rendering artifacts.
user.operator is correct in saying that you should not rely too much on smoothing to get a shape - I very seldom go over 1 level, 2 at the very most. If it needs more than that, there is a problem with the modelling technique. This is where you need to do careful planning when doing sub-D modelling - you have to be in level 1 smoothing to start and have to give it at least one more level when finished. After that, any more edges you need to cut in have to then be smoothed, so it needs to be planned so that when done, you don't need to cut anything extra in.
Finally, if you would like to learn more about topology, go to http://vimeo.com/user904568 there is a lot of useful information in those videos.
That's a lot of very helpful advice, Roygee.
Strange, the first thing I ever made (around the time I bought Bryce) was the egg-plant tutorial for Anim8tor! That was all I did with it - free time was in short supply.
Your mentor's advice is something I'll remember and try to put into practice.
You've analysed perfectly the muddle I got into over the nose part - I see it that way now - and the reduction method shown will be really useful in future.
I've always realised that the look of the final model isn't quite convincing. Seeing the photo the model in the box it's clear that my model has the proportions the wrong way round - the rear should be longer than the nose.
These cars, when seen on television racing are usually taken from a low angle and with a (long?) lens that foreshortens them. So they look low, stubby and very wide. But in reality they are long and almost narrow.
It struck me more than once that the simple mock-ups I started with were better proportioned and more convincing within their limits.
I've studied your Mech - its very impressive. You really let yourself in for a lot of work there. Its fantastic that Hexagon can handle such a project. Please don't tell me it transforms into a truck!
Hey - transformer - now there's an idea - maybe into a spacecraft - always wanted to do one of those!
That's the beauty of CG - you can do anything your imagination allows :)
Anim8or is a great little app for learning the basics and it has some pretty impressive features - such a pity development seems to have stagnated.