Editing Cars
 oconnordavid16
Posts: 168
oconnordavid16
Posts: 168
in New Users
Anyone know if its possible to edit a car to make it into a taxi, add a custom taxi paint and roof sign? Also is there anyway to add moveable working windscreen wipers?
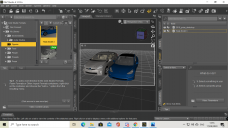
Desktop Screenshot 2020.08.17 - 13.55.43.47.png
2560 x 1440 - 456K
Daz 3D is part of 
Connect
DAZ Productions, Inc.
7533 S Center View Ct #4664
West Jordan, UT 84084
Licensing Agreement | Terms of Service | Privacy Policy | EULA
© 2026 Daz Productions Inc. All Rights Reserved.
Comments
Re texturing is certainly possible, and you can use hexagon or Blender or the like to model a roof light. If the model has windscreen wipers already you could use the Joint ditor tool to give them a bone, position it, and assign weights (for a weight-mapped figure - if the car uses legacy rigging you'd need to create two bones for each wiper, one as the pivot and one for the actual blade, otherwise it would be hard, possibly impossible, to avoid distorting the adjacent areas of the car).
Ah good, never textured before but not to ohard I imgiane? I have hexagon Don't think the cars have wipers, was hoping there would be some way to add ones
Yes, just model them to line up with the car and you can then parent them to the body in DS and rig them.
Will try that so thanks
for the wipers yes? how would I do this
If the wipers are made to move each blade as a piece then, from memory, you can select the imported OBJ, Edit>Object>Rigging>Convert to Figure. The with the Joint Editor tool right-click>Edit>Create new Bone twice, to create a bone for each blade. Once you have the bones, use the Joint Editor to move the centre point to the place where the wiper should pivot, select one of the bones, then switch to the Node Weight paint Brush tool, in the Tool Settings select the General Weights map from the Available Maps list, then you want to seelct the whole of the wiper (use the Geometry Editor tool, click on part of the wiper, then press cmd/ctrl * to select everything connected to the selected polygon, then switch back to the brush tool), and fianlly right-click>Weight Editing>Fill Selected and give it a value of 100%; repeat for the other wiper.
so thats for cars with wipers already? there are no wipers on the car at all, I want to add some
Blender or Hexagon will do that
Ah so like a taxi sign I can add wipers in Hexagon, I have that but not used it yet
they are modeling programs, so you can add anything you can model
oh nice, got blender but never used it before ,any good tutorials that can tell/show me how to add wipers as im assuiomging its not gonna be really easy
use the geometry editor to isolate some wipers on another car and export an obj wwith not hidden ticked
oh I see, not sure I have any cars with wipers
turns out I do actually have a car with wipers they don't move though and are not a seperate part, they are tied to a bunch of other parts
what do I do now after selcting the wipers?
You create a new material zone and assign those polygons to that zone. Then you select the other zones and delete them till the only one left is the wiper one.
so now what do I do to make them moveable and be able to add them to other cars?
You need to convert the model to a figure, add bones, and weight map - as I described above, though you will have to do all the moving parts.
oh ya sorry, followed that so far but kinda confused at the joint editing part
You need to move the centre point to the pivot point of the bone, and then adjust the alignment to make the bone run along the model's long axis (usually - for the wipers it might make more sense to have it project along the axis of the pivot, then you use the Twist paramater to move them). You can set the base alignment via the rotation order (the first axis is twist, the second should be the ebnd that is least likely to hit ninety degrees as that helps to avoid gimbal lock).
If you get stuck there is always this: https://www.daz3d.com/advanced-vehicle-rigging-techniques
Thanks, I'd forgotten about that.
any videos on this or something similar, this al lsounds very confusing
Ah I see that advanced rigging thing might be useful but don' really want to spend money on this stuff right now
this is probably so simple; once you know how but im really stuggling with it and figuring it out even with written instruction (it sounds so confusing) might be time to just give up on getting working wipers

... or get a car that has working wipers. I don't have an extensive collection but these cars I checked. They all have working wipers.
Car Boss
Car Mark
Car Victoria
Family Car 1950
I'm wanting modern everyday cars tho, I have the wipersa as a seperate surface but need to make them moveabl and thats the bit im finding hard and the instuctinons given sound confusing, I find it easier to follow video or photo examples rather then text instructions with these types of things sometimes
forgetting about the wipers for now going back any good videos to show how to make textures so I can make a taxi paint and make a taxi roof sign, I have blender but not really used it much so not sure how to do it
Don't look for videos that are specific to the exact task you are looking for. I think, at least as the question is phrased, and tutorial on hard surface texturing should cover you (assuming your sign is UV mapped - if not that's where you need to start).
found this video problem is the cars bvase image is just blue s oguessing I need UV mapped?
Yes, if maps don't apply it almost certainly needs UVs