Texturizing Problem
 Claywoman
Posts: 31
Claywoman
Posts: 31
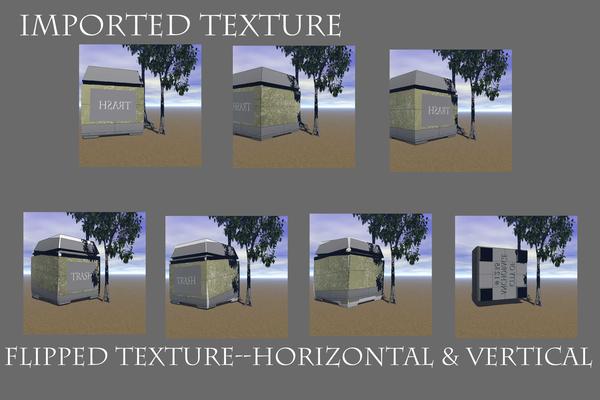
I modeled a trash can..very basic. Im trying to learn how to texture properly . I created a texture in PS, of course, now that its rendered, I can see where I needed to paint closer in...but my main concern is the texture placement.
In Hexagon when I added it, it placed fine, but the letters on the bottom and front are backwards. I clicked to flip the texture vertically as well as horizontally and they are falling off of the model. On the texture that is flipped, no words show on the bottom at all!
What can I do?
Thanks in advance
Daz 3D is part of 
Connect
DAZ Productions, Inc.
7533 S Center View Ct #4664
West Jordan, UT 84084
Licensing Agreement | Terms of Service | Privacy Policy | EULA
© 2026 Daz Productions Inc. All Rights Reserved.
Comments
PamYla, I know what has gone wrong (coz I've done it myself a few times) but I cannot put it into words. There is a way to avoid it in the future. You know when you add a UV plane to a flat object Hexagon saves a picture like a chess board. Take that into a paint package and put text in the squares (0-9 for example) - My version is saved out at 2048*2048.
After you have unfolded the object, load in the test grid and tick the Flip Vertically box. If the numbers are up-side-down or Left to Right flip them around on the UV-View window (using edges rather than faces, its easier to see), having a split view (UV & perspective) will also help you see what is going on.
I've just made you a quick test grid, this should help solve your problem. It will also come in handy for other things as-well :)
Thank you so very much Wee Dangerous John. I will try this out tonight. thanks for the grid also, you explained it well. have a beautiful day!
Pamyla
Ok I have been placing and replacing this texture with the words. I have decided to back off for now and look for another way. there is something very wrong that I am doing, and I need to know the answer lol
Here is another render with a new texture...thanks for your help
Pamyla
I do not use PhotoShop so I'm probably wrong. It looks like you have merged the UVmap and the metal texture into one image, only a guess because of the lines on the bottom panel.
Yes it looks as if the UV map is attached
Yes you are both right. It is merged. Im new at this...i wondered why I had those lines..thanks
Pamyla
Glad I was of use.
Have you tried UVMapper Classic (classic is the free version), you load the OBJ file and it gives you more size output options.
http://www.uvmapper.com/downloads.html
I would also recommend watching Gary Millers tutorials over at GeekAtPlay.com -
http://www.geekatplay.com/hp1.php
This is a great help, thank you very much, both for the numbered texture and the clue to why text is all backwards in Hexagon's UVMapping.
I haven't learned how to apply texture in Hex yet so I do all of my painting in Studio.
First I get a UV from Hex or UV Mapper and take it into Photoshop. Then I apply a plain layer over it. I turn the opacity of the layer down so I can see the UV under it then paint or letter as desired. Once everything is in place I run the opacity back up and flatten the image to save it.
After applying the texture I check it out to see if everything is O.K. If not I go back to Photoshop and click the backup icon to turn it back into layers and make any adjustments.
I've never had any backward problems and I'm usually satisfied with the results.
Nice shirt Gotfryed.
I use PSPx6 myself. I have a similar process but I always add a feather to the map first , this gives me a border (normally 2-4 pixels depending on the image size) which removes the seam (I have BlackSmith3D Paint for stubborn seams).
To load a texture into Hexagon just select New material (rename it) then browse for it and tick the Flip Vertically box.
I've never seen the point in texturing in a modelling app - except maybe to test the UV map, and that is best done with a grid.
It just makes sense to me to do the texturing in the rendering app, because they all have different rendering engines which handle textures differently.