Charlene hair (and others)
 Carola O
Posts: 3,862
Carola O
Posts: 3,862
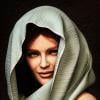
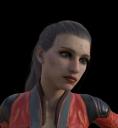
I have a bit of a problem, I'm using Charlene Hair as a example but this problem exists in osme other hairs I have too from different vendors. Today I was trying out this hair on a character (Rita) and I get these odd markings on the head, I tried the character without hair and with another hair without getting this problem.
As I know I have had with other hairs too, and I also have several hairs from OOT that doesn't give this problem, so I am wondering what is causing it and how can it be fixed? That is how it can be fixed without needing to do it in postwork.

Daz 3D is part of 
Connect
DAZ Productions, Inc.
7533 S Center View Ct #4664
West Jordan, UT 84084
Licensing Agreement | Terms of Service | Privacy Policy | EULA
© 2026 Daz Productions Inc. All Rights Reserved.
Comments
The easiest way to fix this is to go into render settings and change Instancing Optimization from auto to speed.
Edit: Sometimes this may not work, so an alternate fix is to adjust the haircap fit settings.
erh.. what? I'm utterly confused as to what that does in this case, don't get me wrong I did try it and it worked, just confused as to why having it on Auto causes such oddities to happen.
Many thanks though :)
That I do not know.
The artifacts do seem to be related to slight misfits between the hair cap and the head (which is why adjusting the fit of the hair also sorts it out) but as to why this causes artifacts, and why changing the Instancing Optimization helps is a puzzle.
Thanks, galien, for that useful tip. Now, there is another issue I have---specifically with OOT hairs---when zeroing the opacity of a hair surface (in cases where OOT has not provided a hide button) dark artifacts appear in the render. I haven't figured out a way around this, but I'll try InstancingOptimization/Speed on it when I get a chance.
I found having the model positioned at / around 0 can help this, as well as working with the skull cap opacity in the surfaces panel of the hair.
Whenever that happens, I increase the head size adjustment by one or two percent and that takes care of it. That's what that slider is for.
I've read on here that adding a smoothing modifier to the hair works, too. While you have Charlene Hair selected in the Scene tab, under Edit ---> Geometry ---> Add Smoothing Modifier if I recall correctly. Then in your parameter's tab, you can set the smoothing iterations, usually 3-5 will suffice.