Still Cannot Figure out Pattern Shaders with checkerboard icons
 ebonartgallery
Posts: 272
ebonartgallery
Posts: 272
Using Plastic and Latex Iray Shaders.
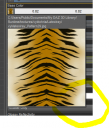
I want to take this pattern

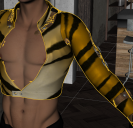
And apply it to this jacket
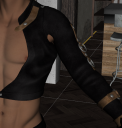
I use a Reset Surfaces tool to get rid of any bump I don't want, then apply the shader to the surface.
This is the result. Notice the white edges on the lower part.
Now, I know WHY it looks like that - the shader is being applied as one, um, 'thing' to the jacket. Thus, the jacket picks up the white outer edges of the jpg.
I know, somehow, that tiling prevents that. Somehow. And I know I won't see it until I render.
However, I click and click on any of those checkerboards and not a damn thing ever changes. Ever.

What am I doing wrong?


Daz 3D is part of 
Connect
DAZ Productions, Inc.
7533 S Center View Ct #4664
West Jordan, UT 84084
Licensing Agreement | Terms of Service | Privacy Policy | EULA
© 2026 Daz Productions Inc. All Rights Reserved.
Comments
In the surfaces tab with the surface selected, scroll down and you should see sliders labeled Horizontal and Vertical Tiles, change these and see if this helps to tile the pattern more.
Still does not tell me what the checkerboard shaders are suppossed to do.
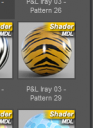
The checkboards give in indication of the tiling effect - higher numbers means more ;copies' of the pattern.
Nothing wrong with discussing shading this garment with a striped pattern... it's a nice pattern after all and it might be better if it was seamless. But is it really a procedural shader? Correct me if I'm wrong but I thought procedural shaders were the ones that made grass grow with new geometry on a flat plane say.
No, not a procedural shader, a shader preset that will apply the pattern to any surface. The tiling doesn't have to be in integer increments, and would look pretty bad with a non-tiled pattern.. To make it fit the garment in question, just slide the Vertical and/or Horizontal tile values to a bit less than 1.0 until the blank parts are covered. You might need to adjust the offsets, too, to get it centered. Unfortunately, it will stretch the pattern, so hopefully it won't need much to fit.
I might be using the wrong term.
I get that... but how are they used? They're there, they have to do something or change something when you click them.
With your surface still selected with the Surface Selection Tool (which you had to use to apply the shader in the first place), double click one of the tiling presets and you should see the result. You can try it on a primitive shape with some shader pattern applied to see the effects on a simple surface, like a sphere or a cube.
The checkerboards are no Shaders but tiling presets, The smaller the checkerboard the smaller the pattern of the material on your cloth will become. You use it by selecting the cloth you have the texture applied too and just double click on the checkerboard * tiling size * of your choice.
This right here is what drives me insane about DAZ - no bloody docs. Nothing, literally nothing I've ever read, says to apply the tiling pattern AFTER the shader. When in the thing it's clearly numbered 1, 2, 3, 4, with tiling pattern always first.
Tiling repeats the entire texture, it doesn't skip pixels. So, if you don't want to see any white, open up a paint program and crop it out of the texture.