I need help with UV-Mapping a WIP
 Turk_WLF
Posts: 177
Turk_WLF
Posts: 177
I never done a project like this before & I’m looking ahead to when I need to do the texturing. I wondering what would be the way to do the UV-Mapping for style of object.
As you may be able to see you can see the two halves that I haven’t welded together yet. Just for the record the only thing I know about Hex’s UV-Mapping section that it has the tools & I know nothing about using them.
Thanks,
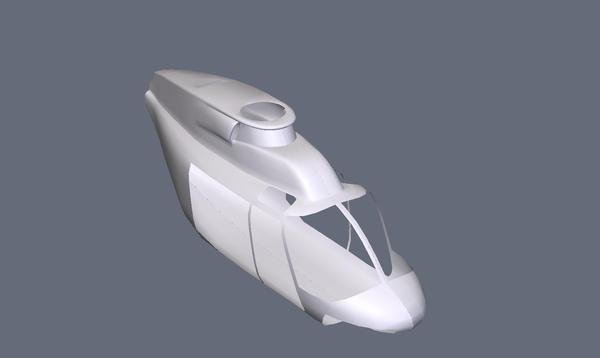
Bell_Helicopter(WIP).jpg
1635 x 976 - 44K
Daz 3D is part of 
Connect
DAZ Productions, Inc.
7533 S Center View Ct #4664
West Jordan, UT 84084
Licensing Agreement | Terms of Service | Privacy Policy | EULA
© 2026 Daz Productions Inc. All Rights Reserved.
Comments
First step is to absolutely finish "all" the modeling. Welding will zap uvmaps.
.............................
Some go with Shading Domains first.
I do not.
I go with remove any existing Shading Domains first.
Apply the uvmap [possibly the plane here] ... and "validate it".
Then unfold it [that's the fun part that requires a lot of patience] ...
Then maybe pin it ...
Eventually 'validate' it.
Then rearrange the islands to better sizes and positions.
Assign Shading Domains.
Assign materials ... every S.D. must have its "own".
Save the project.
Export out the model.
Close Hexagon.
Open Hexagon and import in that model.
Remove any unused materials.
Export out the model again.
Open D/S and import it in, apply textures, save it out as prop or figure if it's a go.
Hi there :)
UV mapping is a whole art in itself - no way to cover it all in a simple post. You probably know this, but basically what you want to achieve is to have the representation of the mesh laid out flat, without any wrinkles and overlaps - as if it was a piece of paper that you were going to paint on and then wrap back around the object so that it fits perfectly.
For organic forms, such as your model, the best method is to unwrap, as opposed to projection mapping. Take a good look at your model - think of it as being made of paper and visualize where you would need to cut it to have it laid out flat. I suggest you practice on some simple shapes, such as cylinders and spheres to get the principles right before attempting to do it on your model.
What Patience wrote is correct - UV mapping is the very last thing you do after finishing the model - any changes to the vertex count after UV mapping will cause the map to vanish. I UV map in the unsmoothed state, because there are less edges to worry about and then smooth after mapping.
The process for mapping is:-
1. With the model selected, click on the head icon in the UV mapping tab.
2. On the model, select the edge loops that you want to cut around - for each edge loop you select, click on the + sign in the properties tab. The edges you have selected will turn a bright blue when your mouse is in the model window. To cancel an edges election before hitting the + sign, Shift-click it. To cancel a selection after hitting the sign, select and hit the - sign.
3. This whole process must be done at a single sitting - Hex does not remember cut edges if you save and close. Continue cutting up the model until all the edges you want have been set. Hit the head icon and it will unwrap, with the map shown on the grid in the UV view panel. If you are happy with the way it worked out, hit validate and save. Each cut section gets unwrapped in what is known as an island.
4. If it all looks like a big mess, try changing the projection axis and hitting the head again for a different unwrap.
5. You can use pins to get a symmetrical projection from a distorted island - where and how you pin really comes down to experience and how you want it unwrapped, how you to are going to get the texture onto the object. In general, you select two verts at opposite ends of the island,on a centre line (edge) change the def. from seams to pin (usually does this automatically), hit the + sign and the head to get a new unfold.
6. Once it's all done and validated, go to face selection mode and select the whole UV map - if all went well, it will all be a uniform blue colour and the outline of the islands will show as a recognizable depiction of parts of your model- any overlapping facets will show up as a brighter blue - meaning there is some work ahead to figure out where it went wrong and how to fix it.
7. You can use the normal tools to select, move rotate, etc. to align and set out the islands on the grid to suit how you are going to go about placing your texture. make sure that all islands are within the boundaries of the grid - anything outside the grid will not take a texture.
This all seems pretty involved and does take some practice, but you eventually get a feel for where seams need to be cut and pins set out and then it becomes really simple.
Go to it and good luck with the project :)