Useful Mirrors for DAZ Studio Now Available [commercial]
 FirstBastion
Posts: 8,065
FirstBastion
Posts: 8,065
Useful Mirrors for DAZ Studio 3.1+ onwards to 4.6 and beyond
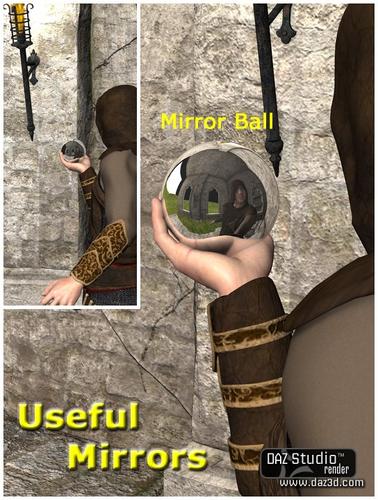
A bunch of useful mirror props for your renders, including,
Framed Wall mirror
Plate Glass Mirror
Mirror ball
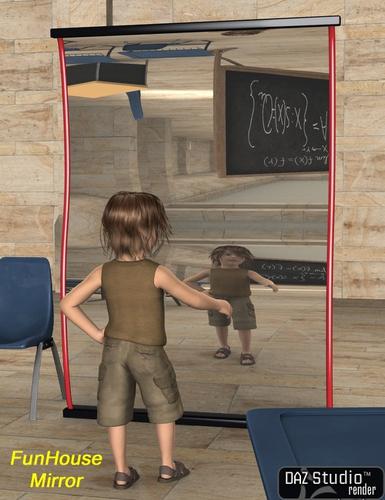
Funhouse Mirror
Self Standing 3 panel fashion Mirrors
http://www.daz3d.com/new-releases/useful-mirrors-for-daz-studio
There's been a few questions regarding these. Here are a few answers quoted.
The mirrors are quite easy to use with this prop set. Load one of the mirrors, they load just behind zero position (where character usually load, and are facing the default camera position. Drop your character/figure in front of the mirror props and render. You'll get a reflection. But because the default lightset with DAZ Studio is just a set of light pointed directly from the cameras position, the reflection will be very dark, because the back of the figure actually has no lights shining on it, because it is not lit.
The Useful Mirrors set also includes two balanced light sets, one standard DS raytraced lights, and one with Uber2 lights,
so the reflection can fit better with the surroundings. You want to load one of these light sets, or some other balanced light sets. Because light placement does play an important part in reflections that bounce back at the camera. Also having an enclosed space like a room with walls and ceiling or a skydomed environment will help with the scene's reflection too, because if you just have the empty 3D void of the default startup there is nothing to reflect back in the mirror to the camera and that will show up as black in the reflection.
Somehow the fact that the set includes the two lightsets was left off the product page, I sent an email to get that added on to the page today. You will definitely want something in the background to reflect back through the mirror also, otherwise it'll be reflecting the black void of the empty 3D space. But these mirror props are a quick and fast 2 click solution. One click to load the mirror, one click to load either of the two lightsets. Then you add whatever else the user might want, a character, room, or outdoor environment. Click render, you will get a reflected image in the mirror.
Here are the comments I added to the readme file for this product.
Reflections increase render times. For example: UberEnvironment 2 takes a long time to process transmapped polies often times found in hair items. During a render in the mirror, that hair will often times be rendered twice in the image, the second time being the reflection of the hair. Hence the increase in render times. Something to be aware of.Lighting affects how the reflection will appear. Included in the set are two basic, and balanced lightsets; one straight DS lights and second Uber2 lights. The lights are set with no shadow, and basically shine through the mirrors to lighten up the subjects face so it reflects evenly with the surrounding environment.
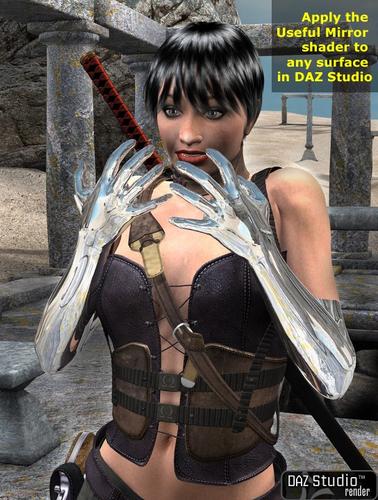
It is also very important to have the mirrors reflecting something. 3D space is an empty void, and the mirrors will reflect the empty blackness of that space. You need to enclose the area so the reflections can be calculated and displayed. Easy enough with an enclosed interior room, but if your scene is outside you need a skydome and ground for the reflection. The promo image of the girl with the mirrored forearms, was done with the dome from A Dungeon Entrance, which has both a large ground area and skydome as part of the set. So the colors displaying on the mirrored forearms in one of the promo renders, is from the blue sky, white clouds, and sandy ground , as well as her outfits and skin.
You have to render the image to see the reflections, the DAZ Studio default preview will not show the reflection beforehand until you render.
To see multiple reflections in the 3 panel mirror, You need to increase the Max Ray Trace Depth in the Advanced Render Settings. so three reflected bounces would need you to setup the Max Ray Trace Depth to 3. Again this will increase render times.
Daz 3D is part of 
Connect
DAZ Productions, Inc.
7533 S Center View Ct #4664
West Jordan, UT 84084
Licensing Agreement | Terms of Service | Privacy Policy | EULA
© 2026 Daz Productions Inc. All Rights Reserved.
Comments
Thank you for the post. This helps me a lot. Anyone know how I can see me looking in or the back of the monitor. LOL
Just been informed that the product page and the readme doc have been updated with the information.
http://docs.daz3d.com/doku.php/public/read_me/index/17349/start
Great! Thanks for responding so quickly to your customer's needs.
Always happy to help! :-)
Just like in real life, love mirrors for getting alternate persepective on a subject - this one's a wee test with RawArt's Monster Bride wearing V6 texture...
On the 3 side mirror
How did you get the refection from the side mirror to show the refection from the other side mirror? All I can get is blank gray to display.
You need to increase the Max Ray Trace Depth in the Advanced Render Settings.
In your advanced render settings, up the Max Ray Trace Depth to 3
Thank you for the mirrors. I love them. I just wished it came with a warning label. Reflections do not show up until after you render. (more notes for my note book). Mow maybe I can do a set of three.
Thank you all for posting the questions and advice, I've added the info to the first post.
I have to admit that the products name made me chuckle a bit :D Mirrors are, like, the least useful thing I can have in a render. They always end up reflecting that one part of a scene that I did not set up very carefully because it wasn't supposed to be in the pciture. And they are not terribly useful to my render time was well ;D Damn you, mirrors! Well, they are more fun than television, I'll give them that.
But it sure is a nice looking product :D
Can't argue with that, they do make you think about the bg (background). ;-)
Greetings,
That render is absolutely FASCINATING!In the full-size version, look at the reflection of her back, along the underarm and down her side. You can see visible stair-stepping along the curves. You can also see it in the back of her right arm reflected above her (real) left hand.
However that stair-stepping is only in the reflection, it's not in the 'real' model.
[Edit: The same effect is even more visible in the EmotiGuy render.]
I wonder if the render engine isn't doing enough sub-pixel evaluations on reflected objects... Is there a setting that would improve that?
-- Morgan
Yeah, I'm not sure - increasing samples per pixel might change it, but it's the good old trade-off of quality vs render speed.
I ran a few test renders to try and duplicate that stair stepping effect and rendered this at 2000 pixels x 1600 and it looks fairly smooth on the curves so I'm wondering if it has something to do with the lights used? This is standard DS lights.
Picked this up the second it hit the store. Always looking for really good reflective shaders. Thanks for the good work!
Reflections are much more sensitive to Shading Rate than directly rendered surfaces.
Thanks Richard, always something new to learn. I was using a shading rate of 0.20
Greetings,
Mind == Blown! Thanks!-- Morgan
Thanks for mentioning the shading rate, that helped get rid of most of the jaggies but take a look at the model and then the reflection and tell me what's missing....
WEIRD!
Do you have something like Uberhair applied to the hair to speed up rendering?
That's either Zac or Taylor hair, right? The more recent SWAM hairs come with Ubersurface applied and raytracing turned off by default to speed up renders. Since raytracing is needed for reflections, that makes it go invisible in mirrors.
Nope it's April's Jordan Hair. There is def some sort of shader enhancement added since there's allot of scrolling to get to the bottom of the surface area. Is there something I can just uncheck or do I have to figure out how to kill all of it and just use the basic shaders? I really like how the hair renders so it would be a shame to kill such nice effects.
Any way for an update to work around this from the merchant??
There might be an option in the hair's presets folder to turn raytrace on
OK, found the switch in the hair surfaces to turn on the Raytracing. It's down towards the bottom of the list.
Now I have one more issue. Is there a way to tell the mirrored wall I used this shader on to NOT render shadows? I turned off cast shadows for the hair, pants and BrunoD but then it looks a bit flat because there would be SOME shadow play before the render gets to the mirrored wall.
Then good look, mate, now this render is gonna take some time ;D
No, actually the render was just a few seconds longer in render time. What I needed to know though if there was a way to tell the mirror to NOT accept shadows so I can turn on shadows default for Dawn (BrunoD), the pants and the hair. Seems there should be a way to do this but can't find it!