Daz 3D is part of 
Connect
DAZ Productions, Inc.
7533 S Center View Ct #4664
West Jordan, UT 84084
Licensing Agreement | Terms of Service | Privacy Policy | EULA
© 2026 Daz Productions Inc. All Rights Reserved.
Comments
It took me a bit too, it's under:
My DAZ 3D Library | Shader Presets | Iray | Daz Uber
!Iray Uber Base
It was definately the SSS volume, I messed around with it a lot and it has massive effects on the bloom filter.
Turning the firefly filter off does trigger some really cool effects... I just need to mess around with it some more to learn how to make those little sparkles do my bidding, instead of whatever they feel like.
I am VERY interested in targeting the bloom filter, so I have added that to my list of things to explore further.
Also, it is AMAAAAZING that you can use the Aux viewport as a mini Iray preview! (I had no idea)
Thank you much @Fishtales
Hopefully this can help someone else...
I was super confused on the Refraction/SSS settings, so I ran some tests to figure out why the things that were happening were happening.
The following were ran with all glossy options off or at 0, thin wall off, with a default 3m primative cube, and a default spotlight centered below the cube.
They only rendered for 60 seconds to get the general idea. The changed fields as annotated on the images (in poor handwriting, apologies) are: Refraction Index, Refraction Roughness, Scattering Measurement Distance (abbrv. SMD), SSS Amount, SSS Direction.
-Tycide
tycide: I found it. Thank you. I also found I had to right click and drag it onto the giant cube I created, and select "parent to cube." One of the tutorials had a link to a video by SickleYield. I followed her directions up to a point and it worked. Kind of. Sort of. I guess. I cancelled the render after 15 min. My laptop only renders with the CPU, no option for a GPU. This pretty much limits me to 3D Delight. I love the effects, and would be excited to apply them, but I may not be able to participate.
So after several STRANGE adventures in rendering...
I find myself with a render fairly close to what I set out to make, so I present to you:
"Failure to Stop at a Blue Light."
Uses: Corin, Nina Hair, Maid Shoes, and some plants from Predatron.
All other assets made by me for this render.
The issue I now find myself with is I'd like to take this in a totally different direction, but at the same location and hopefully make better use of atmostphere.
(Teaser attached below):
More to come...
Thanks everyone for suggestions and inspirations!
(I probably shouldn't type or post things an hour after taking ambien, weeee!)
There are some nice methodss for atmosphere using 3delight as well, its not only Iray. The bloom effect vertainly is something that is not easy to reproduce with 3 delight but its not required ot use bloom.
The easy and fast rendered method again is with several planes stagged up with some distance beween them, see the tutorial I liked some posts further.
There are products like godrays for 3delight as well which work very nicely eg https://www.daz3d.com/simple-godrays by Sickleyield or https://www.daz3d.com/expanded-godrays-celestial-bodies by sickleyield and Marshian or a different route like the product above the clouds https://www.daz3d.com/above-the-clouds-for-3delight-stratocumulus (there is another one as well)
A bit more time consuming is the use of voluminetric cubes / cones / others in 3delight like the Ubervolume
You can find this is your content library within the shader presets look for Omnifreaker. the voluminetric prop will need a light , so the easier way is to plce the light you want and then use the parent to light cone /sphere/whatever.
This is a bit of fiddeling but it comes to great results!
Nice work there tycide, I like the result but I like as well that you posted the things that happened on the way. Now I wonder what you come up next with :D
Made some texture changes, and edited some render settings on this.
@Shinji Ikari 9th
Much better, I can see your characters now.
Here's version 3 I added an almost horizontal fog plane near ground level and another vertical one to the left of the dancers. I'm wondering whether I need to make the fog planes more opaque.
@sueya very nice, how opaque you want them in the end always is a question of taste and always requires some testing around. In your case I think, making the one close to the floor more opaque could be interesting. On the other hand its a question of the light settings as well. You could try making the overall like a bit less inte4nse but the light that lights up you couple more intense ( and for the ambience the ones in the sides) But this really is a thing of your personal preferences
This is a single render with no post work, using nothing but Daz assets. If I can get back to my computer I might make a few tweaks.
I was talking to someone about fun games we had played in the past and Vampire the Masquerade: Bloodlines came up. This is Jeanette, an often recreated character from the game.
For reference, Jeanette 2004.
This started out as my test bed for creating and mapping textures onto primitives, creating transparencies and a try out of the character morphing add ons I bought at the DAZ store. I ended up with an image I was pretty happy with.
I am so confused at this point about what is allowed or not as far as post work and or creating textures transparencies etc. I am not sure how this one will go.
In any case, to my fellow October challengers, Happy Halloween.
A little late, but I managed to do something.
This is actually my second graphic work I create with Daz 3D.
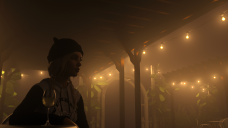
So, I set out to build a bustling scene in the cafe courtyard one table area at a time, and got super-distracted by the first test render. Then I messed up and didn't save it, so I adjusted a couple things and re-rendered it in higher res.
I merged it with the rest of the scene then put it in a group so I could keep the camera "locked" and rotated and translated the group around until I got the positioning I liked:
(no post)
I showed it to some guys at work, including one of the photo department guys, and he brought up post editing. I attempted to adjust some stuff, mostly just used the auto-functions in Gimp. (I don't do very much in 2D, mostly I just click things and see what happens.)
So I was showing off my new "post-edited" image to everyone who would look and one of the video department guys suggested that I try moving the glass back from her face.
I did, and then removed a ton of unseen polys to try and get more convergence out of my overnight renders. (Also because when I tried rendering the emissive lit scene at 4k DS would crash.)
That got me here:
The issue I have now is I like both of them equally, so I have no idea which one to officially submit for the challenge. I also have no idea how to officially submit an entry or if that's even a thing since it's a challenge.
Mostly though I've just had fun creating something I never expected, learning about bloom and volumetric fog, and dragging lots of silders around to see what happens.
Thanks for your suggestions and feedback! :)
Nice work with the mist.
First view of this and I thought breast with a nipple, now I see it is a planet, sun and moon :)
I like the last one.
What exactly confuses you? Everything you do as preparation and take into the render is fine. We are not against postwork either. The only thing I commented on earlier was that the topic in this challenge is to learn about atmosphere that is created within the 3d program, This is something we would prefer the participants to do with the 3d program and not in post.
I think your render of Janette is coming along very nice!
very nice start here well done! I thinkt playing around with the camera angle might be something for this one
@tycide very cool work, there. I like the last one best, it gives the character room, but that is personal preference
Thanks for that Linwelly.
My confusion was about using 2d programs in creating the "set" which I did not see addressed either way in the rules, combined with your comment, that in hindsight I may read into too much. Thank you for the clarification.
Recreating something like Jeanette by its nature requires a lot of things created from scratch, but I wanted the challenge. I did my best to keep as much of it as I could in Daz Studio. Things like her make up, blue eye and the signs I would like to of done as well but that is well beyond my skills at this point.
LOL. Maybe I spent too much time with Jeanette.
Thanks!
I tried to play with the camera but... well, I'm not very satisfied with the result. Anyway, thanks for the tip!
Thanks Fishtales and Linwelly,
The last one does seem to be the most popular.
This is my final version. I have increased the opacity of the fog planes.
Decided to make an addition to my first idea with a final runner. The question is, 'Is the walker coming up on a meeting in progress, or is he joining said meeting?'
Seriously last minute entry. Please take it as-is. Maybe I'll do better next month.
This challenged is now closed!
Thanks a lot to all participating and see you soon for November Challenge
Just a little note that we are working on selecting the showcased images...we havent forgotten. We just needed a little extra time this time around <3 The showcase should be up sometime Sunday/Monday